
How to Record YouTube Video

Looking to capture your cherished FaceTime moments? Discover the easy steps to record FaceTime with audio on your iPhone, iPad, or Mac and keep those memories forever!

What to know about FaceTime recording with audio:
This guide helps you in recording FaceTime with audio on iPhone, iPad, Mac and more.
FaceTime is a popular chat app by Apple that's available on iPhone, iPad, and Mac to keep in touch with others anytime, anywhere. Whether you're using it for personal chats or business meetings, there may be times when you want to record a FaceTime call with audio for future reference or later sharing. Fortunately, with many helpful FaceTime call recorders, it's not challenging to screen record FaceTime with audio in just a few steps.
In this guide, we'll explore different screen recording software for FaceTime users and provide step-by-step instructions on how to record FaceTime with audio easily. After that, you'll be able to record FaceTime's screen and audio on your iPhone, iPad and Mac without difficulty.
Yes. FaceTime calls can be recorded with audio whether to preserve memory moments or capture important details from online meetings. With stable Wi-Fi or cellular network, Apple users can easily make a FaceTime call on their iPhone, iPad or Mac. Once the FaceTime call is initiated, users can simply capture a call recording with audio on FaceTime by enabling the built-in iOS or Mac screen recorder, or applying some efficient FaceTime recording software.
Note: It's important to respect the privacy and obtain the consent of all call participants before screen recording a FaceTime meeting.
Recording FaceTime with audio on iPhone or iPad is a straightforward process that can be easily achieved thanks to the built-in iOS Screen Recorder introduced in iOS 11 and later versions. For anyone who wants to keep a record of important conversations or interviews, it offers the ability to record FaceTime video and audio simultaneously, and also allows you to include or exclude microphone audio while performing a screen recording on FaceTime.
With it, you're able to record everything that happens on your FaceTime screen and save the FaceTime recording with audio on your iPhone or iPad in good quality.
To record a FaceTime call with audio, add the iOS Screen Recorder to your Control Center first:
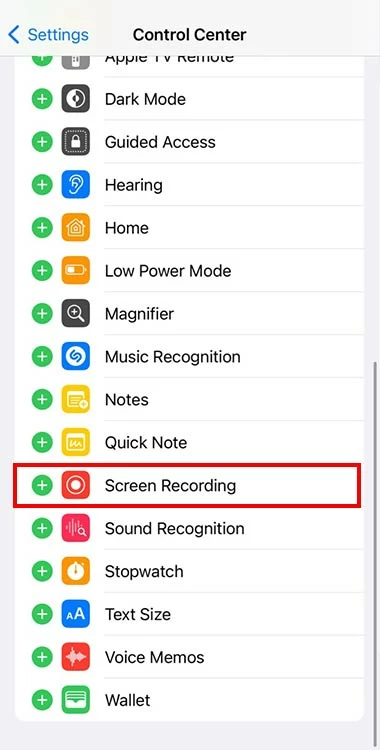
Add Screen Recording option to iPhone / iPad's Control Center.
Now, follow the steps on how to screen record FaceTime with sound on iPhone / iPad. For better video and audio quality, make sure your device is connected to a stable network.
Step 1. Open the Control Center by swiping from the top or bottom edge of your iPhone screen, depending on which device you're using.
Step 2. Long-press the Screen Recording button. It can be released once the recording box appears on the screen.
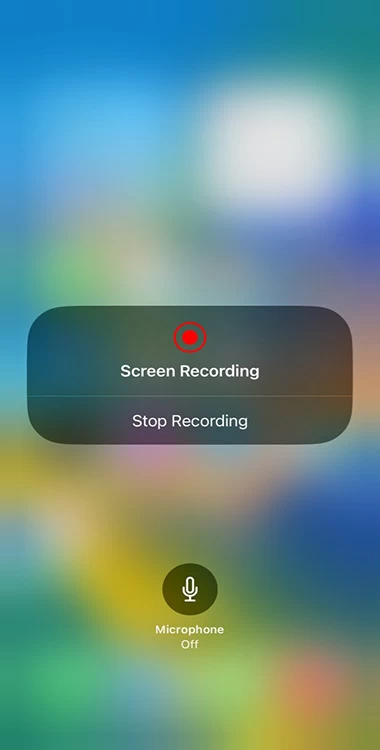
Turn on Microphone for screen recording FaceTime with sound.
Step 3. Tap on the Microphone button to enable the audio recording. This may not be selected by default. Make sure the microphone icon turns red and shows Microphone On.
Step 4. Press the Start Recording. When it starts, you'll get a red indicator bar on the top.
Step 5. Open the FaceTime and make a call. Select New FaceTime in the app, and call someone by tapping the person's phone number or email address.
Step 6. Once done, go to your Control Center and tap the Screen Recording again to stop recording. Or, simply tap the red status bar at the top. Remember not to lock your iPhone before that, or the FaceTime recording stops automatically.
Step 7. The recorded video will be saved to the Photos app where it can be accessed and shared.
For those who own both iPhone and Mac, there's also another way to record FaceTime with audio on iPhone via an easy option — QuickTime Player, a free Mac screen recorder built into macOS that can also be used as a video-call recorder for FaceTime screen and audio recording.
[Explore more: How to Record Screen and Audio with QuickTime]
Although FaceTime offers the option to hand off a call between iPhone, iPad, or Mac, QuickTime Player provides a simpler and more direct way to record FaceTime calls with audio on a connected iPhone. Additionally, it allows for basic editing and sharing across Apple devices, making the recorded FaceTime video easily accessible. Using it as a FaceTime recorder, here's how you can create a call on iPhone and record the FaceTime on a larger Mac screen:
1. Connect your iPhone or iPad to your Mac with a USB cable. Allow your device to trust your computer to activate the connection.
2. Launch the QuickTime Player on Mac desktop, and open File menu > New Movie Recording.
3. Click the arrow icon next to the Record button, and select your connected device from the expanded menu. This displays your iPhone or iPad screen on your Mac.
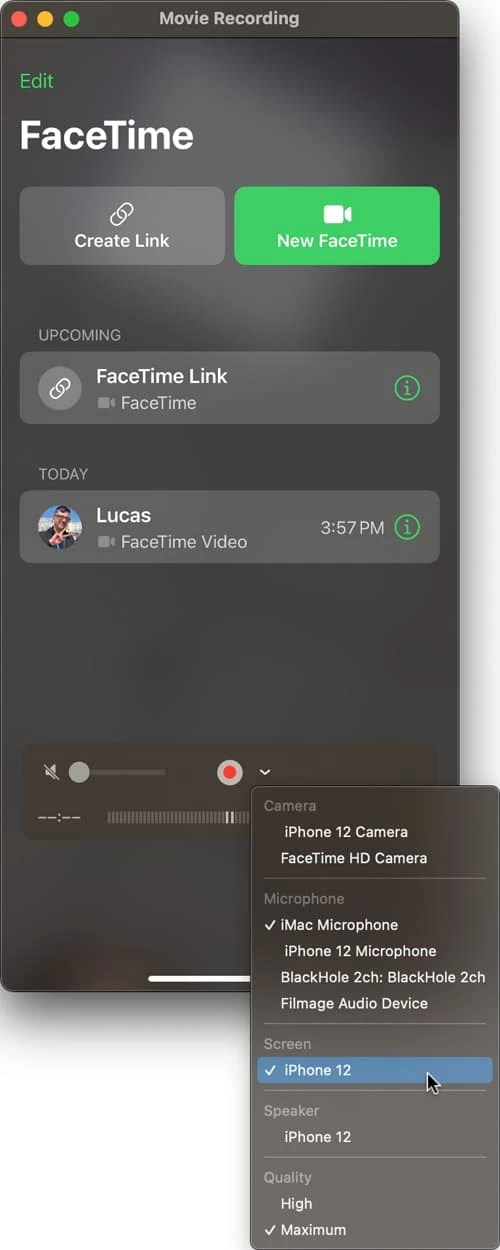
Recording iPhone screen to capture a FaceTime call with audio.
4. Make a FaceTime video chat on your phone, and quickly hit the Record button in QuickTime. All content on your device's FaceTime screen will get recorded with audio.
5. When your call ends, stop the recording by selecting the Stop button in QuickTime.
6. Play the FaceTime call recording, then click File and Save to save it to a folder on your Mac.
This is how to screen record a FaceTime call with sound in QuickTime. Aside from a media player, it's also a pretty helpful tool for capturing FaceTime calls, recording Zoom meetings, and more.
Tips: For iPhone XR, XS and later, you can turn on the Voice Isolation feature during a FaceTime session to make your voice to be heard more clearly. To do so, simply access it from the Control Center and tap on Mic Mode.
Although it's convenient to record a FaceTime call on iPhone using built-in screen recording features, many people prefer to record FaceTime with sound on their Mac, particularly during group meetings or one-on-one interviews where it's important to keep track of important details.
To make the recording process even more efficient, using a full-featured FaceTime recorder is an ideal solution. That's where the AppGeeker Screen Recorder comes in handy, providing you with the ability to record screen with audio on FaceTime in the best possible quality, while also allowing you to add real-time annotations and drawings on your FaceTime call recordings to highlight the crucial moments for later review.
Additionally, this FaceTime screen recorder supports recording internal audio and microphone sound simultaneously and offers more advanced features to help you record FaceTime screen with audio in adjustable resolution up to 4K and 1080P. Also, it includes a built-in editor, letting you perform immediate trimming to your FaceTime recordings and save them in popular audio and video formats, including MP3, MP4, WAV, GIF and more.
See how to screen record on FaceTime with audio below. Not limited to FaceTime, it's also a helpful tool to record online meetings and streaming shows such as Skype, Zoom, YouTube, etc.
Step 1: Install and launch AppGeeker Screen Recorder on your Mac.

Step 2: To record FaceTime video with audio, select Video Recorder. You may choose Full to capture your full Mac screen; or customize a recording area on FaceTime through Custom option.
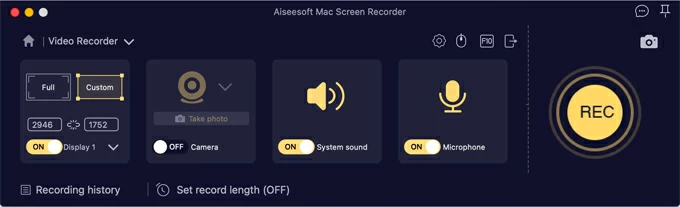
Select the area and audio source you want to record from FaceTime.
Step 3: Toggle on the System sound and Microphone to get your FaceTime audio captured. It enhances the FaceTime audio and your external voice automatically.
Step 4: Before recording, adjust the output formats and recording quality by hitting the gear settings icon. You can select a specific folder to save your FaceTime screen recordings as well.
Step 5: Once ready, start your FaceTime call and click REC button to begin recording. It captures any activity on FaceTime screen and allows you to take notes or screenshots while recording.

It's easy to add onscreen annotations while recording on FaceTime call.
When the call is finished, don't forget to click on the red Stop button to end recording. Then you can replay the recorded video from the preview pop-up, and edit or share it as needed.
Sometimes, you may want to record a FaceTime call on your Mac but only capture your own actions or presentations. In such cases, the Screenshot Toolbar on macOS 10.14 and newer versions delivers a quick way to create FaceTime recordings with the audio from your microphone only. It's very easy to use and can be activated by a simple keyboard shortcut.
Pre-installed with the capability to record Mac screen video with audio, this free software results in clean screen recordings of FaceTime with your external audio. Explore the quick steps on how to record FaceTime with sound:
1. Press the shortcut Command + Shift + 5 to enable the Screenshot Toolbar.
2. Click on the Options list, and select a microphone audio in the drop-down menu. You may also want to change the storage destination or more.
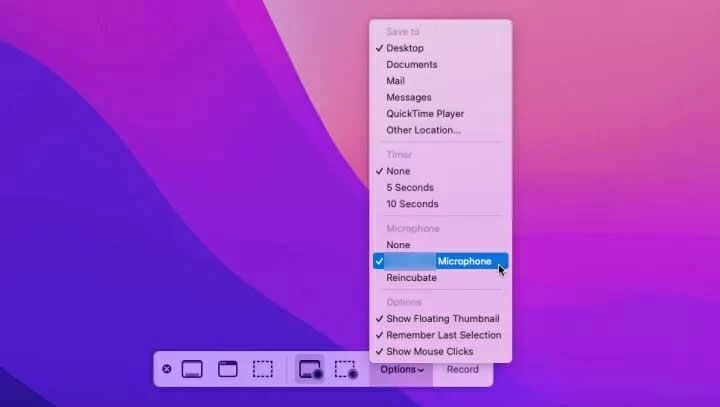
Select internal or external microphone for FaceTime audio recording.
3. Next, decide whether you want to record FaceTime with your entire screen. Or, you might want to keep the FaceTime in a small window and choose to record a specific portion of your screen.
4. When it's all set, click on the Record button to initiate screen recording.
5. Now, make a FaceTime call on your Mac. It's getting recorded.
6. When the call is over, click the stop square icon at the top menu bar to stop and save your FaceTime call recording.
Are you interested in joining a FaceTime call but don't have an Apple device? No problem! Apple has recently announced a feature called FaceTime Link which allows users to create links to FaceTime calls and share them with anyone, even those who are using non-Apple devices. This means that Android and Windows users can also be invited to join a FaceTime call by clicking the link and record their FaceTime call through an Android or PC's browser.
However, it's important to note that the FaceTime Link is currently only available on Apple devices running iOS 15, iPadOS 15, or macOS Monterey. Additionally, non-Apple devices may need to use a supported web browser (such as Google Chrome or Microsoft Edge) to join the call.
How to create a FaceTime invite from iPhone or Mac
Once the FaceTime link is received, Android or PC users can open it on a browser and join the FaceTime meeting. For potential recordings, use FaceTime recording software for Android or Windows to capture what's needed. Also see: How to Screen Record on Windows 10
1. Why can't I record FaceTime audio?
If you're using the built-in Screen Recording option on your iOS or iPadOS devices, make sure to toggle the Microphone option to On. Simply tap and hold the Screen Recording icon in Control Center, and you'll find it. Or, you may also use some 3rd-party screen recorders for Mac or iOS to record FaceTime with audio more efficiently.
2. Is it illegal to record a FaceTime call?
The legality of recording a FaceTime call varies depending on where you locate. In some states, you may need to get the consent from all parties on the call. It's always a good idea to check the local laws before you perform FaceTime call recording.
3. Can you screen record a FaceTime call on iPhone?
Yes. iPhone comes with a built-in screen recorder that can be used to screen record FaceTime calls with ease. The iPhone Screen Recording feature is accessible in the Control Center. If you cannot find it, add it by heading to Settings > Control Center > Tap the plus button next to Screen Recording.


