
Guide to Fix iPhone Powering off Issue

Here are three user-friendly approaches for you to record a webcam video of yourself narrating presentations.

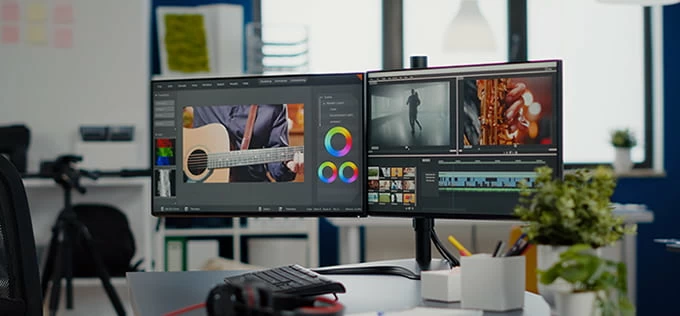
PowerPoint presentations are necessary parts of most businesses and the academic world. They allow you to present information in easily digestible ways, to engage the audience with visuals instead of simple oral speeches, and more. Those benefits are dramatically increased when you pair your PowerPoint presentation with video recordings.
Let's admit the fact, when you don't use a video recording with your PowerPoint presentation, you'll face the risk of losing the audience's attention, letting your points fall flat, and overall, not getting the results you desire. We're going to help you avoid that with this guide of recording PowerPoint with a webcam, which everyone has on their laptops nowadays.
Following are efficient ways to screen recording for presentations.
Table of Contents
The first method we'd like to discuss is done with the AppGeeker application. AppGeeker features high-quality recordings with settable screen captures, mobile phone, webcam, external camera connectivity, and even gaming recording for PC gamers.
One of the stand-out features is its Advanced Trimming feature. Trimming is one of the most annoying tasks to handle, and it often creates awkward transitions with other programs. This Screen Recorder prevents that and streamlines the trimming process for crisp transitions.
Step 1: Download and launch the App
This will allow you to start setting up the recording parameters and get started. You'll also need to make sure that the webcam or other camera you're using is connected to your computer at this point. If it's not, the app won't provide it as an option.

Step 2: Choose recording mode and adjust the setting
Click on the Video Recorder icon on the left side of the interface screen. Then you can choose how you'd like to start your recording in this screen, such as recording area selection, webcam, system sound and microphone. To record your PowerPoint presentation with webcam, please follow below steps.
1. Click the Full or Custom button to capture your desired area.

2. Switch the toggle near Webcam to ON position.
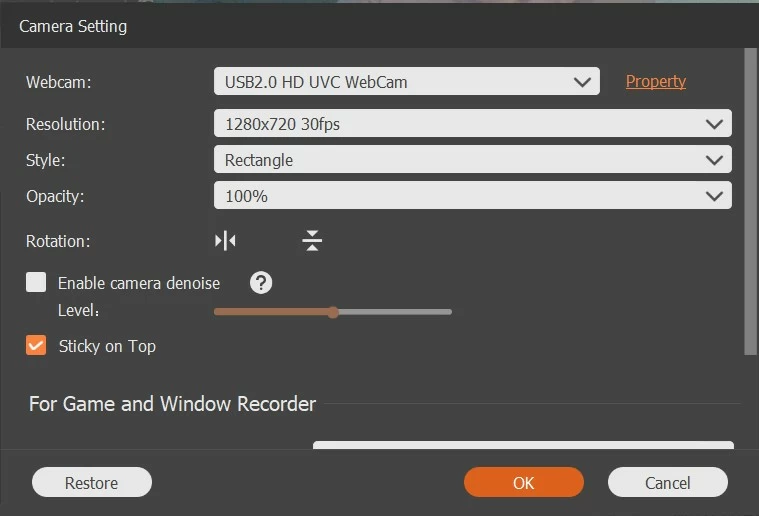
Click on the camera icon, you'll have other options such as external cameras to choose from, but using a standard webcam is the easiest route to take. Before official recording, it's better to adjust the setting, like Resolution, Style, Opacity, and Rotation. All of those options can be found on the Camera Setting taskbar, and you can take a few moments to play around with them until you've familiarized yourself with these options.
Tip:
3. Switch the toggle near Microphone to ON position.
By doing this, your voice can be captured while you're having the presentation. The sound volume can be changed easily by moving the volume slider from left to right below the microphone icon.
Step 3: Start recording
Once you've set up your video settings, go ahead to click the REC button on the right end. There will be a simplified taskbar showing up in the bottom right corner of the screen. You'll find the taskbar with the pausing, stop, minimize button on the left end in order.
![]()
Step 4: End the recording
Once you've recorded everything you need, simply hit the red square icon to stop.
Video editing and preview are the post-production part of the process. You'll be able to review the video, cut parts that you don't like, trim and move segments, or separate one larger video into smaller, edited clips.
Tip:
The second method we recommend is Microsoft's built-in presentation recorder. One of the main advantages of this method, besides you already having access to it, is that it's very simple to use. Outside of learning a few niche features, you can make a couple of clicks and immediately start producing a high-quality presentation. And it's included with Office 365. So, if you're already utilizing Microsoft Office, there's no reason not to give it a try.
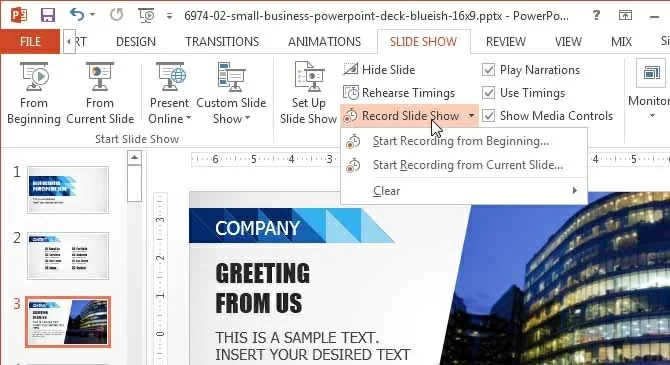
1. Activating the presentation recorder
First, you'll want to have your slides prepared before you start this process. You'll also want to insert any notes you might need into PowerPoint because those will be used for a feature during the recording process.
To start your recording, locate the ribbon button on the PowerPoint taskbar. Click on Record Slide Show option below Slide Show. Once you click that, tow options will pop up. Take a minute to review them, choose Start Recording from Beginning or Start Recording from Current Slide.
2. Record your content
Clicked the red Record button, and then the recording will start. You'll see a taskbar with highlighters, various markers, and other tools. As you use those tools on the slides, your cursor and your tools will be recorded in real-time. This is great for creating visual aids for your audience, highlighting keynotes, and generally creating a more engaging PowerPoint.
As you develop more skills with the program, you can start pausing it to prepare yourself appropriately between sections, resizing the window to cover more or less of a slide, and other things that aren't 100% necessary but definitely come in handy.
Tip:
3. Stop the recording and export
Finally, when your presentation is done, hit the Stop button. That will end your recording immediately. The Export option can be found in the File menu, and it's your choice to export the presentation to a pointed destination. Then, you can take some time to edit the video, but Microsoft 365's toolset for this isn't phenomenal.
With this method, we recommend planning ahead to make sure your editing requirements are minimal. This is also a better tool for less important presentations. If you're presenting a new idea at a board meeting or to a class, this will work. If you need to make a highly professional presentation that your job depends on, you might want a more comprehensive video option or at least invest in worthwhile editing software to touch it up.
This is a solution for our Mac users. Mac's primary method of recording on top of PowerPoint slides isn't overly complex, but it gets the job done. We're talking about the QuickTime Player. It's a built-in feature for all of Mac's current computers, and it's a simple screen recorder.
You'll have access to all the basic features with QuickTime Player. You can resize your window, use various cameras, apply various built-in effects, and do a bit of light editing. This should be enough for the average person.
First, you'll need to navigate to your application folder and locate the QuickTime Player launcher. This is integrated into Mac OS. So, you shouldn't have any problems finding it. Once you've launched QuickTime Player, you need to navigate to the File > New Movie Recording.
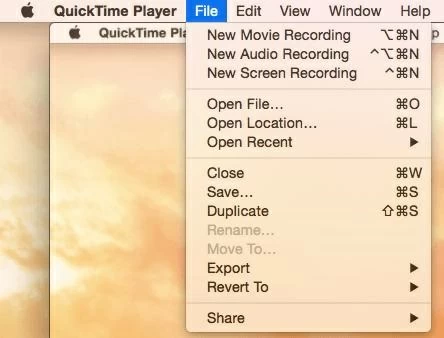
Unlike other programs we've covered, this will not start the recording process. Instead, it will bring up your webcam menu. Here, click View and select Float on Top. This will keep your webcam on top of your other applications, and it will prevent your video feed from being cut off.

Now, you can move your recording window around, or resize it for your presentation, etc.
Once your window is sized appropriately, and you've followed the other steps, go back to the File menu and click New Screen Recording. This is where you'll find the typical red recording button, volume options, and more. Start the video by clicking the red button when you're ready.
Ending a recording in QuickTime Player is easy, but it is a bit different from what you do with Windows programs. Press the Command, Control, and Escape keys at the same time, this will end the recording and save your video.
One good thing about the QuickTime Player app is that it allows you to handle some decent editing tasks within the app itself. Go back to the File menu and click Edit. In the Edit menu, you'll find your recording saved and ready for editing.
By selecting it, you'll find all the basic editing tools most users need. You can cut out parts that you don't like, trim long sections into clips, rearrange those clips, and even add some special effects. Certainly, none of it is as in-depth as dedicated editing software, but it is useful.
You don't need fancy editing software and peripheral equipment to record professional presentations with PowerPoint. If you have a webcam, PowerPoint, and one of the software options we listed above, you can make a PowerPoint recording with webcam technology available to everyone. It will keep your presentation engaging, help you drive home the points that matter, and create more effective presentations in general.