How to Record YouTube Videos on Mac

What is the best streaming audio recorder? We've tested and come up with three best recording apps on any MacBook Pro or MacBook Air to capture streaming audio.

Listening music on audio streaming sites is a wonderful experience, but downloading the streaming music to a MacBook can be tricky for some reasons. Never fear though, an optional way is to record the streaming audio on your MacBook. So, after recording the song from the internet, you can enjoy the playback wherever you like, or share it with someone.
To make the livestream recording process easier, all you need is a streaming audio recorder. Here we'll show you several simple sound recording tools available and step-by-step guide to record streaming audio or music on MacBook comfortably. Happy streaming sound capturing!
If you've found a track that you like on the internet, recording streaming audio to MacBooks is straightforward.
Getting online streaming audio recorded is a process of recording audio clips coming from websites through MacBook's speaker. And in order to capture internal system sound flexibly, go straight and resort to AppGeeker Screen Recorder—an all-in-one Windows/ macOS recorder for video & audio recording needs.
QuickTime Player comes handy if you prefer a best free streaming music recorder on MacBook to record the streaming sound.
Basically, QuickTime Player offers built-in functionalities to record screen, webcam video, and microphone audio aka external audio. With audio drive like Soundflower selected as the sound input and output, the audio streamed from a browser will be routed to the recording app on your MacBook and gets captured without the surrounding noises.
Do the following in a way of using QuickTime on your MacBook (Pro, Air) to make streaming audio recordings at lossy AAC format or uncompressed AIFF-C audio format.
Step 1, In QuickTime Player, choose File > New Audio Recording on your MacBook.
To start a streaming audio recording from any web browser, open QuickTime Player.
From its menu bar, click File > New Audio Recording.
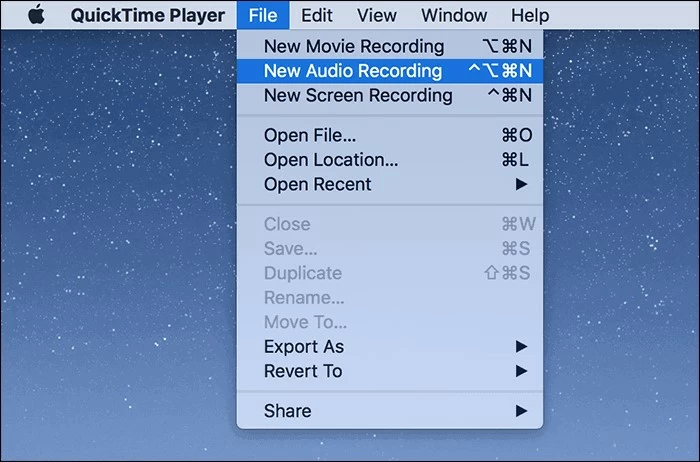
After you launch QuickTime Player app, press Ctrl + opt + cmd + N to invoke New Audio Recording feature.
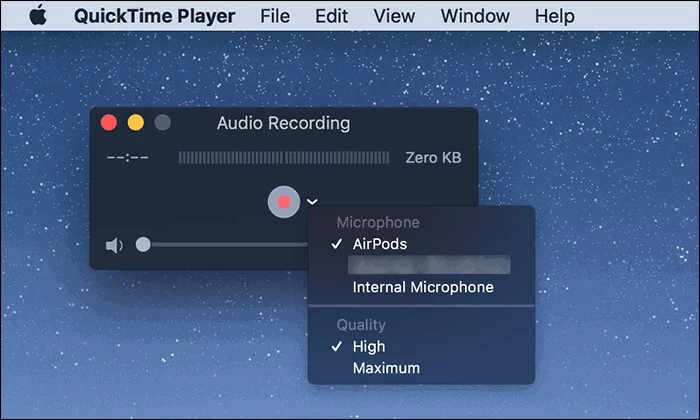
Step 2, Click Options menu, then choose recording options for audio input/output device.
"Audio Recording" interface now appears with a Record button, an Options menu (small drop-down arrow), a volume control slider, and a file size counter.
Click Options menu, and choose the device to record the audio. By default, there's an 'Internal Microphone' option for capturing external audio. In this case of capturing audio coming out of a streaming site, you need an audio drive.
QT Player lacks an internal audio recording ability built-in to record streaming sounds from MacBook itself.
To do that, install Soundflower on macOS and configure it as the sound input and output in system sound settings. Go to click Apple menu, choose System Preferences (or System Settings) and select Sound. Then under Output tab, choose Soundflower (2ch) available from the list.
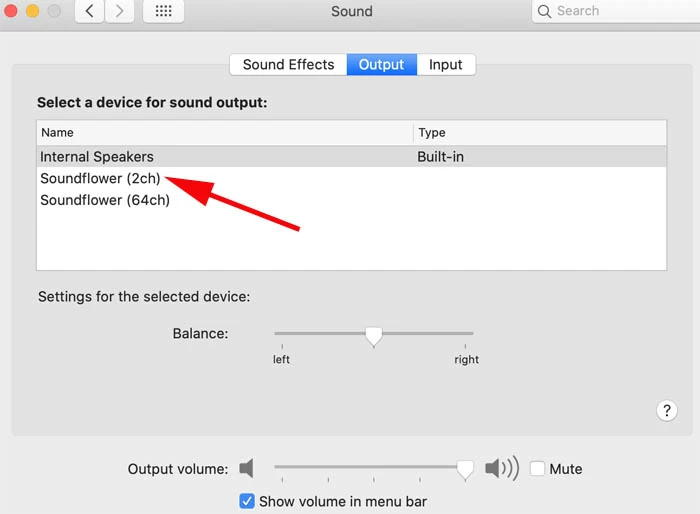
The audio drive integrated with macOS will get the browser's audio to record with the recording software.
Once the actual audio driver is set up, return to "Audio Recording" window within QuickTime, then from the Options menu, check Soundflower (2ch) as selected in the Sound Output Settings.
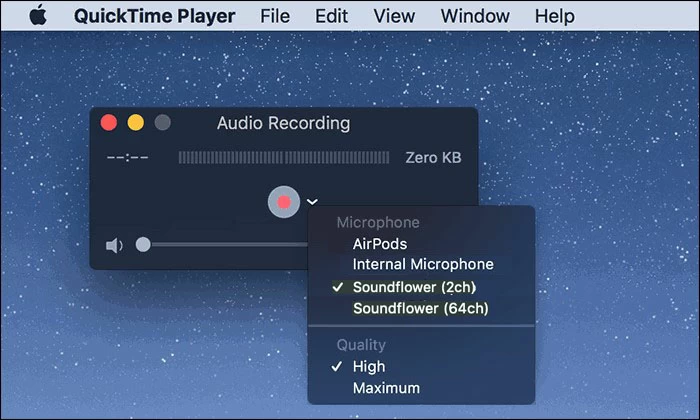
Pick the audio device and sound quality in Options drop-down menu, and adjust the volume for the online audio.
Step 3, Hit the red Record button to start recording your streaming audio.
When you've finished above steps, hit red Record button to kick off the recording on the site.
Step 4, Play the streaming media on your browser from which QT captures the audio.
While your MacBook is recording, head over to website and play the streaming music/ video that you wish to grab the audio into your recording file.
QuickTime allows an unlimited recording time.
Step 5, Hit Stop button inside QuickTime Player app to stop the recording.
When the web stream is captured, press the Stop button to end the recording. The live audio file being recorded now appears on the QT for you to play. If you want to trim your new recording, click Edit > Trim.
To save the audio recording once it's finished, go to the menu bar and click File tab, then choose Save option. On the window that opens, rename the file, and choose a destination where you want it saved, either your Mac's drive or an external drive if needed.
After the entire process is done, don't forget to return to Sound Output Settings pane and change the sound input device back your MacBook's original settings.
Let's face it: the Soundflower audio driver renders QuickTime audio recorder captures streaming music playing on the MacBook, but you can't hear the audio you've recorded. Fortunately, knowing what the live streaming content is while recording streaming audio Macintosh is possible if you're using the third-party user-friendly utility - Screen Recorder.
The software is comprehensive and lightweight that captures anything streamed from internet browsers and other apps. You can capture streaming videos, streaming music, or live audio from the streaming video.
To create live audio recording, this audio recorder features with built-in audio driver so you can hear the output sound from the website while recording. It also offers different output formats to choose for your audio sources, which is useful if want to get the high-quality recording file.
Get this streaming music recorder for your macOS. With it, you can turn on system sound to easily record computer audio, and then save the recording to your MacBook.
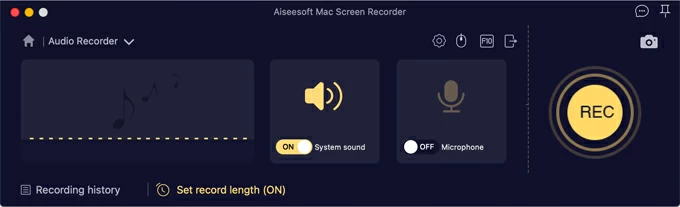
1. Start Screen Recorder and choose Audio Recorder tab.

2. To record the streaming music or audio, enable the toggle for "System sound." This integrated feature works with any system audio in macOS without having to do extra steps of installing and setting up an audio driver.
A tip here. This streaming audio recorders for Mac users offers options to customize output format as desired, such as MP3, M4A, FLAC, etc. Visit this page for more details.
3. To start a recording, tap the REC button. Then open the stream on MacBook's browser you want to record audio. A floating bar appears on the screen.
![]()
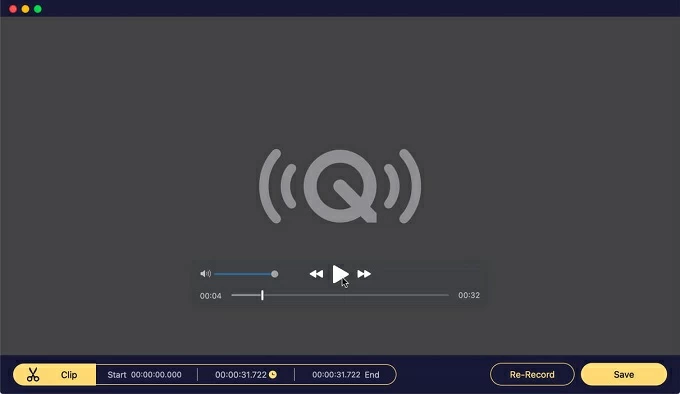
4. When done, click the red Stop button on the floating bar to stop recording. Your streaming audio will be now recorded. You can play it in the viewer and listen to the sound.
5. Hit the Save button at the lower right of the screen and save it to your laptop.
Read Also: How to Record Snapchat Video
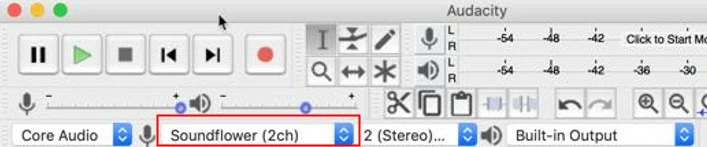
Basically, Audacity is a popular recorder running on macOS and available for recording live streaming audio through a microphone or mixer, or digitize recordings from other media. After recording the stream, you can use its editor to modify the file.
Using Audacity on MacBook to record internal sound requires Soundflower, as you did with QuickTime recording network stream audio.
How does Audacity record streaming audio from websites on a MacBook:
Before getting Audacity to recording online audio from your MacBook, you need to first install Soundflower and set it up. Go to System Preferences > Sound, and then choose Soundflower (2ch) as output. Then do the following:
How can I hear the audio while recording streaming audio with QuickTime Player?
When you're working with Soundflower to capture streaming sound in QuickTime Player, you won't be able to listen to the audio as it's being recorded, but you can record the streaming content correctly.
If you want to hear anything whilst recording without Soundflower, consider try AppGeeker Screen Recorder mentioned above.
Can VLC record a network stream audio on the MacBook?
The open-source VLC Media Player can also work as an audio recorder, and comes with Network Stream function to record music online. Once you copy the URL of the streaming audio and paste it onto the appointed field, VLC will begin capturing the audio that comes from the website.
Is there a free online audio recorder for streaming audio?
There are many online audio recorders out there to record online or streaming audio for free on the MacBook. However, before you decide on a streaming audio recording application, you will need to make sure the program has no adds, and no malware.
What is the best audio streaming recorder?
The article puts together three top audio streaming recorders for Mac: