How to Boot Computer from CD/ DVD Disk on Windows
Whether updating software or troubleshooting serious issues on Windows, sometimes you will want to boot the computer from a CD/DVD disk. Here's how to do.

Rob Parsons Updated on Mar 21, 2025 4:15 PM
Modern computers allows you to select a bootable CD/DVD-ROM at the startup (BIOS stage). To boot from a CD/DVD, make sure that the CD/DVD-ROM has boot sequence priority over the hard drive. Follow these easy steps to specify the boot sequence to set computer boot from a CD/DVD-ROM.
Generic procedure:
Here below are 4 mainstream types of motherboards BIOS Setup procedure, check out that is relative of your locked computer to finish the BIOS configuration task.
If you have no CD/DVD-ROM in hand, learn how to set computer to boot from USB Device.
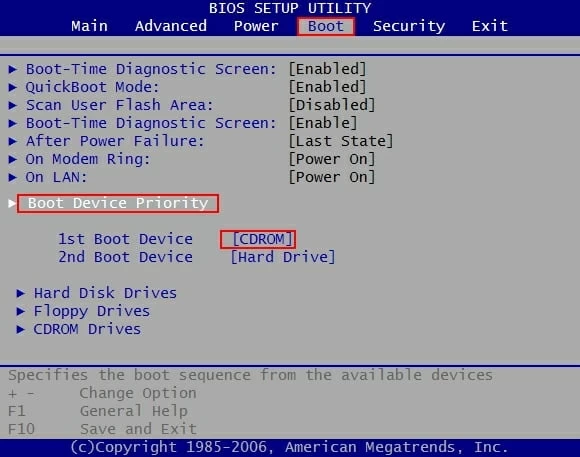
1. Set AMI BIOS to Boot from CD/DVD-ROM
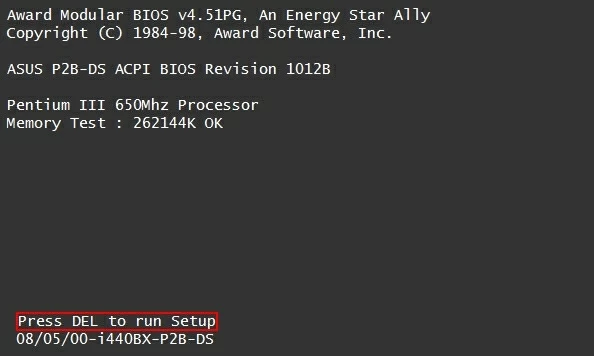
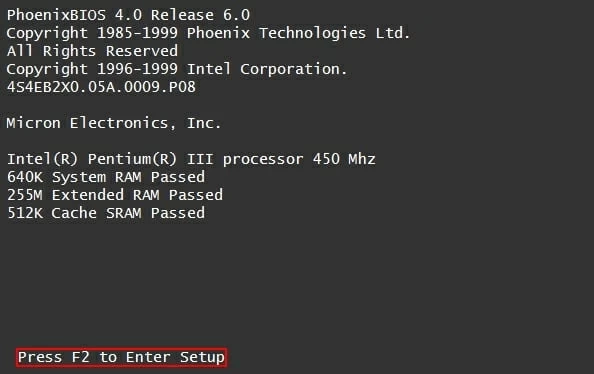
Start your locked computer, as soon as you see a message that says "Press DEL to run Setup", immediately press DEL key on the keyboard to enter the BIOS.
If you read the initial startup screen on your PC carefully, it will tell you exactly what you must do to access your BIOS settings.
Once you're in the BIOS, use the instructions given at the bottom of the screen to navigate through the BIOS.
Here you go to Boot > Boot Device Priority > 1st Boot Device, and select CDROM as first boot device (you may need to move to the top of the list).
Press F10 key to save changes.
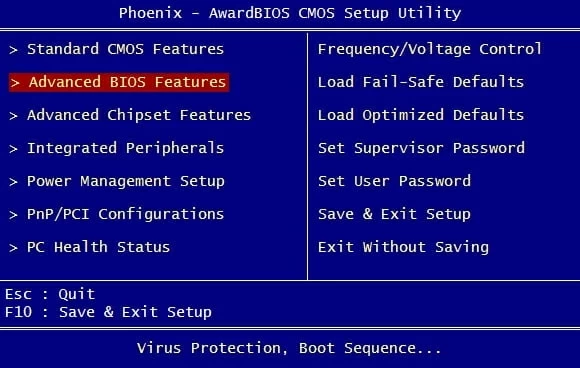
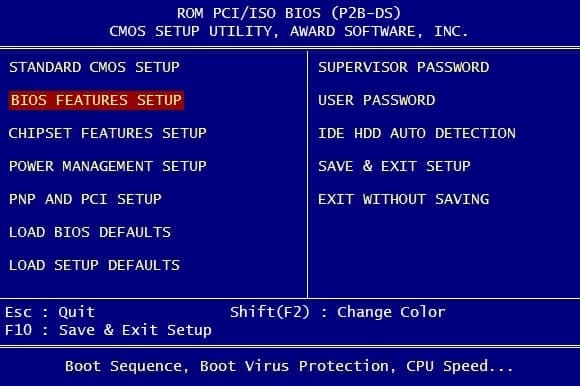
2. Set Award BIOS to Boot from CD/DVD-ROM
On Award BIOS you will see a screen similar to the image below, simply click the DEL key to access to the BIOS.
Now choose Advanced BIOS Features.
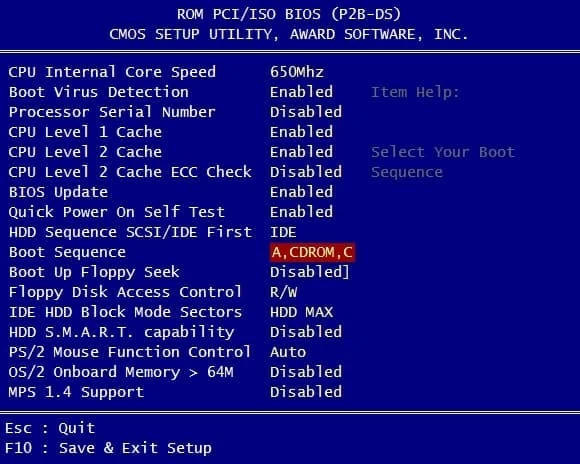
And set First Boot Device to CDROM, and set Second/Third Boot Device to HDD-0, Floppy.
Press F10 to save it.
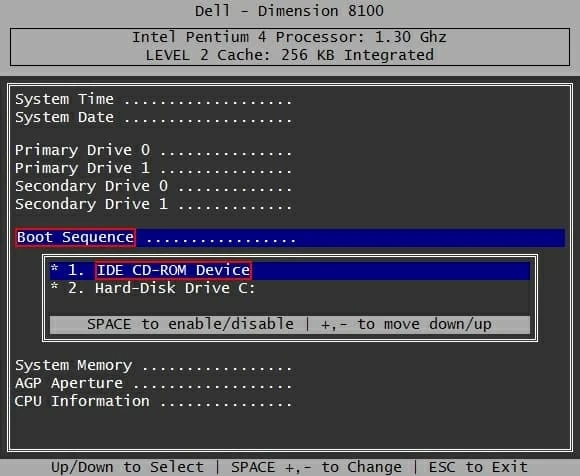
On some Dell Systems you can enter BIOS by pressing F2 key.
Now choose Boot Sequence and then set 1 to CD-ROM by pressing - and + and press space to enable it.
Press ESC key on the keyboard and choose Save settings and exit.
4. Set Phoneix BIOS to Boot from CD/DVD-ROM
Press F2 key to get into the BIOS settings.
Next, select BIOS FEATURES SETUP option.
In Boot Sequence move the disk type you want to boot from to 1st order and Press Esc and F10 to save it.
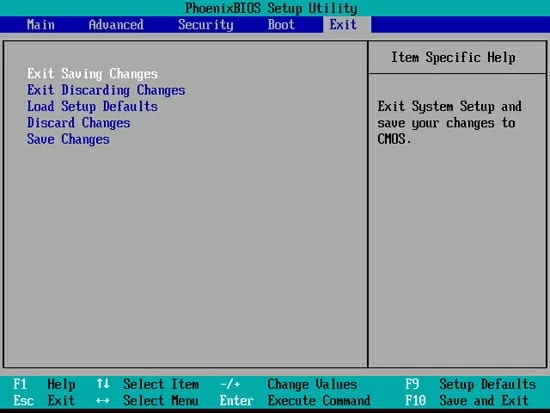
5. Set Phoneix BIOS to Boot from CD/DVD disk
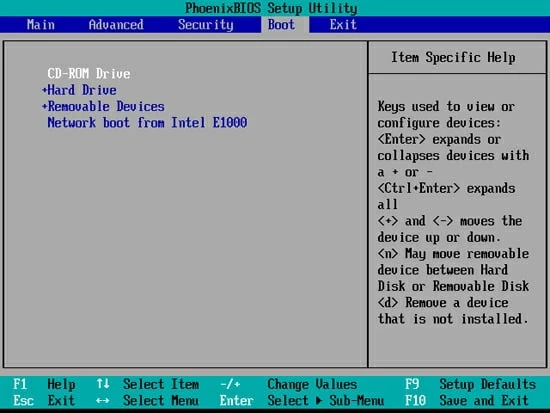
Press F2 key to get into the BIOS settings.
Step 1. Use → or ← key on the keyboard to navigate to the menu named Boot. Then use the + and - key to move devices up or down in the priority list. Here we need to designate the CD-ROM Drive as the first boot device option. In other words, keep "CD-ROM Drive" on the first order in the priority list.
Press F10 key to save your settings and exit BIOS. Alternatively, navigate to Exit Menu and press Exit Saving Changes (or similarly words) to save your changes and restart your computer.
If you want to boot from a Windows password reset CD/DVD disk, now insert it into the computer and press enter key to go on.
Now, you computer will restart and boot from the CD/ DVD disk.
Note: The process will look different on each computer and the screenshots won't look exactly the same.
Common Keys to Enter BIOS Setup on Windows Computer
Acer - Aspire, Power, Veriton, Extensa, Swift, Ferrari, TravelMate, Predator, Altos, etc.
- Press Del or F2 immediately after powering on.
- The BIOS on the Acer Altos 600 server uses the Ctrl+Alt+Esc key and the F1 key for advanced options.
- Older Acer computers may also use the F1 or Ctrl+Alt+Esc keys to access BIOS.
ASUS - VivoBook, Zen AiO, Zenbook, B, S, Q, V, X, K, T, U series, etc.
- Press F8 repeatedly to enter BIOS > Advanced Boot Option.
- Press F2 repeatedly to start the BIOS setup utility.
- Some Asus laptops might use Del, Esc, or F10 key.
- Older ASUS computers may required you to press the ESC key until Boot Device Selection screen appears, then select Enter Setup from the menu.
HP - Pavilion, TouchSmart, Pro, Vectra, Stream, Vectra, OMEN, ENVY, OmniBook, EliteBook, ProBook, Zbook, Tablet
- Press the F1, F10, or F11 key until you see the BIOS screen.
- HP Tablet PCs may use F10 or F12.
- Other HP computers may allow access to BIOS using the F2 or Esc keys.
- Some of old PCs might require that you press the Esc key and then F10.
Lenovo (formerly IBM) - ThinkPad, IdeaPad, Yoga, 3000 Series, Legion, ThinkCentre, ThinkStation, H535, 3000 Series, N Series, etc.
- Press F1 or F2 after powering on the computer.
- Press F12 to access BIOS.
- Some Lenovo laptop have a small Novo button on the side (next to the power button), press and hold it to enter the BIOS setup utility.
- Older PCs may use Ctrl+Alt+F3, Ctrl+Alt+Ins, or Fn+F1.
Dell - XPS, Dimension, Inspiron, Latitude. OptiPlex, Precision, Alienware, Vostro
- Press F2 when the Dell logo appears. Press every few seconds until the message Entering Setup appears.
- Older Dell desktops and laptops may instead use Ctrl+Alt+Enter or Del to enter BIOS.
- Older Dell laptops may use Fn+Esc or Fn+F1.
Shuttle - Glamor G-Series, D'vo, Prima P2-Series, Workstation, XPC, Surveillance
- Press F2 or Del on startup.
Sony - VAIO, PCG-Series, VGN-Series
- Press F1, F2 or F3 after turning on the computer.
Samsung - Notebook, ATIV Book, ATIV One, ArtPC PULSE, etc.
- Press F2 key after turning on the computer.
Toshiba - Portégé, Satellite, Tecra, Equium
- Press F1 or Esc after powering on to access BIOS.
- Press F12 on a Toshiba Equium.
Compaq - Presario, Prolinea, Deskpro, Systempro, Portable
- Press F10 while the cursor in the top right corner of the screen is blinking.
- Older Compaq computers may use the F1, F2, F10, or Del key to enter BIOS.
eMachines - eMonster, eTower, eOne, S-Series, T-Series
- Press Tab or Del while the eMachine logo displays on screen.
- Other eMachine computers may use F2 to enter BIOS.
Fujitsu - LifeBook, Esprimo, Amilo, Tablet, DeskPower, Celsius
- Press F2 once the Fujitsu logo appears.
Gateway - DX, FX, One, LT, GM, NE, GT, GX, NV, Profile, ONE, SX, Astro
- Press the F1 or F2 key repeatedly after restarting the computer.
IBM - PC, XT, AT
- Press F1 immediately after powering on the computer.
- Older IBM computers may utilize the F2 key for BIOS entry.
Micron (MPC Computers) - ClientPro, TransPort
- Press F1, F2 or Del immediately after powering on the PC.
NEC - PowerMate, Versa, W-Series
- Press F2 to enter the BIOS Setup.
Packard Bell - 8900 Series, 9000 Series, Pulsar, Platinum, EasyNote, imedia, iextreme
- Press F1, F2, or Del to enter BIOS.
Sharp - Notebook Laptops, Actius UltraLite
- Press F2 after the computer starts.
- Some very old Sharp PCs require a Setup Diagnostics Disk to access BIOS.
EVGA - SC17, SC15
- Press Del repeatedly to access BIOS Setup