How to Transfer Videos from PC to iPad

If AirDrop is not working on your iPhone or iPad to share or receive files, then this article will list the solutions for you to fix AirDrop not working on your iPhone or iPad.

Quick Tutorial: If you can't use AirDrop to transfer photos from old iPhone to new iPhone, you can try Appgeeker iPhone Data Transfer to do this task in one click. You can also use it to transfer files between iOS devices and computer in both directions.
There are a lot of available tips to fix AirDrop not working on iPad and iPhone.
Because of the convenience of wireless transfer, more Apple users choose to airdrop photos from iPhone to Mac or airdrop photos, videos, music and other files between iOS devices. To make the iPhone / iPad AirDrop work properly, you need the following conditions:
However, there is always something happened to make your AirDrop not work. Don't worry, if AirDrop isn't working on your iPhone or iPad properly, this article will list the ultimate solutions for you to fix the AirDrop not working problem.
If your iPhone/iPad is the target device for airdrop, make sure your device is switched on and unlocked. Because airdrop signal cannot search for locked devices, AirDrop won't work if you lock your device. And users are also unable to get and confirm the prompt to receive airdropped files on locked iPhone/iPad, which will cause AirDrop not working issue on iPhone or iPad.
Also, put the two devices within an effective distance, not more than 30 feet (about 9 meters), to avoid signal interference or signal weakening.
In fact, AirDrop works by sending Bluetooth signals to detect other devices nearby and establish a peer-to-peer Wi-Fi connection as a way to communicate and transfer files between devices. If your iPhone AirDrop can't work properly, check if Bluetooth and Wi-Fi networks are enabled. If they are not enabled, turn them on; if they are on, turn them off and toggle them on again.
To check Bluetooth and Wi-Fi on your iPhone, swipe down from the top-right corner of your screen (iPhone X or later) or swipe up from the bottom of your screen (iPhone 8 or earlier) to access Control Center, then in the upper-left corner, enable Bluetooth and Wi-Fi options. Or tap both options twice to restart them.
Tip: If the AirDrop still doesn't work, you can reset Wi-Fi settings to troubleshoot if it's a Wi-Fi problem. Navigate to Settings > General > Transfer or Reset iPhone > Reset and select the "Reset Network Settings" option to restore your Wi-Fi configuration to factory settings.
One of the reasons why AirDrop is not working on your iPhone/iPad is that your Personal Hotspot is active. To fix the AirDrop not working problem on the iPhone or iPad, you can disable Personal Hotspot directly in the Control Center. Or switch "Allow Others to Join" to Off in Settings > Cellular > Personal Hotspot.
Sometimes, you may find that you can't share or receive files on iPhone/iPad even though you have the AirDrop turned on. AirDrop provides three receiving options, namely Receiving Off, Contacts Only, Everyone. If you select "Receiving Off", AirDrop will not work on an iPhone and iPad. So, to fix the AirDrop not working, switch the option to "Contacts Only" or "Everyone."
As we all know, iOS and iPadOS updates tend to fix some inexplicable bugs in the device. If you have an update request for your iPhone or iPad, update it to the latest version to be more compatible with the AirDrop feature.
If you cannot update system directly on your iPhone, then you can update your iPhone through iTunes.
Force Restart can help you solve some system problems or temporary failures, such as AirDrop not working, Wi-Fi not connecting, Bluetooth or mobile data not working properly, etc. And depending on your device model, the process of force restart is different.
If none of the above tips help you solve the AirDrop not working problem, then you need to contact Apple Support for further technical guidance.
If you can't figure out why AirDrop is not working or don't want to waste time trying the above solutions one by one, then use iPhone Data Transfer, a quick and easy solution that allows you to transfer files between iOS devices or between iPhone and computer in both directions.
With iPhone Data Transfer, you can transfer multimedia files, including music, photos, videos, audiobooks, ringtones, etc. from iPhone to iPhone, from iPad to iPhone, or from Mac/Windows to iPhone/iPad, and vice versa. Besides, using it to transfer files over a wired connection is more stable and faster than using AirDrop.
Here are the steps on how to transfer photos from iPhone to iPhone when you have the AirDrop not working problem on the iPhone.
Step 1. Download the software and connect your iPhones to computer. Install and launch iPhone Data Transfer, then plug your two iPhones into the computer using data cables.
Step 2. Choose the correct iPhone. After connecting the device, select your source device from which you wish to transfer photos in the drop-down menu at the top of the home page.

Step 3. Select photos for transfer. Go to the Photos tab in the sidebar, then select the photos you want to add to another iPhone from the given subdirectory.

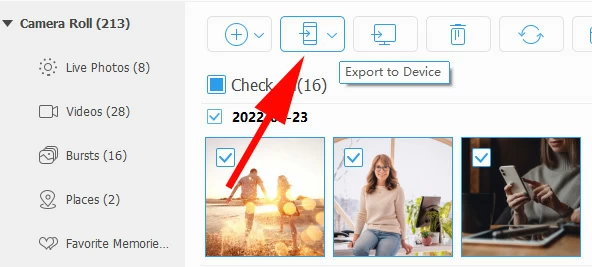
Step 4. Transfer photos to the target iPhone. Click the iPhone icon (Export to Device) on the top taskbar and select another iPhone as the target device to start transferring photos.
Waiting for the transfer process to finish, you can view these photos in the Photos app. Likewise, the software lets you transfer photos from Mac to iPhone. Moreover, if you want to transfer music from computer to iPhone without iTunes, the software can also meet your needs!
As an all-in-one file transfer and management tool, giving iPhone Data Transfer a chance will not let you down!