How to Set Music as a Ringtone on iPhone

Running out of storage on your iPhone and want to transfer photos to iCloud to free up space? Here's how to move photos from iPhone library to iCloud storage.

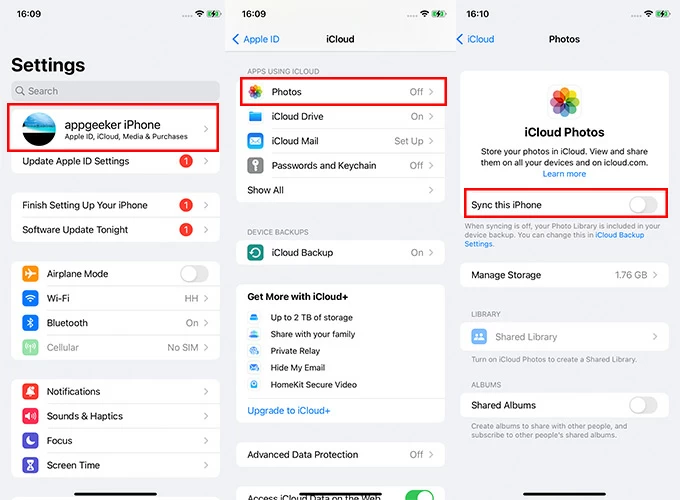
To move photos from your iPhone to iCloud, go to Settings > [your name] > iCloud. Tap Photos, and then turn on Sync this iPhone. This will automatically enable iCloud Photos and sync your iPhone pictures to iCloud and up to date across other devices using the same Apple account.
![]()
To reclaim storage space, you can enable iCloud Photos on iPhone to move pictures to iCloud and access anywhere.
For many people, Photos save their precious memories, maybe a snapshot of a beautiful sunset, a candid family gathering, or a travel adventure. What a shame it would be if losing your iPhone meant the loss of all those important moments, not to mention those photos and videos consume significant storage space.
That's why it's crucial to move your photos from iPhone to iCloud, ensuring that they are safely stored and easily accessible from any other Apple device connected to the same Apple account. Fortunately, uploading your photos to iCloud from an iPhone is a simple process that can be done directly from your device.
Here we'll take you through a step-by-step process on how to upload photos to iCloud from iPhone, as well as other things you can do after moving pictures to iCloud storage.
For a seamless photos transfer between iPhone and computer, go with Appgeeker iPhone Data Transfer.
Table of Contents
Let's say over the course of those years you've gathered up a huge number of pictures on your iPhone. Now, you've purchased additional iCloud storage and would like to move the photos from the iPhone to the iCloud to free up the space in your device. Here's how.
1. Connect to Wi-Fi
Syncing your photos stored on iPhone with iCloud can consume a significant amount of data, so it's recommended to use a Wi-Fi connection to avoid any additional charges and to ensure a smooth synchronization process.
2. Enable iCloud Photos
Before turning on iCloud Photos, ensure that you've set up iCloud and sign in to iCloud on your iPhone. Then, follow these steps to enable this feature.
On your iPhone, go to Settings and tap on [Your name] at the top of the screen.
Then, select iCloud and choose Photos under APPS USING ICLOUD heading.
Toggle on the Sync this iPhone option. This will automatically upload photos and videos to iCloud from your iPhone and up to date across your other devices that shares with the same Apple Account.
Note:
See Also: How to fix this Apple ID is not active
3. Choose "Optimize iPhone Storage"
If your iPhone storage is almost full and you want to save space, turn on Optimize iPhone Storage. This feature ensures your photos are stored in iCloud Photos with their original format at full resolution version, such as HEIF, RAW, 4K, Live Photos, time-lapse.
On the other hand, you will keep optimized space-saving versions on your iPhone, which can be significantly free up your space. Your photos library also intelligently optimizes to ensure you have enough space by prioritizing the management of photos and videos you rarely access.
If you prefer to have the original, high-resolution versions of your photos accessible in both iCloud and on your iPhone, tick Download and Keep Originals instead. Please note that enabling this option may lead to storage constraints and potential performance issues.
4. Begin photos upload to iCloud
Once iCloud Photos is enabled, the iPhone will start uploading your photos to iCloud and organizing into Years, Months, Days, and All Photos. The transfer can take as little as a few minutes or as long as hours, depending on the number of photos and videos and your Internet speed.
See Also: Photos disappear from iPhone
By uploading full-resolution photos in the iCloud and storing smaller versions on your iPhone, you can decrease the usage of your device's storage, which can be especially useful for whose device has limited storage capacity. So after everything is synced while enabling iCloud Photos, any way to delete the photos from the iPhone but not iCloud so that you don't lose them?
Here's how to move photos from iPhone to iCloud storage and then delete from your iPhone but remain in your iCloud Photos library that's accessible on other Apple devices.
1. On iPhone, go to Settings > [your name] > iCloud.
2. Tap Photos, then turn on Sync this iPhone.
3. Wait for it to complete syncing all your photos to iCloud.
4. Turn off Sync this iPhone.
5. When prompted, tap Remove from iPhone in the pop-up.
6. Confirm your action and tap Remove from iPhone option again.
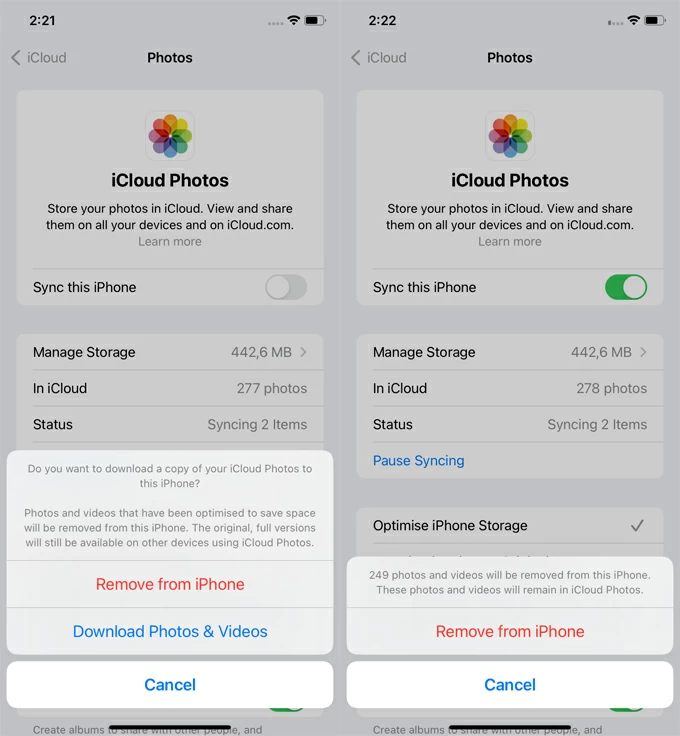
It will delete all of your photos and videos from your iPhone automatically. These photos and videos will remain in iCloud Photos. If you want to resync your iPhone's photo library with iCloud, you can turn Sync this iPhone back on.
Note, DO NOT delete photos on your own, unless it is a photo that you do not want to keep.
Tip: Always create backups of your photos if you attempt to use the system in ways it wasn't originally intended for. You may transfer your pictures and videos to computer locally.
See also: iPhone passcode not working
If you just want to move photos you select to iCloud library, Apple offer an easy way to do this:
Note:
1. Open Safari on your iPhone and visit iCloud.com
2. Sign in to iCloud using your Apple account and password.
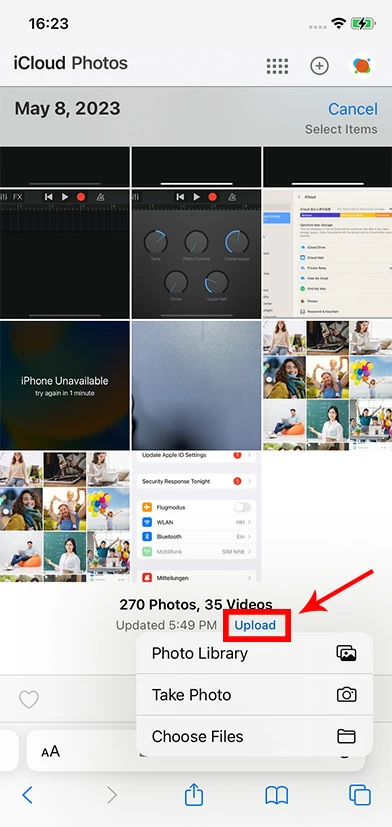
3. Once you are logged in, you will see a list of iCloud services. Tap on the Photos icon.
4. After that, hit the Upload button located at the bottom center of the screen, and select Photo Library.
5. Tap on the photos you wish to upload, and a blue checkmark will appear on each selected photo.
6. Next, tap Add in the upper right corner. The selected photos will now begin uploading to iCloud.
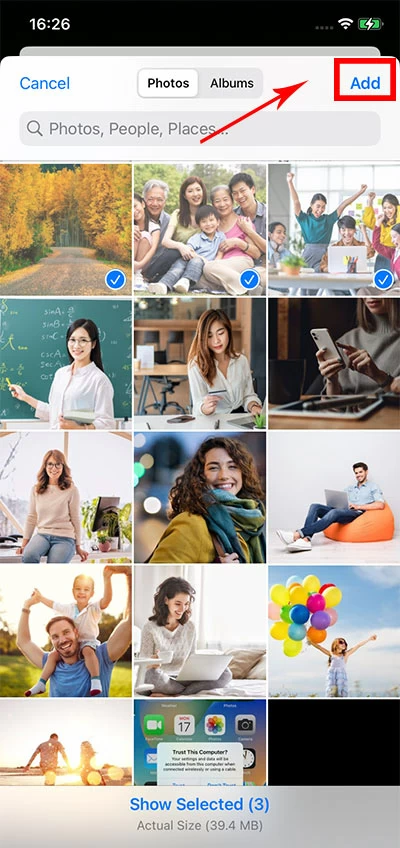
Once the upload is complete, you will see your selected photos in your iCloud photo library and accessible on all your iCloud-connected devices.
Tired of iCloud's limitations for syncing photos? You will want to move your photos from iPhone locally for a solid backup copies of your library. That's where Appgeeker iPhone Data Transfer comes in.
iPhone Data Transfer is one of the slickest and efficient file transfer software utility around, with seamless transfer experience. You can use it to transfer your media files (photos, music, ringtones, videos, audio tracks), documents, and other files on iPhone to and from PC, Mac, or even between Apple devices without worrying about storage limits, Internet dependencies, or format compatibility issues.
In addition, the software gives you flexibility to organize your library with a few clicks. You can choose specific albums, individual photos, or even a specific time range to export, customize the transfer process according to your preferences and needs.
Here are the steps to use iPhone Data Transfer to transfer photos to Windows computer: You will be guided through the similar steps for photo transfer.
Step 1. Launch the software
Download and install the software on your Windows computer.
Step 2. Connect your iPhone
Use a USB cable to connect your iPhone to the computer. Make sure to unlock your iPhone and trust the computer if prompted.

Step 3. Choose photos to transfer
In the software, click on the "Photos" tab in the left menu bar. Then, select the certain photos you want to transfer, or choose the "Check All" option to export a specific album.

Step 4: Start the moving process
Once you've selected the photos, click on the "Export to PC" button at the top. Later, specify the destination folder on your Windows PC where you want to transfer the photos from iPhone to PC, and wait for the process to finish.
Note:
View photos on other devices
With your iPhone photos moved to iCloud, you can access them from any device with an internet connection. Whether you're using another iPhone, an iPad, a Mac, or even a Windows computer, you can log in to iCloud and view or manage your photos easily.
Download iCloud photos
The method of downloading photos from iCloud to iPhone is similar to uploading photos from iPhone to iCloud. If you have iCloud Photos enabled on your iPhone and it is set to automatically sync and upload photos to iCloud, you can go to Settings app > [your name]. Tap iCloud, then tap Photos. Select Download and Keep Originals.
See Also: How to transfer music to iPhone without iTunes
Share iCloud photos
Aside from moving photos from iPhone to iCloud, you can even create shared albums and invite family or friends to view and add photos. To do this, open the Photos app and scroll down to Shared Albums. Select an album and then choose your desired pictures, tap the Share button.
iCloud photo library integration
If you use iCloud photo library, any changes you make to your photos, such as edits, additions, or deletions, will be synced across all your devices. This ensures that your photo library remains consistent and up to date, regardless of which device you're using.
Check your iCloud storage
You may go to Settings > [your name] > iCloud. You'll see a bar graph at the top showing your overall storage. For more details, tap Manage Account Storage. If your storage is almost full, you can upgrade to iCloud+ by tapping Change Storage Plan and select a plan.