How to Transfer Videos from PC to iPhone

If you want to update iOS software by connecting iPhone with iTunes, then this article will give you a comprehensive guide on how to utilize iTunes to update your iPhone.

![]()
You can install the latest iPhone update using iTunes.
For stability and sustainability, while you can do software updates directly on your iPhone, some people still want to update the iPhone to the latest version of iOS through iTunes. Updating your iPhone in iTunes is a straightforward process to keep your iOS device up to date with the latest software enhancements and bug fixes.
This guide will explain how to update your iPhone through iTunes, providing step-by-step instructions to allow you to enjoy an enhanced user experience.
If, after the update, you want to transfer music, photos and videos backed up in iTunes to iPhone without replacing the original media library, Appgeeker iPhone Data Transfer is your trusted partner, letting you transfer files seamlessly between iTunes and iPhone in both directions.
Table of Contents
Actually, it's very easy to update your iPhone with iTunes, as long as you have a well-connected lightning-to-USB cable and the latest version of iTunes installed on your computer. But before that, you have to make sure that both your computer and iPhone are connected to a reliable Internet network and that your iPhone has enough storage space to install the new iOS version.
If you are all ready, here's how to update an iPhone using iTunes:
1. Connect your iPhone to the computer via a USB cable directly.
2. Launch the up-to-date iTunes on your computer.
Note:
3. Click on the "iPhone icon" in the top left corner of iTunes.
![]()
4. Locate the "Summary" tab on the left sidebar and select "Check for Update" / "Update" to check if there is an update available.
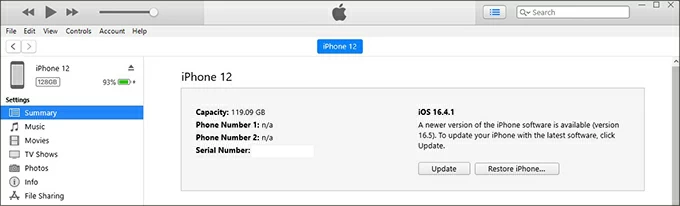
Tip: You can create a backup of your iPhone's music or other data in iTunes by navigating to the Back Up Now option before updating.
5. Click "Update" and follow the prompts to complete the remaining instructions.

6. If necessary, enter the passcode on your iPhone to confirm the update process.
During the update process, keep a stable connection between your iPhone and computer. After completing the download and installation, your iPhone will be successfully updated to the latest iOS system via iTunes and will reboot.
Note:
If you'd prefer to transfer iTunes library to another computer or a new computer, here are the bullet points: How to transfer iTunes library to new computer.
As you know, when a new iOS system is released, your iPhone will automatically remind you to update it. Although it is possible to update iOS on iPhone, it is different from performing an iPhone update through iTunes.
Read more: How to sync music from iTunes to iPhone
Update in iTunes
Using iTunes to update an iPhone is done through a wired connection, which is safer and more stable, and also ensures a high update success rate. iTunes provides complete update files, but it is also time consuming to apply an update to your iPhone in iTunes.
Update in iPhone
It is very fast and convenient to update your iOS device wirelessly. However, you have to make sure that your iPhone has strong and stable network support to avoid failure to download the full update file and slow iPhone reboots. In addition, the battery life is easily damaged is another issue to be aware of when using wireless updates.
If you created a backup before updating iPhone in iTunes, to export your iTunes music library to an iPhone running the latest iOS, you can transfer music from iTunes to iPhone with the help of Appgeeker iPhone Data Transfer. Unlike iTunes, this software won't replace your iPhone's original music files, and it can move your iTunes music library to iPhone with the same high quality.
With iPhone Data Transfer, you can effortlessly transfer music from iTunes to iPhone without syncing or adding songs from your computer to iPhone, enabling you to manage your music library freely.
Key features:
You can refer to How to transfer music to iPhone without syncing for more details.
1. Plug your iPhone into the computer and run the software. Unlock your iPhone and trust the computer so that the software can detect it.

2. Choose your iTunes library. Select "iTunes Library" from the One-click Operation at the bottom of the home page. This option allows you to add iTunes music to your iPhone in one go. If you'd like to make the same journey in the opposite direction, see How to transfer music from iPhone to iTunes.

3. Transfer iTunes music to iPhone. Click "Sync iTunes to Device" and select the item in the given window. You can check Music, Audiobooks, Playlist, or other items such as Movies, TV Shows, Home Videos, etc. according to your needs.
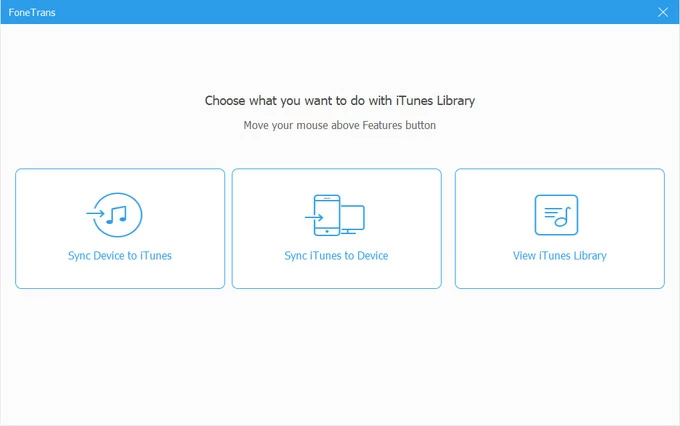
Once you've made your selection, click the "One-Click to Device" button below to start transferring your iTunes library to your iPhone.