Restoring Messages on iPhone Without Backup

Backing up data on iPhone to computer is a wise option to prevent loss. Here's how to make an iPhone backup on PC via iTunes or 3rd-party backup tool.

So, you're ready to back up your iPhone to a PC (Windows11, Windows 10, Windows 8, Windows 7, etc.) and keep a copy of your information from losing in case your iPhone is lost, damaged or broken: messages, photos, contacts, and other data and settings. Backing up iPhone on Windows PC or laptop can also be a smart choice in the moment when you upgrade to a new device and need to transfer your content and settings from the replaced one.
Take it easy. Here's a comprehensive rundown of how to backup iPhone to a Windows computer, using iTunes for Windows; and more convenient tips and tricks on finding iTunes backup stored on the PC as well as restoring all backed-up content to your iPhone.
We also run iOS Data Backup & Restore software to conduct a backup of iPhone on PC without iTunes and save the backup to any folder on the desktop & laptop.

You can backup your iPhone to the PC via iTunes, if your iCloud storage is full that you can't back up to iCloud.
Creating an iPhone backup to Windows is going to take same work, no matter what you iPhone model is - iPhone 14 or newer, 13, 12, 11, XR, XS, X, 8, all gens of SE, or earlier iPhones. There're two methods to help you back up iPhone to PC. The biggest difference is the ability to access the computer backup and view the information.
The official route to avoid data loss in case of device loss, theft, damage, or replacement is to backup an iPhone to a PC by means of iTunes.
The caveat is that you can't view what has been backed up. The only way to access the iTunes backup file is restoring iPhone via iTunes Restore feature - it's an all-or-nothing affair that may cause data loss. If this doesn't bother you much, get ready to use iTunes to back up iPhone to computer for free in a few simple clicks. We also have a link for Mac users' reference on how to backup iPhone to a Mac machine.
1. Connect iPhone device to your Windows PC via USB cable, and start iTunes.
2. When prompted, tap Trust on your iPhone and enter passcode to confirm you're trusting the computer.
3. Click Device icon at the upper left of iTunes windows.
4. Choose Summary from the sidebar on the left.
5. Scroll down to "Backups" section on the right pane and do the following:
6. Once you're ready, hit Back Up Now button to kick off the process. You will see a process bar at the top of iTunes window, indicating that your iPhone is backing up to PC.
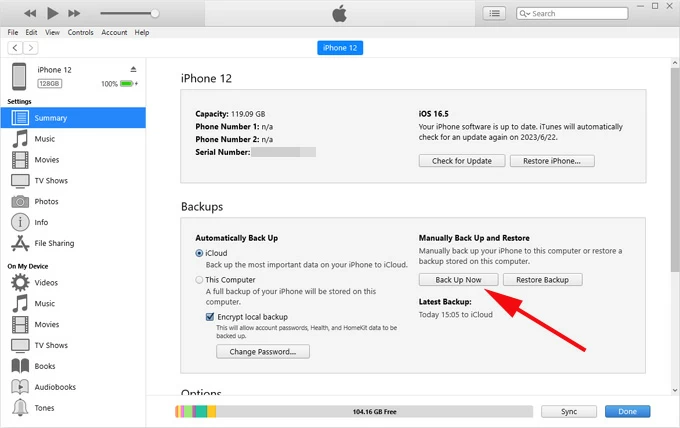
When the backing up process is finished, you should be able to see the date and time of your last backup under Back Up Now button. iTunes lets you confirm whether the backup you just made is successful or not via Edit > Preferences > Device, and delete it if you no longer need.
By far, you've successfully taken iTunes backup and kept an archive copy of all iPhone data on PC's hard drive.
Finding iPhone backup on your PC is easy if you know how. You could locate the default location manually within: C:\Users\[your user name]\AppData\Roaming\Apple Computer\MobileSync\Backup
Or, alternatively, search for the backup folder with the term %appdata% (or %USERPROFILE%) on your Windows 8, Windows 10 or Windows 11 PC.
Every time when you discover that your iPhone has been lost, damaged, broken, misplaced or replaced, you can restore all content to a new iPhone from iTunes backup. This is also the only way to view your iPhone PC backup and check if the backup is integrated.
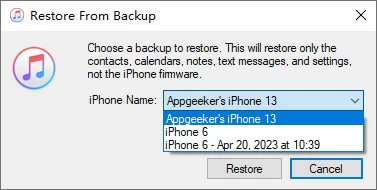
Plug your iPhone into the computer you normally backup to. Upon opening iTunes, click Device icon on the top-left corner of iTunes window, choose Summary, then click Restore Backup under Backups section.

When a window pops up, select the backup you want to restore, and then press Restore button to restore your files and settings to iPhone. Note that data that is currently on your iPhone but not in the backup will be erased when restoring iTunes backup.
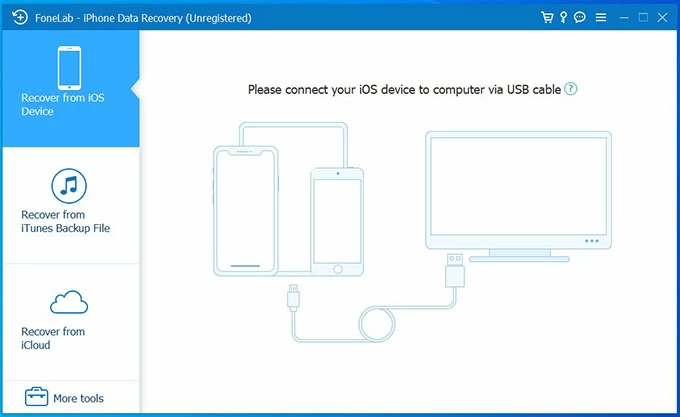
Tip: To restore certain files and settings, not the entire iTunes backup, consider trying a useful iPhone backup extractor named iPhone Data Recovery. It allows you to view the backup file and pulls your desired data off the backup. Further Reading: How to Restore Data from an iTunes Backup.
As previously mentioned, iTunes has long been the go-to offline solution for backing up the iPhone to a PC, but the fact that the iTunes backup typically can't be accessed is simply an annoying thing. If you're looking to easily back up your iPhone and read the backed-up information without trouble, iOS Data Backup & Restore for Windows could be your best bet. It provides a flexible route making manual local backup of iPhone on Windows PC painless.
The software acts as a storage service and save the backup in a form that the computer can read when you back up iPhone data. You're able to get all data to back up for a full backup, or just choose to keep a copy of certain data if want to save time.
Key Features:
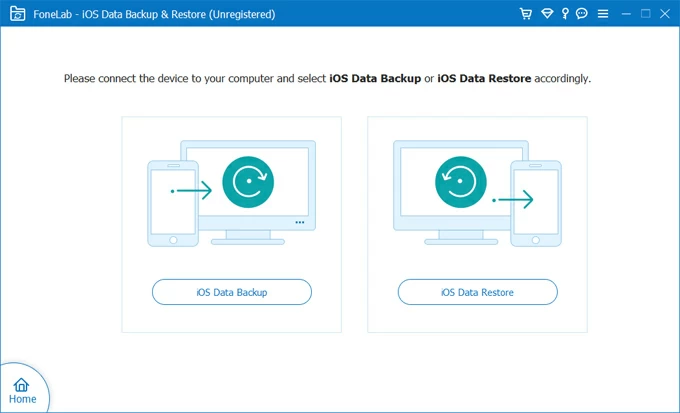
If you're new to iOS Data Backup & Restore utility, take a look at the following guide on how to back up the iPhone to a PC, and how to restore data from backup when iPhone is lost, damaged, replaced.
Step 1: Run the tool on PC (Windows 11, 10, 8, 7, etc.)
Open up the software on your computer, choose "More Tools" from the left column.
You should immediately see a user-friendly interface with four modules attached on. Choose "iOS Data Backup & Restore" module to go on.

On the next screen, click on iOS Data Backup button.
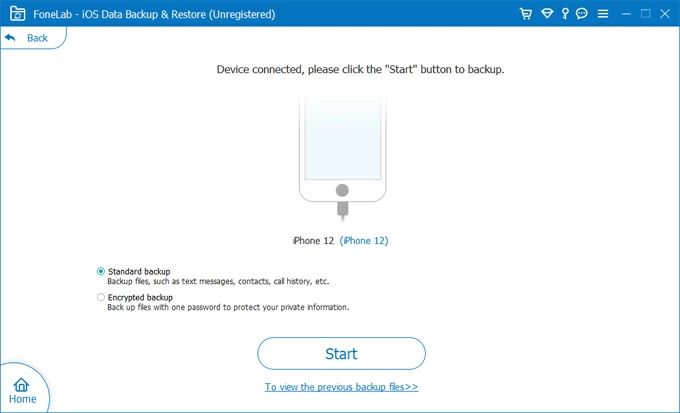
Step 2: Connect your iPhone to the computer
Then, use a UAB cable to connect your phone to the computer, and when it's recognized, click Start button to get to the next window.
Tip: You can also make an encrypted backup by checking "Encrypted backup" option and setting an encryption password before hitting the Start button.
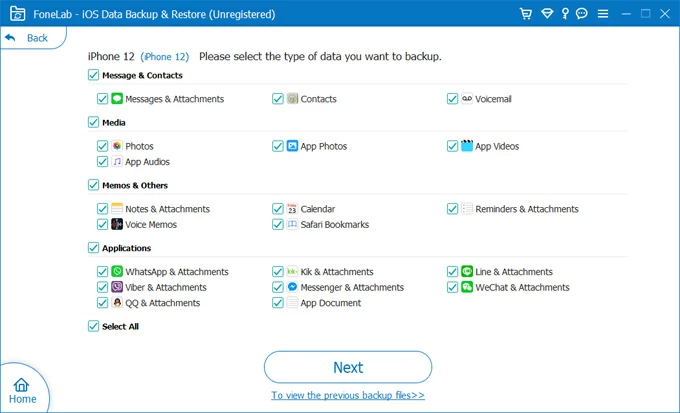
Step 3: Choose types of iPhone content to back up to the PC
After an automatic & quick scan, the software displays a panel of types of files that you can back up from iPhone to Windows computer.
By default, all the options are selected for creating a full backup in one fell swoop. You can also back up certain types of data: photos, messages, iMessages, contacts, notes, WhatsApp messages, voicemail, videos, WhatsApp, reminders and so on.
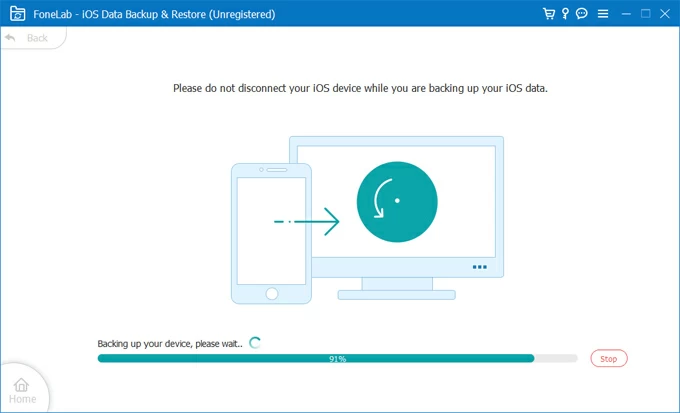
Step 4: Back iPhone up to PC running Windows OS
Once everything matches your expectations, hit the Next button and the utility is now doing iPhone backup to computer to make sure you don't lose data. Do not disconnect your device until the process is finished.
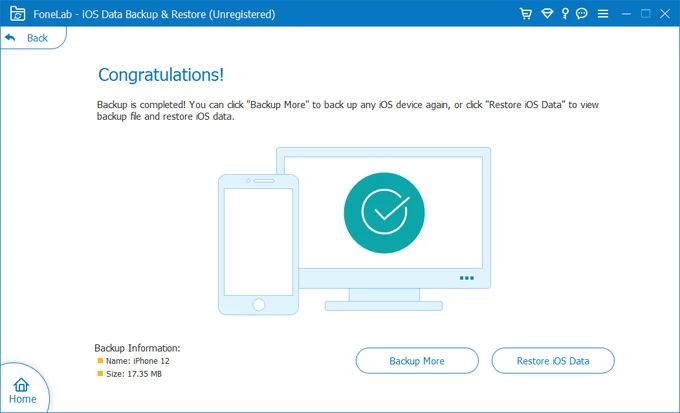
Step 5: View the backup file of iPhone
When done, you will get the "Congratulations!" window, informing you that your iPhone has been backed up.
To view backup file or restore iOS data if necessary, you need to click on Restore iOS Data button at the lower right of the interface.
Next, choose the iPhone backup you just created and click View Now button.
Now, you can see what files actually save within the backup, and even if your iPhone got factory reset, damaged, lost, replaced, you can restore the data to readable format to your device or computer.

[Popular Topic: How to Retrieve Data on iPhone without Backup]
Video Guide: iPhone backup to Windows computer
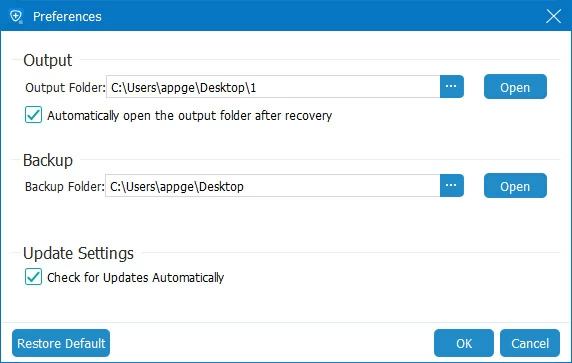
iOS Data Backup & Restore program includes the ability to choose any location to backup iPhone on PC or laptop. You can set the path for the backup in:
It's all that simple to backup your iPhone to your Windows computer and save a copy of data and settings locally. To make more secure, it's recommended by Apple having both a local backup or iCloud backup. If you haven't use iCloud to back up the iPhone, you'd better do that right away. It's a matter of tapping Settings > [your name] > iCloud > iCloud Backup, turning on Back Up This iPhone, and tapping Back Up Now.
See Next: How to Fix iCloud Won't Back Up iPhone