
Where Do AirDrop Files & Photos Go?

If you want to delete photos from iPhone but not iCloud, this post will show how to delete photos jut off your iPhone and not from iCloud, as well as possible backup solutions.

It is possible to remove photos from an iPhone but not from iCloud library.
It is not uncommon for users to have too many photos and videos filling up their iPhone memory. Many people want to delete some photos to reclaim storage on their iPhone, but still wish to keep those precious memories. While iCloud provides a handy solution to store photos in the cloud, the problem arises when you delete photos from an iPhone without losing the ones safely stored in iCloud.
So, deleting photos from the iPhone without removing them from iCloud storage is a goal many users are pursuing. Fortunately, this article walks you through several methods on how to delete photos from your iPhone but not iCloud, ensuring that you don't lose any cherished images while clearing up much-needed space on your device.
iCloud Photos is primarily used to sync photos and videos across all Apple devices connected to the same Apple ID, and updates any changes. With iCloud Photos enabled, when you delete a photo on one iPhone, that photo will also be removed from the iCloud Photo Library and mirrored on other devices. Therefore, it can be a challenge for users who only want to make room by deleting photos from iPhone while keeping them intact in iCloud.
Relax, there are still ways to prevent iCloud from deleting photos when you remove them from your iPhone. And another good alternative is to back up your iPhone photos before deleting them, ensuring that your valuable photos remain safe in iCloud.
Read more: How to transfer photos from iPhone to external hard drive
Here are a few ways to delete photos locally from your iPhone but not from iCloud:
To delete photos from an iPhone while preserving them within iCloud storage, turning off iCloud Photos is one of the easiest ways to achieve this. Disabling iCloud Photos temporarily breaks the sync between your iPhone and iCloud. As a result, any changes you make, including deleting photos, will only affect your local device and not the cloud.
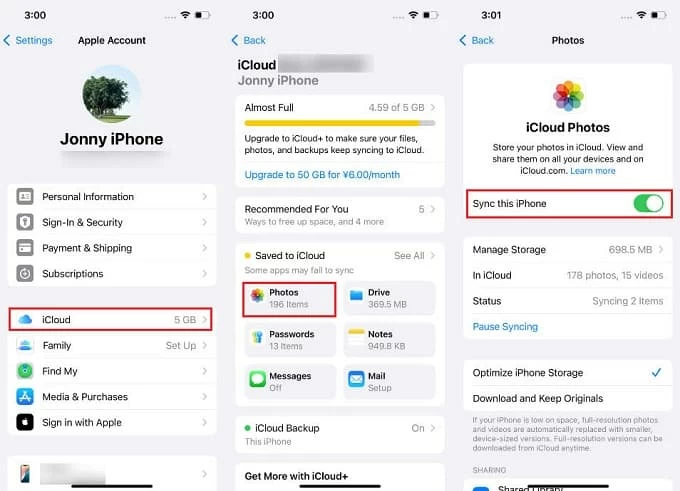
1. On your iPhone, open Settings app.
2. Tap [your name] at the top of the screen.
3. Select iCloud and then tap the Photos option.
4. Disable iCloud Photos by toggling off the Sync this iPhone option.
Tip: When a window with the options "Remove from iPhone" and "Download Photos & Videos" pops up, selecting the former will remove the optimized photos and videos from your iPhone internal storage to make more free space, but they will still be saved in iCloud at the original quality. Selecting the latter will keep a full copy of all photos and videos on iPhone at full resolution.
You can delete undesired photos in the Photos app now, and this deletion will not sync to iCloud. These deleted photos are still accessible via the iCloud.com or other Apple devices.
Note:
If you manage multiple Apple accounts, switching iPhone's Apple account will completely separate your photos from the current iCloud account, ensuring that even if you delete photos from the iPhone locally, they will not disappear from the original iCloud library.
1. Make sure your iPhone photos have been uploaded to iCloud for synchronization and backup.
2. Sign out of current iCloud account. Go to Settings > [Your Name] > Sign Out. You'll be asked to enter your Apple ID password to isolate your iPhone from your iCloud data.
3. Create or sign in with a new Apple account. Tap Settings > Apple Account to create a new Apple account or sign in with a different existing one.
4. Take photos off the iPhone. Open the Photos app and delete the photos you no longer need on your device.
Tip: Your photos will remain in the original iCloud account and can be accessed by signing back in.
For those who back up their data across multiple cloud services like Google Photos, Dropbox, or OneDrive, moving photos to other cloud platforms is a great way to separate your photos from iCloud. Your photos will be securely backed up on other non-iCloud platforms, and you can safely delete them from your iPhone without worrying about losing them in iCloud.
Here's how to back up your photos from your iPhone to Google Photos:
1. Open the Google Photos app on your iPhone. If you haven't installed it yet, download it from the App Store.
2. Log in with your Google account credentials and allow Google Photos to access your photo library.
3. Tap your Profile picture in the top right corner and select Google Photos settings.
4. Tap Back up & sync and enable it to upload your photos and videos from your device to your Google account.
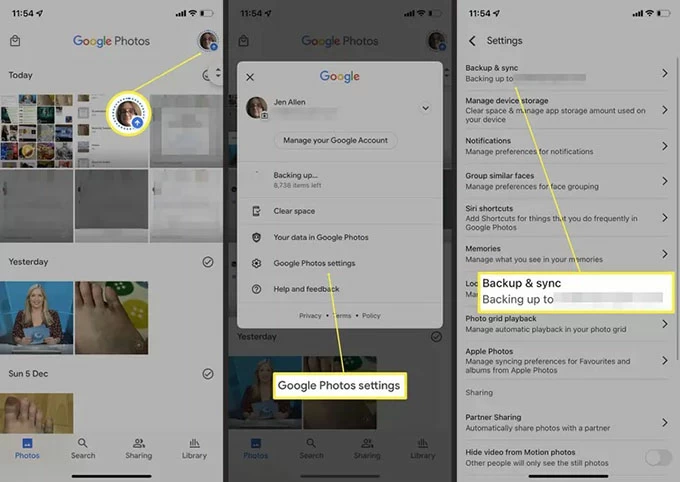
5. You can choose Storage saver or Original quality to determine the quality of the photos backed up.
Note:
If you prefer having a physical backup of your photos or need a more permanent solution, transferring iPhone photos to a computer is a reliable method to store your images for iCloud backup while freeing up space on your iOS device.
Appgeeker iPhone Data Transfer is an excellent software that allows you to transfer your photos from iPhone to PC or Mac without losing their quality. This software can quickly move your large photo library to your computer for backup, so you can safely remove them from your iPhone.
Key features of iPhone Data Transfer:
Here's how to transfer photos from iPhone to computer to make a backup via iPhone Data Transfer:
1. Download and launch iPhone Data transfer on your PC / Mac. Then unlock your iPhone and connect it to computer with a compatible USB cable.

2. Navigate to the Photos tab from left sidebar. All the photos in your iPhone will be sorted into different categories and previewed.

3. Select the photos to move to your computer. You can click Check All to transfer the entire photo library to computer, or pick the desired photos one by one.
4. Transfer the photos to computer. After selecting, click the computer icon in the taskbar above, and then select a folder to download the transferred photos to computer's local storage.

5. Once the photos are backed up on computer, you can select the photos you don't need in the software's photo preview window, right-click, and choose Delete to erase them from iPhone.

On Mac computer, you can use Image Capture to import photos and videos to your Mac from iPhone, and then choose to clear them from the device. With a photo backup on your computer, even if the photos are deleted from iPhone and iCloud, you still have a chance to get them back.
1. Plug your iPhone into your computer using a suitable USB cable.
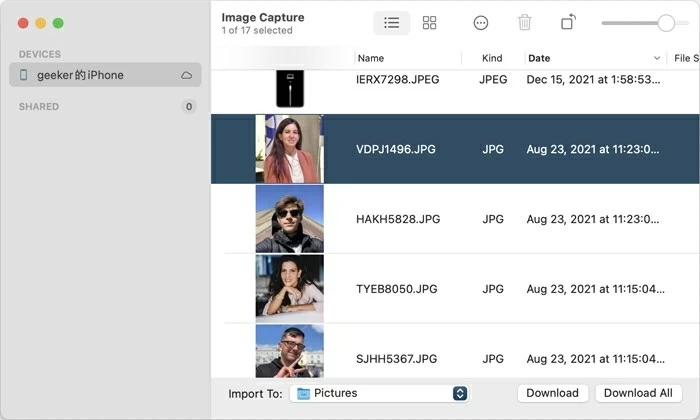
2. Run the Image Capture app on your Mac and navigate to your device name.
3. Preview the thumbnails of the photos and check the items you want to import.
4. Choose a destination folder in the Import To section at the lower left corner to save the images.
5. Click Download or Download All to transfer the photos from your iPhone to your Mac.
6. To remove the downloaded photos from your iPhone, click the Action button at the top of Image Capture and check Delete after import.
Conclusion
In summary, the only direct way to delete photos from iPhone but not iCloud is to turn off iCloud Photos. But you can back up your iPhone photos to a computer or other cloud services or another iCloud account, so that when you want to clear iPhone memory and delete photos, you can ensure the safety of the photos in iCloud Photo Library.
1. If I delete photos from iPhone is it deleted from iCloud?
If iCloud Photos is enabled, deleting a photo on your iPhone typically results in its deletion from iCloud and all other synced devices. But disabling iCloud Photos on the iPhone allows you to remove photos locally without impacting your iCloud photos.
2. How to delete all photos from iPhone but not iCloud?
To delete all photos from an iPhone but not from iCloud, you should deactivate iCloud Photos:
This will stop photos from syncing with iCloud, and you can delete all your photos from your device, but keep them on the cloud library.
3. What does Optimize iPhone Storage do?
With Optimize iPhone Storage enabled in iCloud Photos, your iPhone will automatically replace full-resolution photos with smaller, space-saving versions. The high-quality originals will remain stored in iCloud library, accessible whenever you need them. This feature is especially useful when your iPhone memory is almost full or you want to clean up the memory.
4. How do I know if my photos are fully backed up to iCloud?
Open the Photos app and check if the upload process is complete. You can also visit iCloud.com to verify that your photos are stored in the cloud.
5. How to recover my deleted photos on iPhone?
If you regret deleting certain photos from your iPhone, within 30 days, you can open the Photos app and find the Recently Deleted album. Unlock the Recently Deleted folder and you can recover the deleted photos to your iPhone.


