
How to Fix Your iPhone Unavailable

Want to transfer photos to new iPhone? Whether from an old iPhone, iPad, Android, Mac, PC or SD card, here is how to transfer photos from different devices to a new iPhone.

Appgeeker iPhone Data Transfer supports cross-device data transfer, allowing you to seamlessly transfer photos from iPhone/iPad/Windows PC/Mac to new iPhone without iCloud, while preserving the original parameters.
Read the article carefully to learn how to import precious photos from various devices to new iPhone.
Transferring photos to a new iPhone is a common task for many users upgrading to a newer model. Whether you're moving images from your old iPhone, an iPad, an Android, a computer, or even an SD card, the process can vary depending on the device you're using. Thankfully, Apple offers several methods to help you get your photos transferred to your new iPhone easily.
In this guide, we'll walk you through the most effective ways on how to transfer photos to new iPhone. It covers not only the universal solution using iCloud Photos to sync your photos to your new iPhone, but also breaks down specific methods for each device type to safely transfer photos to a new iPhone from your old iPhone, iPad, Android, Mac, Windows PC or SD card.
Table of Contents
If you plan to import all your photos to a new iPhone without iCloud, or if you need more flexibility to support transferring photos from any device—including iPhone, iPad, Mac, Windows, SD card, external drive, etc.—to your new iPhone, then Appgeeker iPhone Data Transfer is your best choice. This software can transfer photos and videos to new iPhone in batches without losing quality.
iPhone Data Transfer not only allows you to move all your photos from old iPhone to new iPhone and make local backup with one click, but also lets you transfer pictures, music, videos and other files between computer and iPhone, iPad and iPhone seamlessly.
Key features:
Next, let's take how to transfer photos from your old iPhone to new iPhone via iPhone Data Transfer in one click as an example:
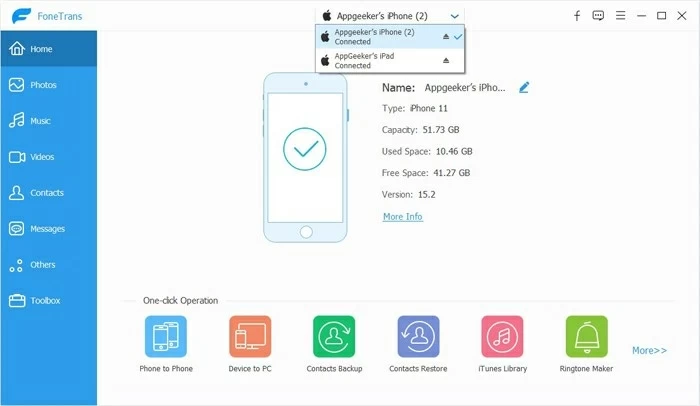
Step 1. Launch the software and plug your iPhone into the computer.
Download and run iPhone Data Transfer on your PC or Mac. To transfer your old iPhone's photo library to your new iPhone, connect both of your unlocked iPhones to the computer.

Step 2. Select your source device.
After the software detects your two connected iPhones, click the drop-down menu at the top and select the source iPhone to transfer photos from.
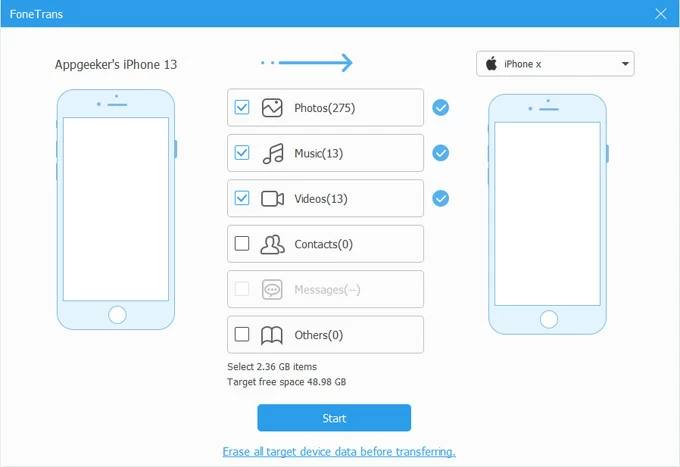
Step 3. Transfer all photos to new iPhone with one click.
Choose "Phone to Phone" in the One-click Operation section, and check the "Photos" option in the pop-up window. Select your new iPhone as the target device in the drop-down list on the right side of the window, then click "Start" to begin the transfer.
If you wish to import pictures to your new iPhone's Photos app from a digital camera, SD memory card, or computer, you can do so by navigating to the Photos tab.
In short, it's the most precise, flexible, and reliable cross-platform solution available. You can manage your entire photo transfer to a new iPhone in one place, eliminating the need to juggle different tools for different devices
Whether you're transferring photos from your old iPhone to your new iPhone, or migrating them from an iPad to a new iPhone, the following methods will work.
iCloud is a cloud-based storage and syncing service throughout the Apple ecosystem. iCloud Photos automatically stores photos uploaded from your device securely and keeps up to date, making them accessible on your iPhone, iPad, Mac, and PC linked to the same Apple account. By enabling iCloud Photos, you can sync your photo library to your new iPhone directly.
Note:
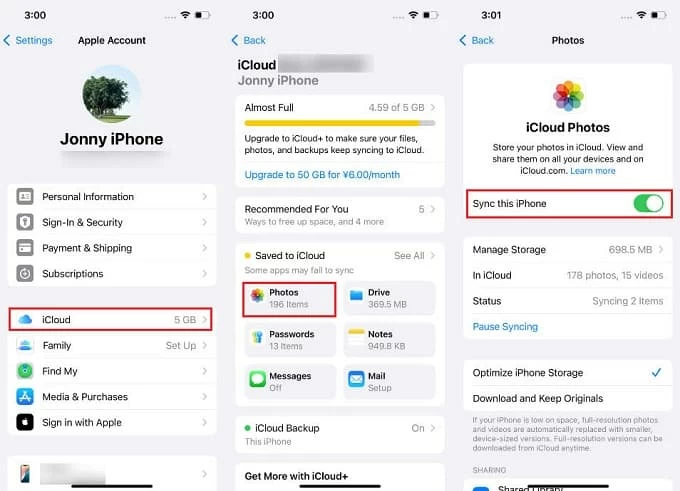
1. Enable iCloud Photos on your old iPhone or iPad.
Open Settings app, tap [Your Name] at the top, then tap iCloud > Photos and ensure the "Sync this iPhone" or "Sync this iPad" option is turned on. Wait for your photo library to finish uploading to iCloud.
2. Sync photos to your new iPhone.
Make sure your new iPhone is signed in with the same Apple account and has iCloud Photos activated. Then the photos will automatically sync from iCloud to the Photos app, which may take some time.
Tip: You can select "Optimize iPhone Storage" or "Download and Keep Originals." iCloud will download the photos to your new iPhone in original quality or optimized form, depending on your choice.
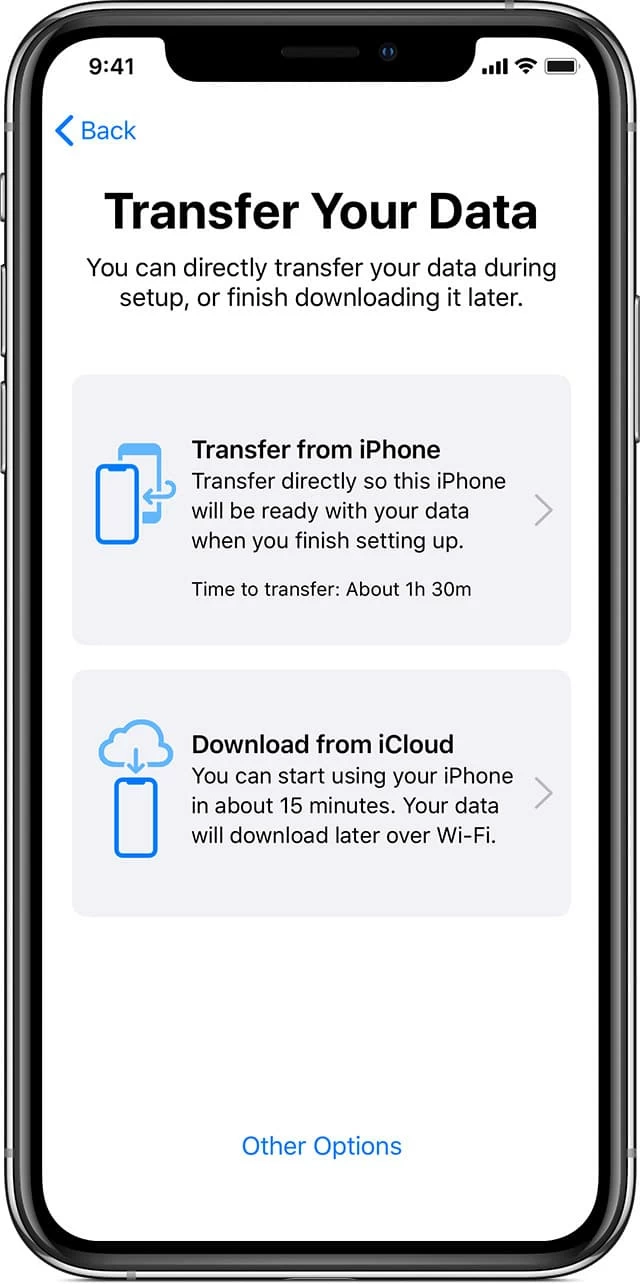
Quick Start is the preferred method for transferring photos to an unactivated, brand-new iPhone. It's a built-in feature designed to enable wireless data transfer to a new iPhone or iPad, provided your current iPhone or iPad is running iOS 11 or iPadOS 13 or a later version.
Although this feature simplifies the setup process and transfers photos to your new iPhone without using iCloud, there are some requirements you should be aware of:
1. Turn on your new iPhone and place it near your old iPhone or iPad. If you have already activated your new device, reset it to its factory settings first.
2. Follow the steps to come to the Quick Start screen.
3. Your old iPhone or iPad will detect the new iPhone automatically and pop-up a "Set Up New iPhone" window, tap "Continue" to use your Apple account to set up your new iPhone.
4. An animation will appear on your new iPhone. Use the camera of your old phone/iPad to scan this animation.
5. When prompted, enter the lock screen passcode of your old iPhone/iPad on your new phone. After successful verification, the new iPhone will show the "Setting up your iPhone…" screen.
6. Then set up face ID on the new phone.
7. When you reach the Transfer Your Data step, select "Transfer from iPhone" to start transferring data and photos from your old iPhone or iPad to your new iPhone.
8. Keep both devices plugged into power and close together until the migration is over.
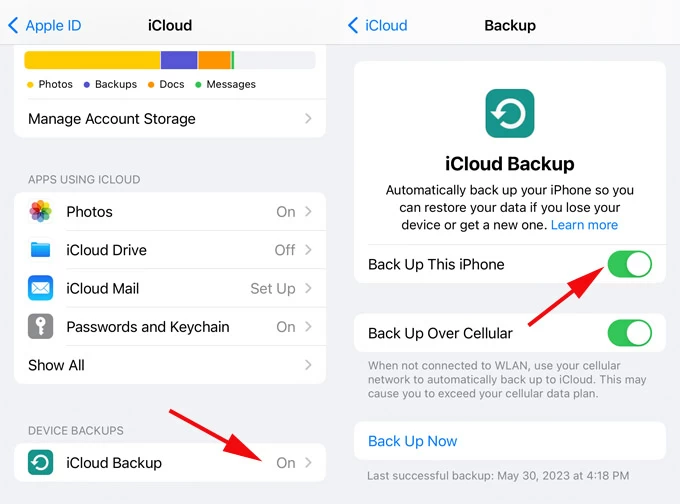
iCloud Backup is another good option to transfer photos from old iPhone to new iPhone or move pictures from iPad to new iOS device. This is especially suitable for users who have upgraded to a new iPhone and want to get all the data and settings from their previous device, including photos. It's done during the setup process of new iPhone.
1. Create a latest backup on your old iPhone or iPad. Head to Settings > [your name] > iCloud, tap "iCloud Backup" and turn on "Back Up This iPhone" / "Back Up This iPad", then tap the "Back Up Now" button.
2. Power on your new iPhone and make sure it is on the Hello screen.
3. Restore your iPhone from iCloud backup. Follow the on-screen instructions to complete the setup steps, and when you come to the Transfer Your Apps & Data screen, select the "From iCloud Backup" option.
Then log in with the same Apple account as your old iPhone or iPad. From the list of available backups, choose the most recent one to restore.
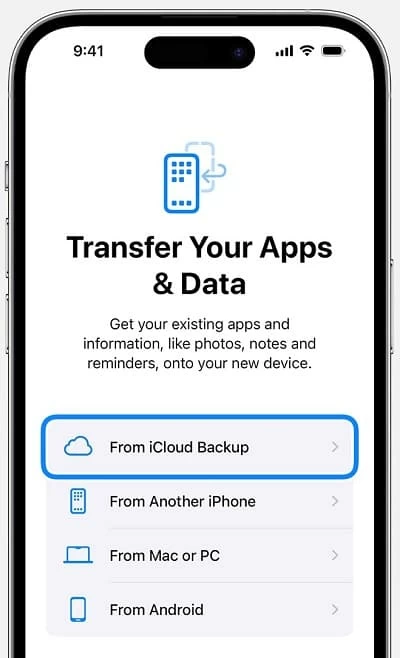
Keep a stable Wi-Fi connection and wait for the restore to complete. Once finished, complete the remaining steps, and then you can access the Photos app to view the transferred photos and videos.
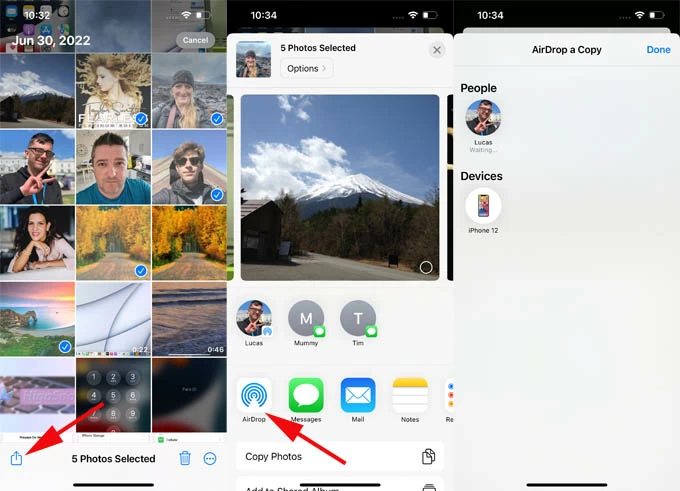
Apple's built-in Airdrop feature is one of the ideal options if you wish to share photos wirelessly. Using the combination of Bluetooth and Wi-Fi, Airdrop is a convenient way to transfer a small selection of photos from an iPhone or iPad to your new iPhone.
To use AirDrop to send photos to a new iOS device from old iPhone and iPad, you must ensure that both devices have Wi-Fi and Bluetooth turned on, and that they're in close proximity.
1. On both your source device and your new iPhone, enable AirDrop by opening the Control Center and tapping the AirDrop icon. Set it to "Everyone for 10 Minutes" or "Contacts Only."
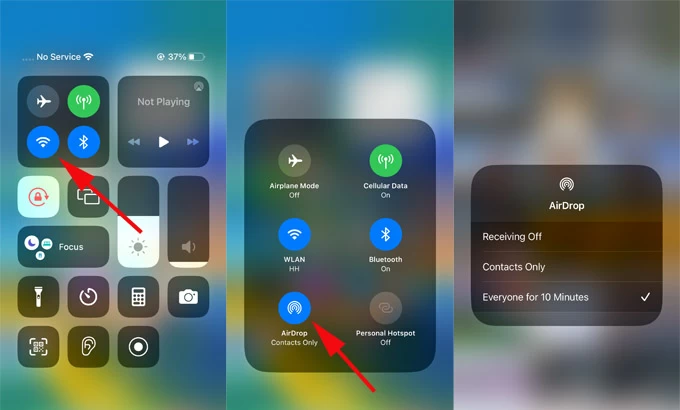
2. Open the Photos app on your old device and select the photos you need.
3. Tap the "share icon" in the lower left corner.
4. Tap the "Airdrop icon" and choose your new iPhone as the receiving device.
5. The selected photos will be sent to your new iPhone. If you're using the same Apple ID, shared pictures are automatically saved in the Photos app; otherwise, you should tap "Accept" on the pop-up alert.
Switching from Android to iPhone is more than just a data transfer—it involves bridging two entirely different ecosystems. Move to iOS is Apple's official solution specifically designed for this transition.
By establishing a private Wi-Fi network between the two devices, you can seamlessly transfer photos from your Android phone to your new iPhone without the need for any cables.
1. Activate your new iPhone and follow the instructions to begin the initial setup.
2. When you reach the Quick Start screen, tap "Set Up Without Another Device" to proceed.
3. Follow the prompts until you arrive at the "Transfer Your Apps & Data" screen, then select "From Android."
4. Set up the Move to iOS app on your Android phone.
5. Tap "Continue" on your new iPhone; a six-digit verification code will be displayed.
6. Enter this code on your Android phone to pair the two devices.
7. On your Android phone, select the data types you want to migrate to your iPhone, making sure to check the "Photo Library" option.
8. Tap "Continue." Your photos will begin transferring from your Android phone to your iPhone. This may take some time depending on the amount of data.
Finish the remaining setup steps on your iPhone. Once you reach the Home Screen, open the Photos app to browse your transferred pictures.
With cloud-based services like iCloud, you can wirelessly download your photos from a PC to your new iPhone. Simply upload your photos from your computer to iCloud, and then access them on your new iPhone through iCloud Photos.
1. Open a browser on your Windows PC and visit iCloud.com.
2. Log in to your Apple account and enter the verification code to verify your identity.
3. Click on "Photos" from the dashboard to access your iCloud Photo Library.
4. Click the "Upload" button (cloud icon with an arrow) in the top toolbar, browse your computer folders, and select the photos you want to add to iCloud.
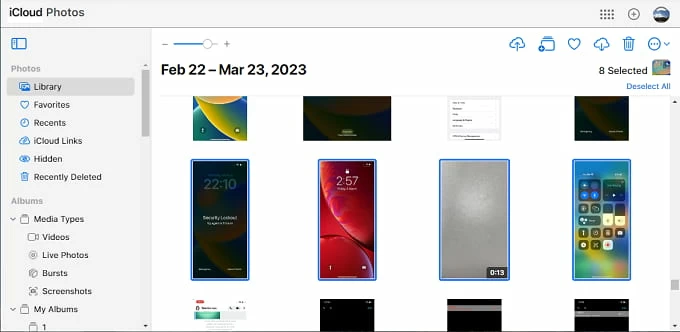
5. On your new iPhone, navigate to Settings > [Your Name] > iCloud > Photos and ensure that iCloud Photos is toggled On.
6. Open the Photos app and wait for the newly uploaded photos to sync to your iPhone.
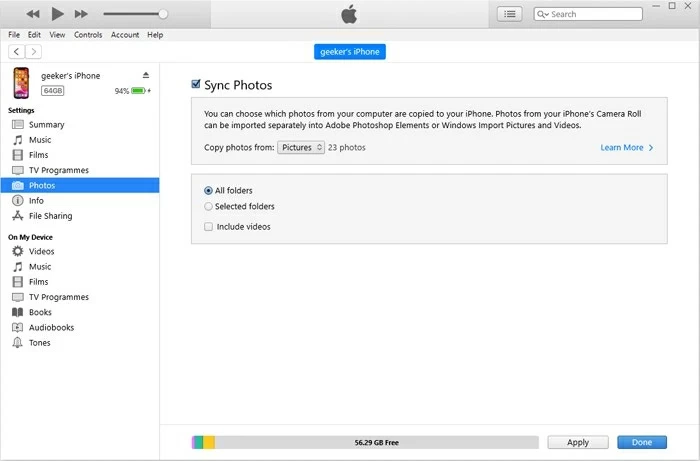
For those who want to transfer photos from a Windows PC to a new iPhone using a data cable instead of iCloud Photos, iTunes is a convenient method.
1. Connect your new iPhone to your PC using a compatible data cable.
2. Run the latest version of iTunes on your PC. If iTunes is not up to date, first update it.
3. Click the "device icon" in the top-left corner of the iTunes window.
4. Locate the "Photos" tab and check the "Sync Photos" option.
5. Select the photos to transfer. In the "Copy photos from" drop-down menu, select the album or folder containing the desired photos. You can choose to sync the entire folder or select specific images.
6. Click "Apply" in the bottom-right corner to sync photos from your PC to your new iPhone.
Note:
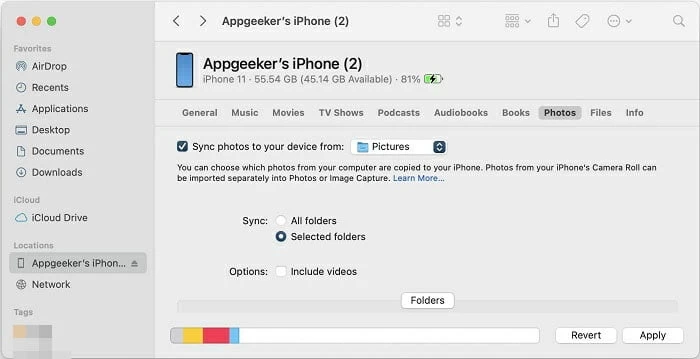
On Mac computer with macOS Catalina and Later, users can copy photos to new iPhone with the help of Finder.
1. Plug your new iPhone into Mac using a suitable USB cable.
2. Open Finder on the desktop and select your device from the left sidebar under Locations.
3. Navigate to the "Photos" tab at the top menu.
4. Check the small box next to "Sync photos to your device from" and select the photos, pictures or folders you want to sync.
5. Choose to move entire folders or albums; or pick selected files to transfer.
6. Click "Apply" to transfer photos from Mac to the iPhone.
AirDrop is better suited for transferring smaller photo sets. As part of the Apple ecosystem, it lets you send photos from your Mac to your new iPhone quickly without any loss in quality or changes to the file format.
1. On your Mac, locate the "Control Center icon" in the top menu bar, then click the "AirDrop icon." When the icon is blue, it means it is turned on.
2. Click the "right arrow" next to AirDrop and select "Contacts Only" or "Everyone" to decide who can discover you. Similarly, your new iPhone also needs to have the AirDrop feature enabled for everyone or contacts.

3. Find the images you want to transfer, right click or click the "Share" button, then select "AirDrop."

4. Choose your new iPhone to receive the shared photos.
5. If necessary, click "Accept" on the pop-up prompt on your new iPhone.
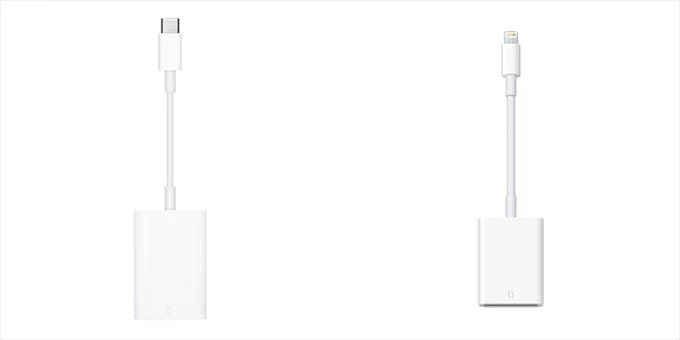
If your photos are stored on an SD card, an external drive or a digital camera, Apple's Lightning or USB-C to SD card reader or camera adapter makes it easy to transfer them directly to Photos app on new iPhone.
1. Connect the camera adapter or card reader to your new iPhone.
2. Plug your camera into the camera adapter, or insert an SD card.
3. Open the Photos app on your new iPhone.
4. Tap the "Import" option and select the import location. You can choose to import all items or select specific images to transfer to the iPhone.
Note:
Conclusion
Moving your photo library to your new iPhone can be easily achieved. Regardless of whether your source is an older iPhone, iPad, Android, Mac, PC, or an SD card, there's a suitable transfer method available. Remember to back up your photos before starting, and choose the method that aligns with your preferences and technical setup.


