
How to Transfer Music to iPhone without iTunes

You can transfer photos from an iPhone SE to your PC or Mac using different methods. Here're step-by-step guide for the six easiest ways to import as many pictures as possible.

You may have thousands of photos with your iPhone SE over the years, and it's essential to transfer photos from iPhone SE to computer for space-saving purpose, a local backup on the (separate) hard drive when you're preparing to factory reset your SE, better edit or enjoyment on a larger screen, or whatever. No problem. There are a few different options available to help facilitating iOS camera photos import to PC or Mac.
It's straightforward to download pictures from iPhone SE to computer with or without a wired connection.
You can always use a direct & stable cable connection for the transfer of a large number of images from the iPhone SE to computer, but it might be quicker and more convenient to transfer just a few pictures wirelessly. Let's check out all your options to access your iPhone SE (1st gen, 2nd gen, 3rd gen) via wired or wireless connection and move the photos to Windows computer or Mac effortlessly as you take them on your Camera Roll.
Appgeeker iPhone Data Transfer is a straightforward iOS-to-computer photo transfer solution tailored for all users to swiftly copy photo library from iPhone to a Windows PC or Mac using a data cable. It includes real-time visibility feature that allows you to transfer all or a selection of pictures over, as well as a HEIC converter offering flexibility in handling HEIC photos.
Table of Contents
It's easy to copy your photos from iPhone SE cameral roll to the computer. Read the following methods and choose the way that suits you best based on your needs of transferring your precious memories right to either a PC or a Mac, regardless of the OS version.
To wirelessly upload photos from iPhone SE to your computer (PC or Mac), you can sync through iCloud Photos using the same Apple Account. The process involves syncing media from iOS device to iCloud account and then downloading photos from iCloud to the desktop.
However, if you got over 5GB of photos and videos, you'll need to upgrade your iCloud storage plan to 50GB, 200GB or 2TB, ensure your entire photo library are transferred over onto your computer.
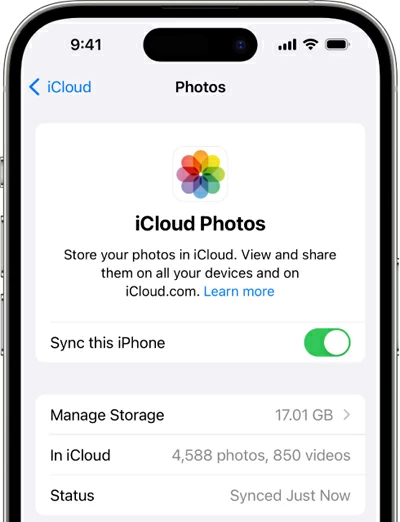
Go to Settings, tap [your name] at the top, then choose iCloud. Underneath the Saved to iCloud section, choose Photos, and turn on Sync this iPhone. All original, full-resolution videos and photos in Photos app on your iPhone SE will automatically sync with iCloud as long as the device is connected to Wi-Fi.
There're two ways of transferring photos from iPhone SE to computer using iCloud Photos sync—iCloud for Windows and icloud.com.
Via iCloud for Windows app
For downloading pictures to a Windows PC or laptop, you need to install iCloud for Windows and set up iCloud Photo Library.
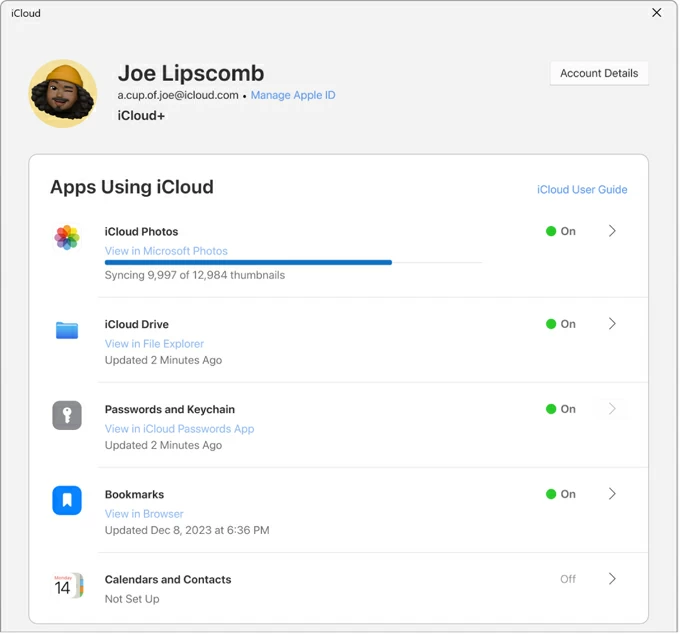
1. Launch iCloud for Windows on your PC.
2. Sign in with the same Apple ID that is used on your iPhone SE.
3. Tap the arrow next to iCloud Photos
4 On the screen that appear, switch on iCloud Photos to enable the download of photos on the iPhone SE to your PC. You will also see that all photos in iCloud will be imported to a computer folder over Wi-Fi:
C:\User\[your user name]\Pictures\iCloud Photos\Photos
5. Click Done and navigate to the designated folder to access your iPhone photos on the PC. You're able to view and copy the photos to anywhere on the PC's drive or external drive.
Tip: You will need the HEIF Image Extensions app in the Microsoft Store app to open high quality HEIC image files on Windows.
Via icloud.com for macOS & Windows
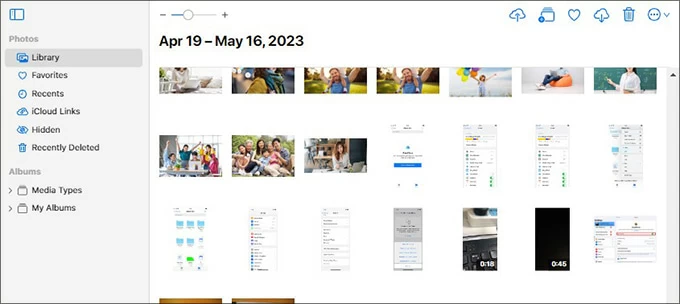
If you'd rather download single photo to the computer from your iPhone SE - instead of importing the whole collection, you can also head to icloud.com and choose the individual photos to download and add to your PC or Mac easily.
Log into the same Apple Account you use to sync the photos to iCloud. Click Photos icon to access your picture library or albums. Pick any photos you need to download to your computer for a wireless iPhone SE photo transfer, then click the Download icon at the top right of the page to trigger the process.
Your selected photos will automatically download to the Downloads folder inside your computer locally.
No matter what other iPhone-to-computer photo sharing methods you're using, taking advantage of this most reliable file transfer tool, named Appgeeker iPhone Data Transfer, can be a great way to quickly move photos from iPhone SE to PC or Mac, or vice versa through a USB connection, especially you're importing several thousand pictures stored on the iDevice to the desktop.
The software has a friendly interface letting you to manage & preview your media in one place. It provides a seamless transfer mode to directly transfer entire picture collection or individual photos between iPhone and computer without losing quality. The in-built HEIC converter automates the conversion during the import process, making any camera-captured HEIC photos turn into JPEG format and show up as available to view on your computer's screen.
iPhone Data Transfer support all versions of Windows or macOS, so feel at ease when you use it. Here's how to transfer photos from iPhone SE to PC Windows 10, Windows 11, Windows 7, etc. The process works the same on importing iPhone photos to a Mac, iMac, MacBook.
1. Launch Appgeeker iPhone Data Transfer on your PC or Mac.
2. Connect your iPhone SE to the computer via a practical lightning cable. Make sure to unlock your phone and tap "Trust" to allow access.

3. On the left sidebar, click on Music as your transfer mode. You will see the photo library of your iPhone SE with the album structure maintained.
4. Browse through your Camera Roll via Live Photos, Favorites, Screenshots, Pictures, Places, Hidden, Videos, etc.

5. Select the certain photos that you want to transfer to the computer, or tick the Check All box in the top if you'd like to move over the whole photo collection.
6. Click the Computer icon (Export to PC/ Export to Mac) in the top toolbar to batch-transfer pictures off iPhone SE to your PC or Mac folder.

Alternatively, you can select a single image to import to your computer. Right-click on the image and choose Export to PC/ Mac from the text menu.
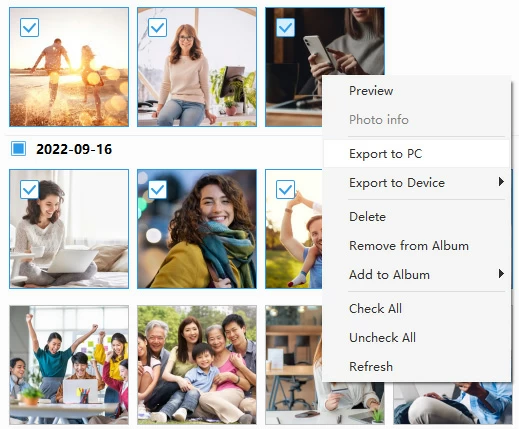
You can also transfer a specific album by selecting the album you want, right-click it, and hit Export to PC/ Mac.

After you're done with moving iPhone SE photos to PC or Mac, you can copy the files to your external hard drive if necessary. We've covered a separate guide for your reference on how to transfer photos from an iPhone to USB drive.
This part is catering to the needs of Windows users who is running out of the storage on the iPhone and plan to transfer the cherished camera memories to a Windows computer.
Microsoft has offered Windows Photos app and File Explorer for free to make the transfer of photos from iPhone to PC or laptop. By building an iPhone-to-PC transfer cable, you don't need to worry about how to download photos from iPhone SE to computer.
Before you start, enhance the compatibility for the photos, particular for the HEIC images and the HEVC videos being accessible on the PC after transferring. Go to Settings, scroll down and tap Apps, then choose Photos. Scroll down all the way to TRANSFER TO MAC OR PC section, then choose Automatic. This ensures that you can transfer your photos and videos in a compatible format.
Transferring photos from an iPhone SE via Windows built-in Photos app requires the latest version of iTunes to be installed on your computer. After that, connect your device and trust the computer, then open Photos app to have all of your photos copied onto the default Pictures folder of the PC.
The detailed steps to transfer iPhone SE photos to the computer with USB and Photos app could look like this. The steps are applied to the Microsoft Photos Legacy.
1- Plug your iPhone SE to your Windows computer through the USB cable.
2- On your device where a notification appears, tap "Trust" and enter the passcode to give your PC the permission to access your photos and videos.
3- On your PC, open Photos app.
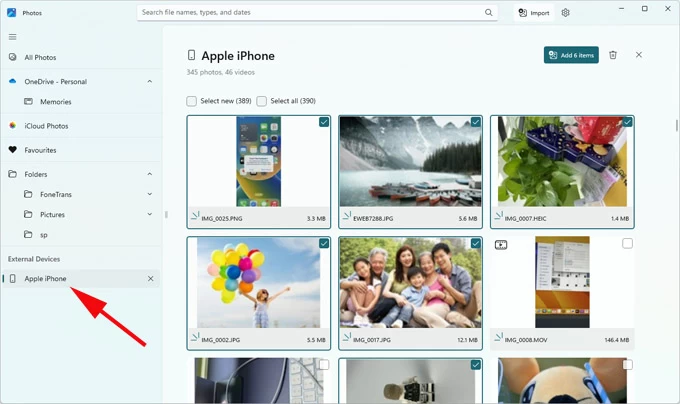
4- In the Photos app, click Import icon at the upper right of the interface, then choose your Apple iPhone from the pull-down menu. The app will automatically load the new photos and videos available for import, and may take a few minutes to complete.

5- Choose the photos you want to import by clicking on each image thumbnails. You can select individual pictures or tick the "Select All" checkbox to transfer all of your photos in your library.
6- Once you've selected your desired photos, click the blue Add button.
7- When prompted, click Change and specify a folder within Pictures folder on your computer to import the pictures. Hit Import button to begin the transfer to move the photos off iPhone SE and onto your PC.
Optional. If you don't want the photos to remain on your iPhone after being imported to the computer, the Delete option could help. Clicking the Trash icon next to Add button at the upper right of the interface will let you erase the photos on your iPhone SE from the Photos app on PC and free up device's space.
Related: How to recover permanently deleted photos on iPhone
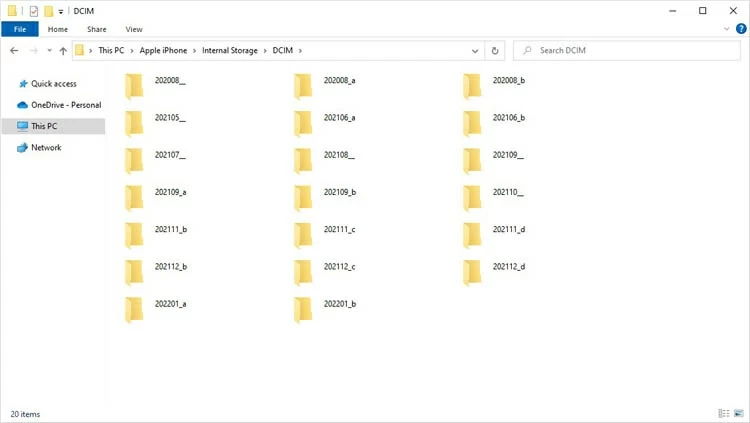
Once you successfully connect your iPhone SE to your PC using the USB charging cable, Windows automatically imports your photos to File Explorer, grouping into DCIM folder. This will not preserve the album structure, so it's not easy to find the photos to transfer.
To free copy pictures from an iPhone SE to a PC using Windows File Explorer:

That's it. While the traditional method works stably, it's may be not a good option if you need to transfer large quantities of photos off your iPhone to PC.
Transferring photos from the iPhone SE to a Mac machine is an extremely easy task, as you may already know how seamlessly Apple devices work together. Besides using iCloud Photos to sync photos from iPhone SE to Mac library, Mac's Photos app and AirDrop lets you manage photo collection and send photos and videos among iPhone, iPad and macOS desktop quickly.
In case you don't use iCloud Photos because of full iCloud storage, plug the USB cable to both your device and Mac, and start importing iPhone SE photos to your Mac in full resolution for a practical backup or whatever purposes.
Once you establish the connection between your iPhone and Mac, open Photos app on your computer, click [your iPhone] under Devices section in the left sidebar to access your iPhone photos on Mac seamlessly.
In the top toolbar, click Add to and choose a location where you want to save the pictures to computer from your iPhone SE. After that, select one photo for import, or hold the Command key and select multiple photos, then click Import Selected. To transfer your entire Camera Roll, click Import All New Photos.

Read next: How to transfer photos from Mac to iPhone
Although AirDrop isn't a wise option if you have hundred or thousand gigabytes of photos you need to move from your phone to Mac, it's worth trying thanks to its wireless file transfer technique. To get AirDrop to start moving just a few of your iPhone SE images over to your Mac, you need to enable it on your iPhone SE and your computer.
On iPhone SE: Go to Settings > General > AirDrop > Everyone for 10 Minutes. You can do this through Control Panel.
On Mac: Open Finder. Click Go in the menu bar and choose AirDrop, then set it to Everyone.
Next, use these instructions if you wonder how to airdrop photos from iPhone SE to Mac nearby without USB.
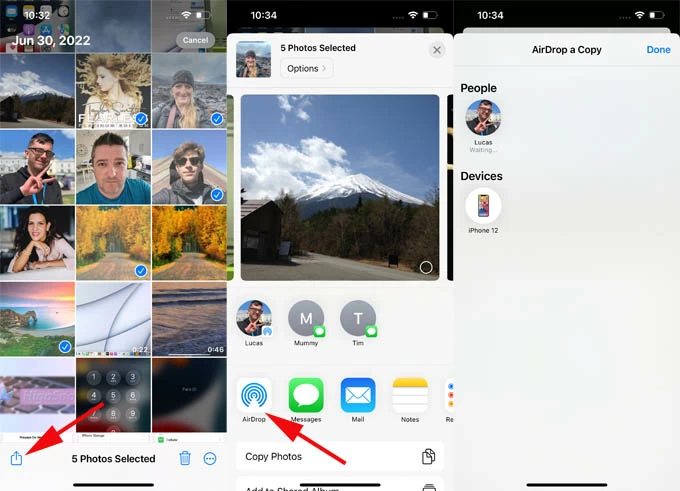
If your iPhone and Mac computer are logged into the same Apple Account, the transferred photos will save automatically into Photos library. If not, you can find the photos in Download folder when it arrives on your computer.
Keeping your precious photos on the computer saves space on your iPhone. You may not have to buy more iCloud storage if you don't want to. Of course, if you already have all your photos on iCloud, the syncing them to a PC or a Mac is a pretty easy way over active Wi-Fi.
As you can see, multiple options are feasible to copy your photos onto your computer. A wired connection might appear to be the fastest way to transfer images from iPhone SE library to desktop computer or laptop, especially when you a large library with a lot of photos.
AppGeeker iPhone Data Transfer will be your best bet. It lets you manage and edit the photos, as well as move the pictures directly from the iPhone to Windows PC or Mac. Plus, it saves you from any trouble when using any native software for the transfer like Windows Photos app or File Explorer, or Mac Photos app not loading all photos in iOS device.
For Mac users, the common route is to use AirDrop for sharing a lesser batch of photos to and from the iPhone device.


