Transfer photos from PC to iPhone with and without iTunes
Have loads of memorable photos on your PC but don't know how to get them on your iPhone? Here we will guide you on getting photos transferred with and without iTunes.

Robin Swift Updated on Oct 9, 2025 4:14 PM
What to know
- iTunes provides support for photos transfer by connecting your iPhone to PC.
- If you don't want to rely on the tedious process of iTunes, you can always use Appgeeker iPhone Data Transfer to transfer photos from Windows PC to iPhone.
- As for getting photos transferred from PC to iPhone wirelessly, Apple's cloud-based service: iCloud is worth a try.
Transferring photos from Windows PC to your iPhone can be very easy.
Pictures are the most memorable asset a person can have. Usually, we save the pictures we like when we browse the web with our computer, or save the pictures from camera on the computer. You may want to transfer photos from PC to iPhone as phone is more accessible.
But moving photos across devices can be a big hassle, especially between PC and iPhone, which are two completely different operation systems. So this guide is here to provide you with some easy methods to transfer photos from PC to iPhone. If you don't want to put up with the hassle of iTunes, you will also learn some iTunes alternatives such as iPhone Data Transfer which will help you get photos from PC onto iPhone without iTunes.
Move photos from PC to iPhone with iTunes
As mentioned at the beginning, Apple has its application: iTunes, which you can use to move photos by plugging your iPhone into your computer with a USB cable. Although iTunes is difficult for a novice to operate, with our clear and concise steps in the following, you can quickly get started. Once you have your iPhone joined to the Windows PC:
Enter the passcode on your iPhone to let it trust this computer.
If you use iCloud or other services to keep content up to date on all your devices, some of the features that sync photos through iTunes may be turned off. Therefore, before moving to next step, check if iCloud is turned off on your phone. Go to "Settings" > "iPhone's name" > "iCloud" > "Photos." Disable "iCloud Photos" to ensure that you can use iTunes to get the task done.
Next, let iTunes run. In the top left of the window, click on the phone icon.
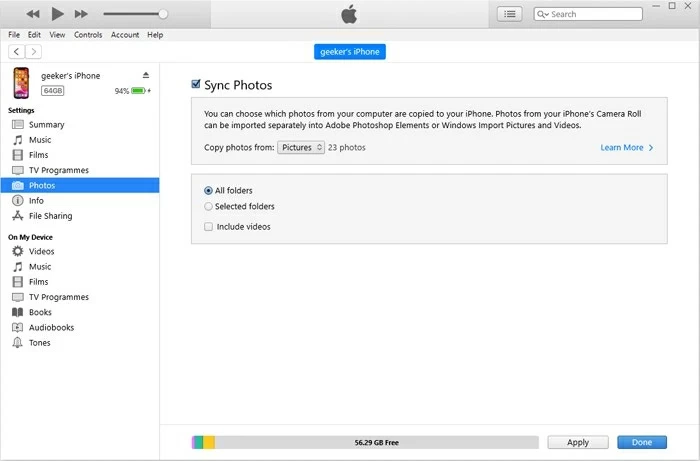
From the sidebar, click on the "Photos" option. Check "Sync Photos" and choose the folder of images you want to transfer from the "Copy Photos From" option. After choosing the pictures that you'd like to move, click "Apply" to confirm. iTunes will start moving photos.
When you're done, open Photos app on your iPhone to view these newly added photos.
Note:
- The process of moving photos from PC to iPhone will overwrite the existing photos in the Photo Library on your iPhone, which may result in the loss of photos.
However, iTunes might not be the best option to move photos from computer to iPhone. Users may lose their photos, and sometimes your iPhone won't even sync with iTunes. If you don't want to get into such a predicament, we also bring you some methods to import photos from PC to iPhone without iTunes.
Transfer photos from PC to an iPhone via iPhone Data Transfer
For those who want to bypass the shortcomings of iTunes, Appgeeker iPhone Data Transfer is probably one of the most trustworthy options. With its easy-to-understand interface, iPhone Data Transfer is easy enough to use to transfer photos from PC to iPhone for even the rookies. It offers so many powerful features that you no longer need to worry about the numerous issues you encounter in iTunes.
This is an out-of-box data manager which can help you transfer photos from PC to iPhone, Mac to iPhone and vice versa, even iPhone to iPhone. In iPhone Data Transfer, there is no limit to the number of photos. You can choose as many pictures you want and transfer them in one go. Another thing you don't have to deal with when it comes to the iPhone Data Transfer is compatibility issue, which means it automatically converts your media files to a format compatible with your iPhone.
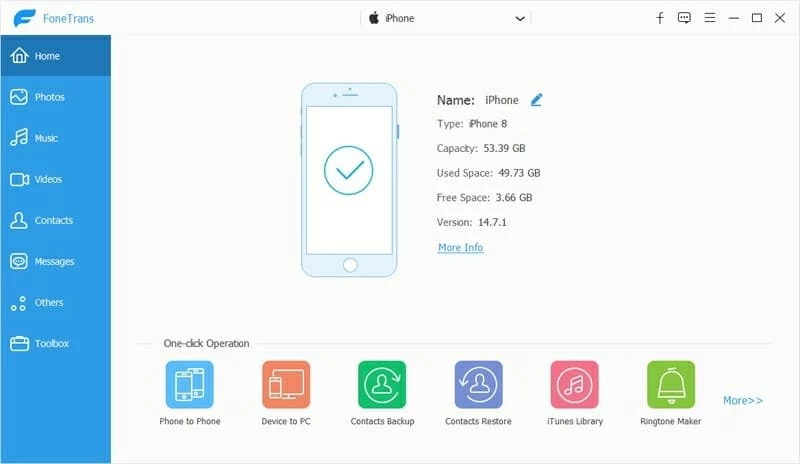
Step 1: Connect your iPhone to your PC
Launch the tool on your PC. You should be prompted to connect your iPhone to manage photos. Just plug your iPhone into your PC. Tap "Trust" on your iPhone and enter the passcode if asked. Then you should see the information about your phone on the screen.
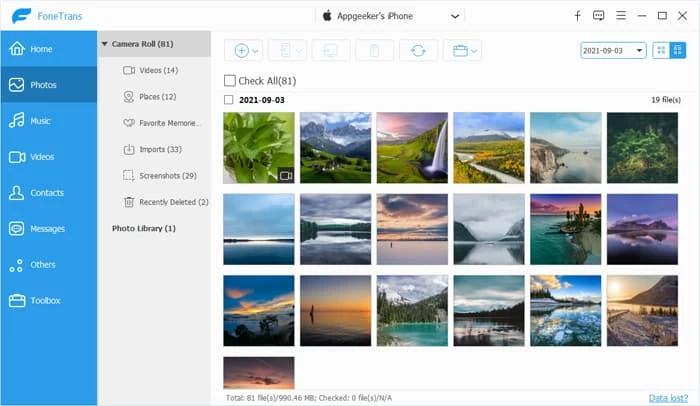
Step 2: Click on the "Photos" button
In the left column of the tool, there are many data types for you to choose from. Click on the "Photos" option. iPhone Data Transfer should show you a window containing all the photos from your phone organized in different folders.
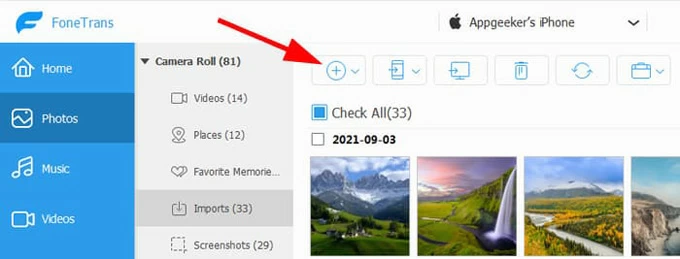
Step 3: Add photos to iPhone
To add photos from PC to iPhone, click "+" icon at the top of iPhone Data Transfer. You can choose "Add Files" to add individual photo files or "Add Folder" to add the pictures folder in which the photos are saved. Alternatively, you can drag and drop the photos to the window.
Now you have all the images you want to transfer from your PC on the iPhone.
Again, with iPhone Data Transfer, you won't encounter the many problems in iTunes. In the blink of an eye, it can help you move pics from PC to iPhone without any data loss.
Use iCloud to sync photos from your Windows PC to iPhone
To transfer your photos library wirelessly from your computer to your iPhone, you can use cloud-based service like iCloud. Once you set up the same Apple ID on both devices, your entire photo library will sync across both devices.
We have cover two options for you to transfer photos from your PC to iPhone using iCloud:
Option 1: iCloud.com
1. Open Settings app on your phone, go to "iPhone's name" > "iCloud" > "Photos." Turn the button next to "iCloud Photos" into green to enable it.
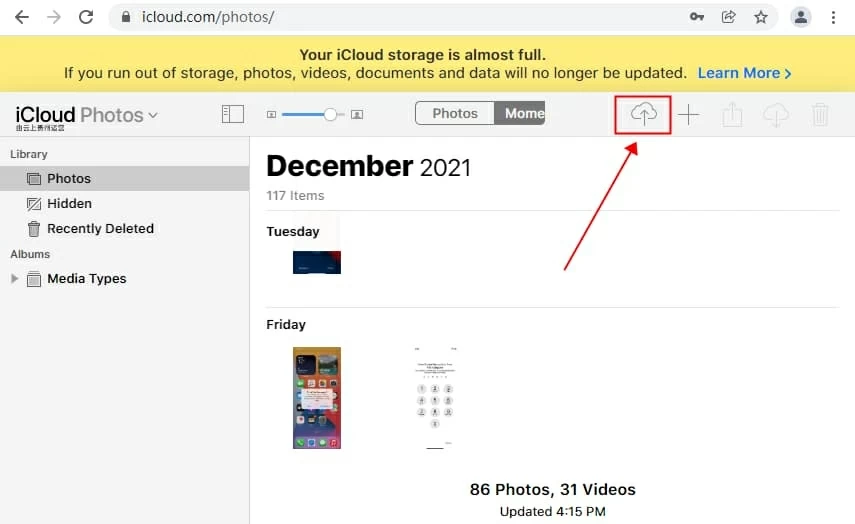
2. Move to your PC, visit iCloud.com in browser. Sign in with your Apple ID. Note that you need to log in to the same Apple ID on both devices.
3. Once you have set up the same iCloud account on your PC, click on the "Photos" button. Then hit the "Upload" icon that looks like a cloud with an upward arrow. Now you can select the pics from your PC and begin the process.
4. You're now done—your pictures are transferred.
Option 2: iCloud app
For the users who have already downloaded iCloud app on PC:
1. Follow the same as above to enable iCloud Photos on your phone.
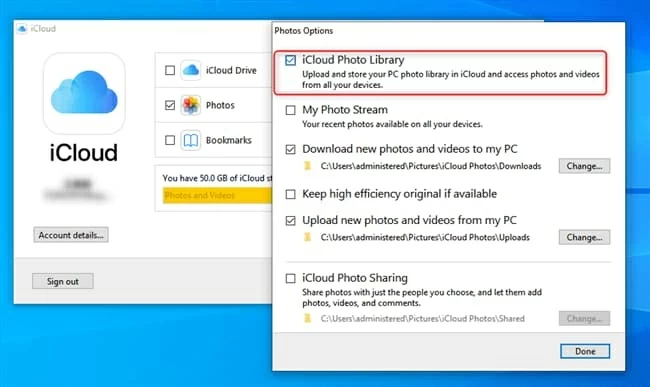
2. On your PC, open iCloud app. Log in with your Apple ID.
3. Go to "Settings" > "Photos" and turn on iCloud Photo Library.
4. Check the box next to "Upload new photos and videos from my PC." Click on the "Change" button to select the folder from which you want to transfer photos.
After uploading the photos, you can return to your iPhone and see all the newly added photos.
Keep in mind that every iPhone user with an Apple ID can only get 5 GB of free storage to start. If you need more, pay for the upgrades.
Other cloud-based methods
Apart from iCloud, there are also other cloud storage service you can use to sync photos from PC to iPhone. Each of the following methods works similarly to iCloud, but each has its own characteristics. Read on and pick a method that works for you.
Option 1: Google Photos
Unlike iCloud, Google Photos provides 15 GB of free storage for every Gmail ID.
Follow these steps:
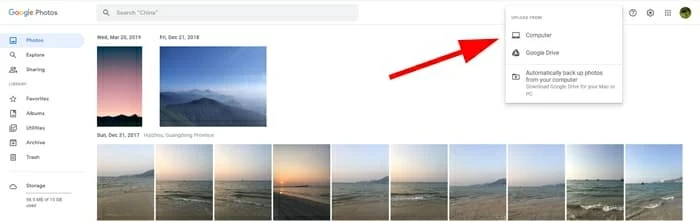
Visit Google Photos on your PC. Log in with your Gmail ID. In the top right of the window, click "Upload" > "Computer." Then select the photos that you want to transfer and click "Open" to confirm. You may be asked to choose your upload size. Choose "Original quality" or "Storage saver" as you like.
Go to your phone, open Google Photos app. You can download it from App Store if you haven't done so. Sign in with the same Gmail ID. You can see all the newly uploaded photos. You can simply download them to your iPhone.
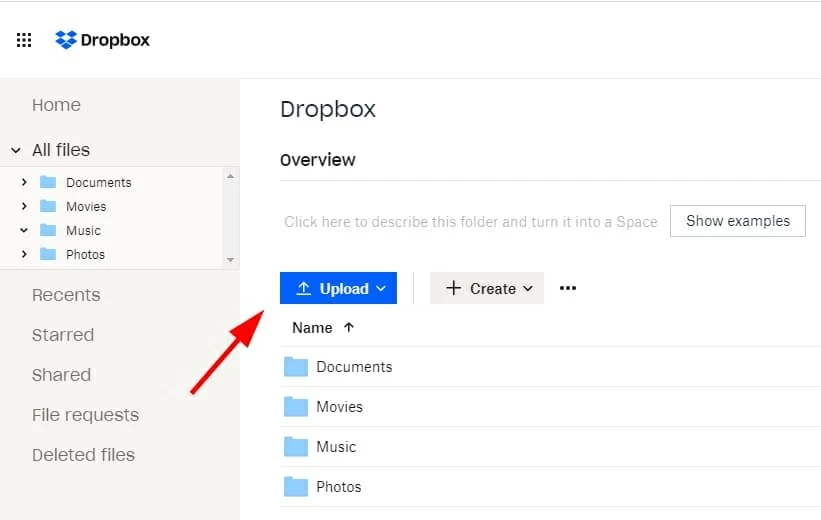
Option 2: Dropbox
Dropbox is also a cloud-based storage software that will help you get the photos transferred. Compared to Google Photos, it supports more data types than just photos. You can use it to transfer photos, videos, files and more from PC to iPhone. However, it only offers 2 GB of free storage.
First, you may need to download Dropbox on both devices. After that, you need to log in. Ensure that you are logging in with the same account on both devices.
On your computer, upload the photos to Dropbox by going to "Files" > "My files" > "Upload files."
Wait a few minutes for the process to complete. Then open Dropbox on your iPhone, you can see the new images. Feel free to download these photos to your iPhone.
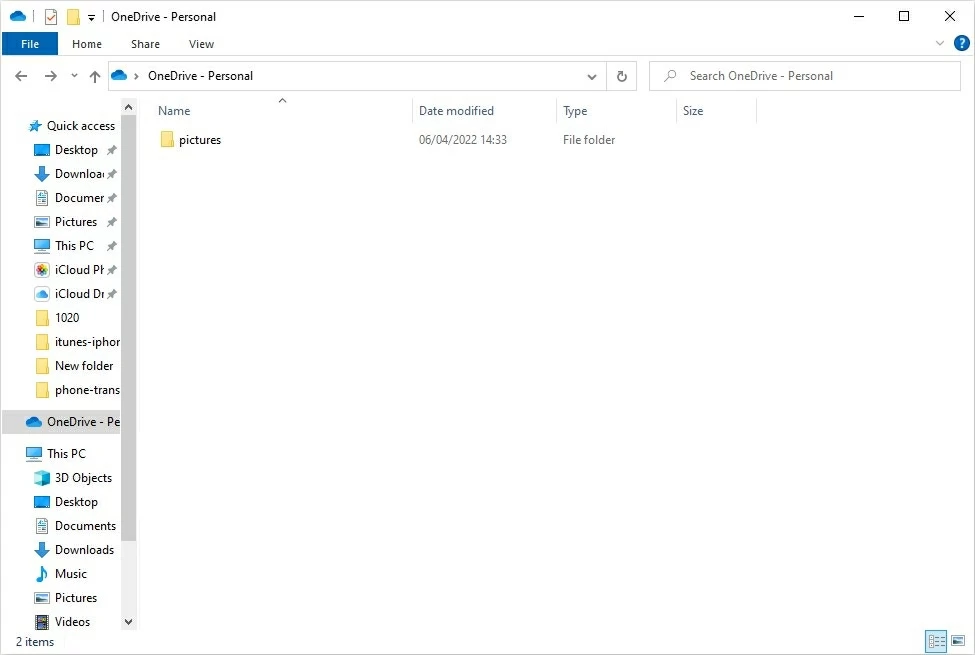
Option 3: OneDrive
Another cloud storage service that can be used to transfer photos from PC to iPhone is OneDrive, which, like iCloud, offers users 5 GB of free storage. This is a built-in program for Windows. Therefore, you don't need to download it on your PC but only on your phone.
1. On your PC, open File Explorer. From the left sidebar, choose OneDrive.
Tip: If you find that OneDrive has suddenly gone missing in File Explorer, follow these steps to get it back: press the Windows key and "S" key to wake up the search bar. Type "OneDrive" in the search bar. When you see OneDrive appear in the search results, click it.
2. To transfer the images, copy-paste the photos that you want to sync or the photo folder to the OneDrive folder.
3. After that, move to your iPhone. Open OneDrive, all of the pictures or the photo folders will display in the "Photos" tap.
4. Feel free to save them on your iPhone by tapping "Download" from the three dots menu.