
How to Recover Deleted Files from SD Card

We're here to help you recover a Word document in Windows 10, including how to recover unsaved Word document and how to find the lost file you deleted.

What you need to know when recovering Word document:

There're a few ways you can take to recover a Word document that was not saved or deleted from Windows 10.
If you have the Word document closed abruptly without saving when you're working on, all your work disappears. This random exit on Word application with the document not being saved might also be caused by system errors, program crash, or automatic restart of computer after update.
Losing an unsaved document in Word makes your sprits deflated. The same is true for accidentally deleting an important Word document you've saved on your desktop.
Luckily, there're multiple methods to recover unsaved Word documents in Windows 10, as well as recover the document that has been deleted permanently from the disk drive. We're starting off using MS's built-in recovery tools to get back the Word file you forgot to save, and then looking into the Recycle Bin to restore deleted Word .DOC or .DOCX to Windows 10 followed by carrying a data recovery program.
Part 1: Unsaved Word document recovery
Instructions in this part are applied to Word 2019, Word 2016, Word 2013, Word 2010, and Word for office 365. Note that Word 2007 and older versions Word are no longer working on Windows 10, and therefore, you may not be able to recover a document not saved.
Part 2: Deleted Word document recovery
If you lost the Word files after accidental deletion and cannot find them on the computer, skip to this part to get you work back.
Yes. Microsoft offers a few useful options for the Word to retrieve a document that was not saved, by the means of Temporary Files, Document Recovery, and AutoRecover Files feature. It's not guaranteed for sure that each method is succeed in finding your unsaved Word documents, but it's better than just giving up.
Is it possible to undelete deleted or lost Word document that was saved on your Windows 10 computer, and that was removed from Recycle Bin? Luckily, yes. When you empty the Recycle Bin, or the document was deleted using Shift + Delete shortcut, the file is still sitting in the hard drive and can be restore. Windows machine do not permanently erase data until new files overwrite the space on the hard drive allotted for deleted ones.
Don't Miss: How to Recover Files from Recycle Bin After Empty
The easiest solution is to arm yourself with data recovery software - in case you don't have backup to restore those missing documents on MS Word. Fiddling too much configurations on Windows 10 could overwrite the files.
Here are four handy ways for gaining access Word and recover the lost document you didn't save on Windows 10 properly.
Should Word keep a backup copy of the file automatically as long as the "backup copy" option is checked. The Word backup file ends with '.wbk' extension.
Before getting started, you need to first check if the "backup copy" option has been turned on:
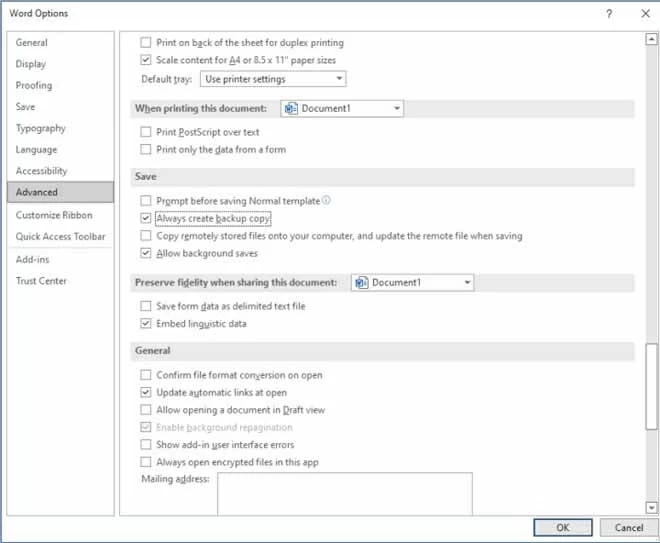
Windows 10 MS Word saves a backup version of a document you were working on without clicking Save button.
Now, you're ready to find the backup copy for the document. In Windows 10 Search box, type in .wbk and then press Enter to let the system find all .wbk files which are named as Backup Of followed by the name of your missing unsaved file. If you can see your document, double-click it to open it in Word.
If you're a subscriber of Microsoft 365, check the backup copy of your work in AppData folder. The
If your unsaved document cannot be found there, try next method.
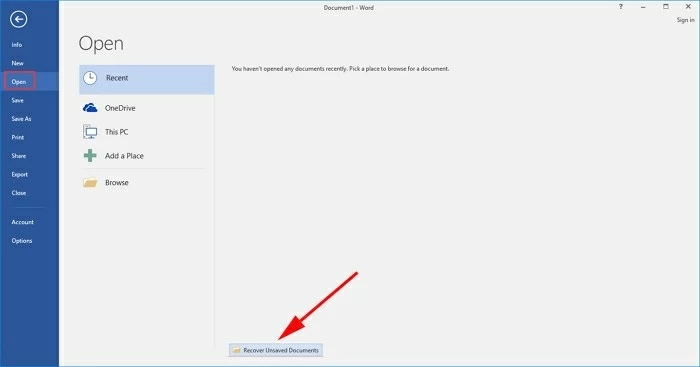
1. Within MS Word, click the File tab at the top left position, and then select Info.
2. Click Manage Document and from the pull-down list, choose "Recover Unsaved Documents."
3. When the UnsavedFiles folder opens, browse for your missing document, click on it, and then select Open located at the bottom.
4. Then recovered document should open in Word. Click Save As at the top when a message 'RECOVER UNSAVED FILE. This is a recovered file that is temporarily stored on your computer' promoted. You can also go to File > Save As to put it onto any location of your choice.

You can find and open unsaved Word document you're missing in Windows 10 system.
Tip: How to turn on AutoRecover to find missing content in Word documents
Always leave AutoRecover set to ON so you can recover your unsaved Word file after accidental loss due to a crash.
While you may not be able to restore document in Word through Recover Unsaved Documents or there's no unsaved file presented on the Document Recovery pane when the crashed Word application comes back online, you might be still be able to access the .asd file using AutoRecover and retrieve the last-changed files.
AutoRecover maintains your unsaved Word document in .asd format waiting to be retrieved in the storage. To recover a Word document that seems not to be saved from Windows 10:
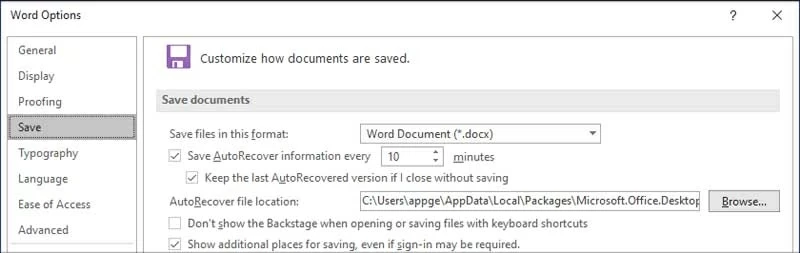
Step 1: Open a document in Word, Click Files, and choose Options at the bottom.
Step 2: From the pop-up Word Options window, click Save tab, and copy the AutoRecover file location path. Click OK button to close it.
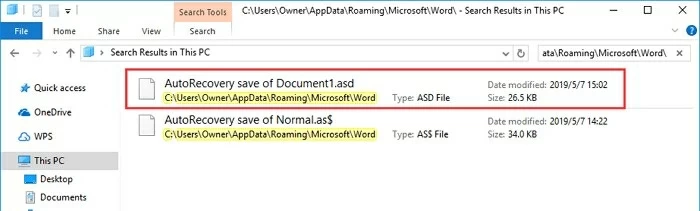
Step 3: Go to File Explorer, and paste the AutoRecover file location path you've just copied in the Search field.
Step 4: Locate the files ending in .asd. Find your unsaved document you want to get back and copy the .asd file.
Step 5: Return to Word app, click File, select Open and then click Recover Unsaved Documents at the bottom.
Step 6: Once a dialog box shows up, paste the copied .asd file into the File Name field. Click Open button to recover your lost unsaved Word and save it to local hard drive.
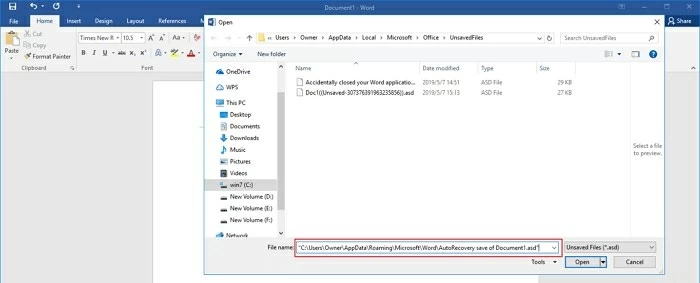
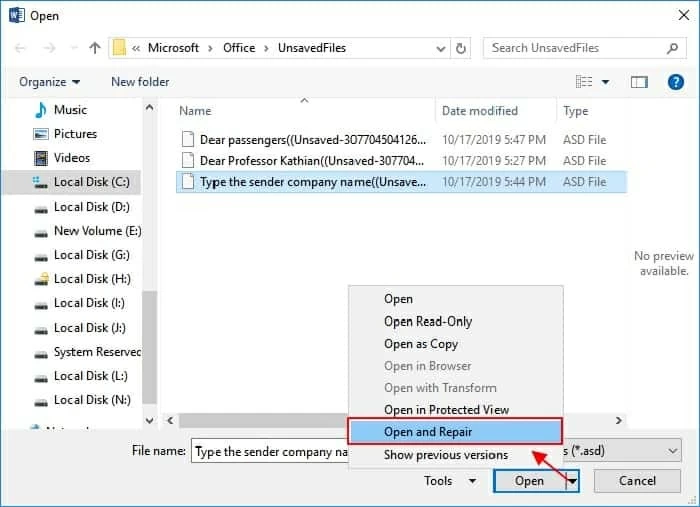
Note: If you're receiving the error "Word experienced an error...," return to the previous step. Click the triangle icon next to Open button, and select Open and Repair.
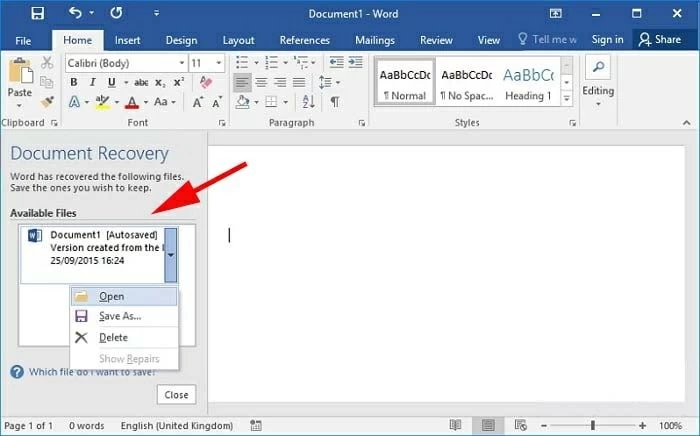
When everything is fine, restart Word and your unsaved documents are displayed under Document Recovery pane.
If a document you were working on was closed without being saved, either by a program crashing or just by accident, you may be able to recover it using AutoRecover feature by which to just reopen Word.
The AutoRecover feature is turned on by default and is capable of restoring unsaved Word documents in most cases when Word app or your Windows 10 computer gets well. You can find the Word document that wasn't saved to the disk effectively under Document Recovery in the left pane.
Once the Document Recovery task pane opens with your missing document listed, followed by launching Word, click on the file and choose Save As to get back the document to any folder of your choice on the Windows 10 PC or laptop, saving as a .docx file.
Here's how to locate the temporary files with .tmp extension in order to recover a Word document that is lost without saved in Windows 10.
1. Click Start and enter .tmp in the Search box.
2. Switch to Documents tab at the top.
3. From the search results, scroll through the files and skim through the file names. You can use your mouse to hover over each file and view the last few dates and times that you edited the document on the right pane.
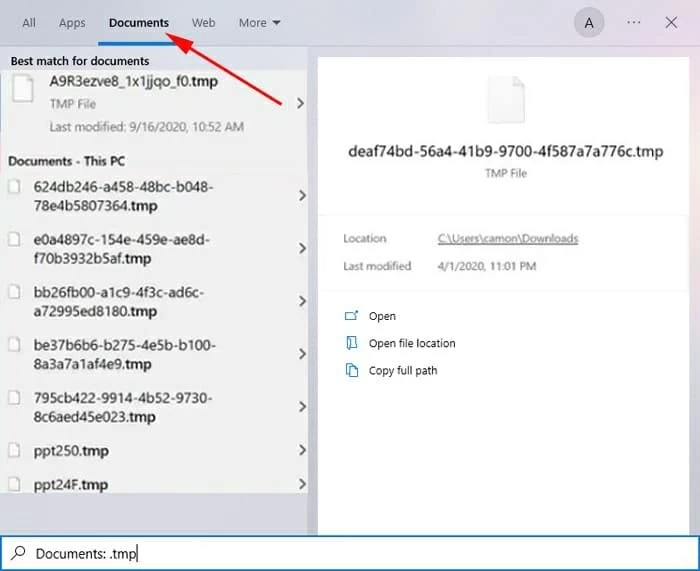
You can find your lost documents that were not saved by tracking the .tmp file based on the last modified date.
4. Now, open Word, click File tab. Select Open and then click Browse.
5. When the File Explorer window opens, change the file type to All Files, which sits next to the File Name field at the bottom.
6. Navigate to the folder where you just found the .tmp file in step 3.
7. Open the .tmp file.
So the document that you had not saved to disk are recovered with Word's built-in recovery tools. What if your saved Word file has been deleted accidentally? The good news is that deleted Word documents can be restored if you know how to find the items on Windows 10.
This part covers how to recover Microsoft Word document in Recycle Bin, and how you can retrieve the files when they're permanently deleted after Recycle Bin gets emptied.
Basically, if you delete a word file without emptying the Recycle Bin, you're able to restore the document easily.
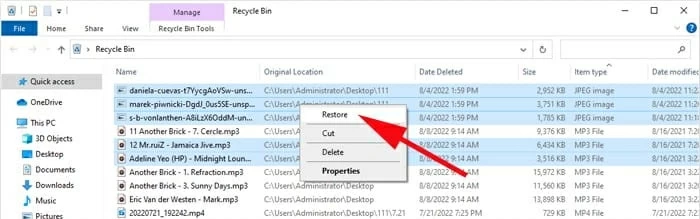
Open Recycle Bin on your computer running Windows 10, and look for the Word documents you deleted. Select the file, right-click on it and select Restore.
The lost document in Word should return to the folder where it stays in before the deletion. If you don't know the original location of the file, you could alternatively drag and drop to the desktop.
Look into your Recycle Bin to see if your missing Word documents are there.
If the Word documents are no longer in the Recycle Bin, and can't be located via the backup, they seem to be permanently removed - but there is still one last string of hope of getting them back.
Data Recovery is a professional and effortless file recovery tool that can be used as a last resort. The only caveat is that it will work only if your Word documents haven't been overwritten by other data. So act quickly and execute a Word recovery once the accidental deletion or loss occurs.
Thanks to a slew of advanced features coming with the software, you can restore all of your deleted Word docs, as well as Excel files, PDF files, photos, video, audio files and other files on the Windows 10's hard drive. You'll be able to preview Word documents before recovering them. The app can handle file recovery in external drives.
Keep in mind that this method works for recovering deleted or lost Word document that has been saved on the Windows 10.
Step 1: Run the software
Start by double-clicking the program's icon to launch it on your Windows 10 computer.
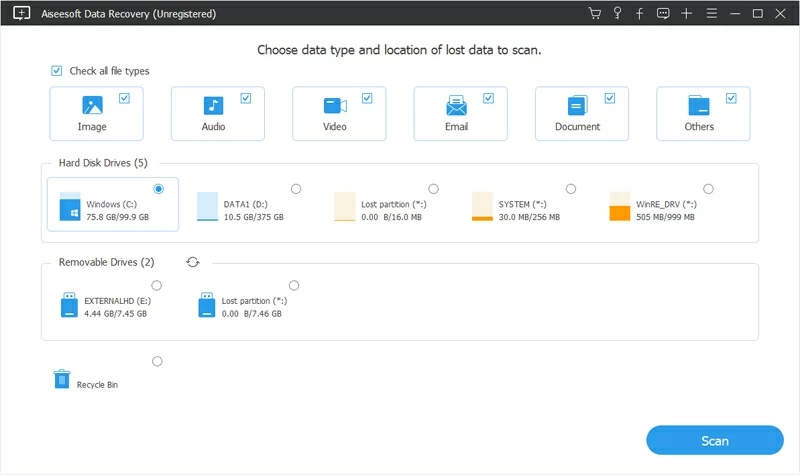
Step 2: Choose 'Document' and the drive where the deleted doc lost from
Highlight the 'Document' option for Word recovery.
You'll also need to tick the box of the disk drive where contains the permanently erased Word files in Windows 10 you wish to recover. The software is able to recover the deleted file from the Recycle Bin until you check the 'Recycle Bin' option.
Proceed by selecting the Scan button.
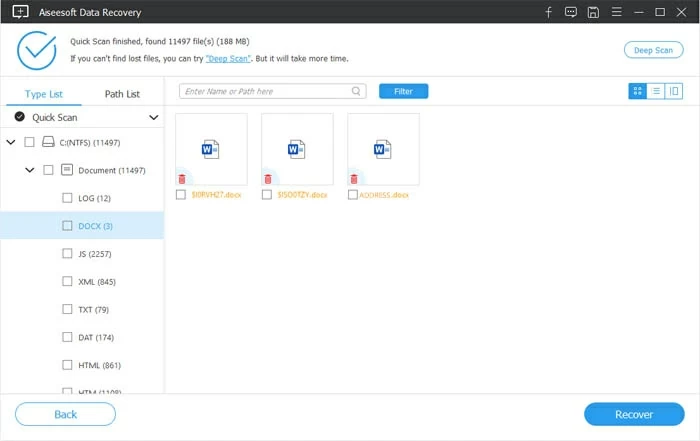
Step 3: Scan for Word documents
After the scan, the utility presents an organized list of document files and folders. To recover the Word you deleted from Windows 10, click DOCX category and locate the lost document.
If nothing turns up in the initial rapid scan, you can press the Deep Scan button at the top right corner of the interface. The full scan begins and takes a few minutes to find your office files.
Step 4: Retrieve all documents in Word on Windows 10
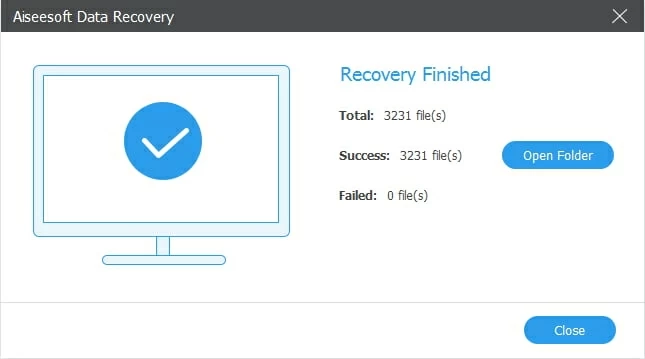
Once you find your deleted Word documents, place a tick in each checkbox next to the file name.
Hit the Recover button. Before the recovery process begins, you'll be prompted to specify a location for saving the recovered Windows 10 Word documents. You'd better store the files to a different hard disk.
Then you're good to go. All selected Word documents are restored.
Windows 10 has a lot of features that help reduce the chance of losing files due to accidental deletion or Recycle Bin empty. When you delete a Word document and you can't restore it from the bin, you're able to configure the Windows 10 File Recovery command-line utility to get back the deleted data.
Having a backup before can also make recovering Word documents that you deleted permanently a breeze. File History, Backup and Restore as well as Previous Version are the practical backup & restore tools built into Windows 10 in case of data loss.
Windows File Recovery only works for retrieving lost or deleted files that hasn't been overwritten. Any new file writes to the space where your disappeared Word document resided could render the odd of recovering the DOCs to ZERO.
Notice: This app is only running on Windows 10 build 19041 or later, and Windows 11.
Download and Install the app from Microsoft Store. Run it and the Command Prompt window opens, reading the Regular Mode and Extensive Mode, as well as the examples of its basic syntax:
winfr source drive: destination drive: [/mode] [/switches]
For instance, in order to recover your Word files from C: drive to the recovery folder D: drive in Regular Mode, type this command:
winfr C: D: /regular/ n *.docx
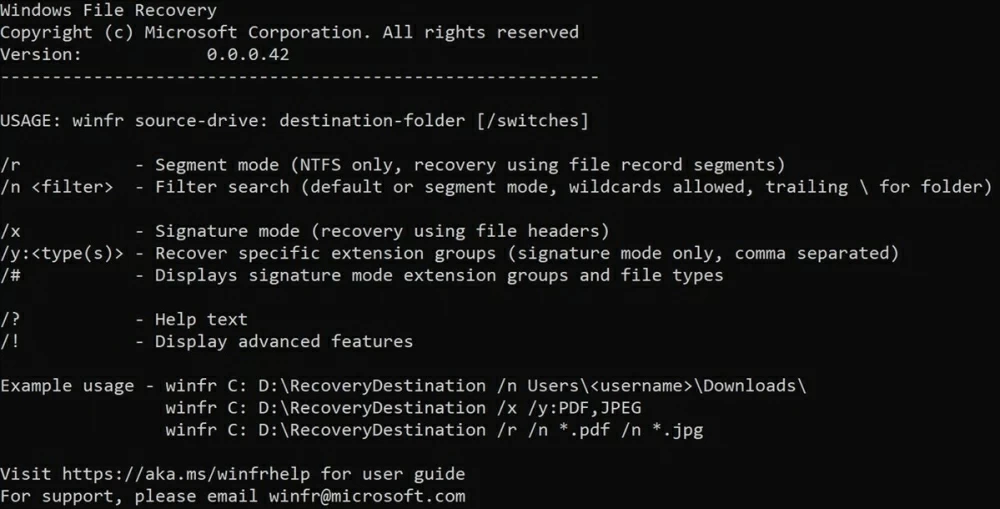
Use the correct command to scan for a specified Word file and recover it.
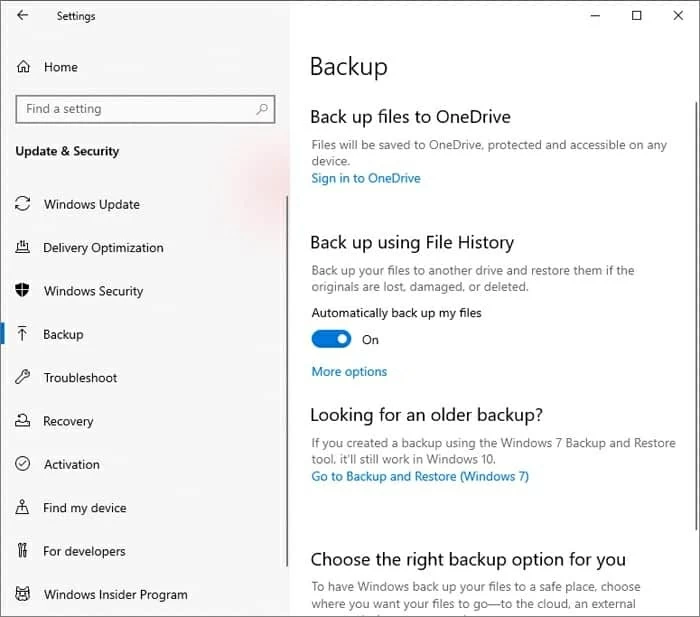
It's always a terrible tragedy when someone loses something important because you didn't save the document properly. If you have not yet kept a backup of your Word files, just back them up right now using an external drive.
In the Start menu, choose Settings, select Update & Security and then Update. Click Add a drive. Connect your drive to the computer and select it for saving your backup. Then, make sure "Automatically back up my files" option is toggle ON.
If File History has been turned on, you can easily restore your deleted or lost Word files in Windows 10.
Assuming that the File History feature has been enabled on Windows 10/ 11 before you had deleted the Word documents, go ahead to do the restoration with these steps:
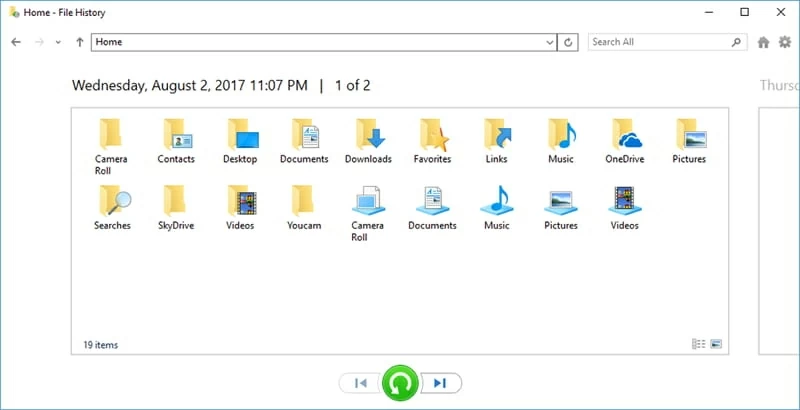
Restoring Word documents from Windows 10 File History backup could bring back your important data.
Read Next: How to Recover Permanently Deleted Files in Windows 10 without Backup
If you used Windows Backup to back up your files on Windows 7, you can still use your old backup to get back a Word document in Windows 10 or Windows 11 if you can't find it on the computer local storage or you accidently modified or deleted it.
[Also Read: Lost Word Document in Windows 7? Here's How to Get It Back]
To restore Word files from backup, go to Control Panel, select System and Security, then click Backup and Restore (Windows 7.) On the pop-up window, choose Restore my files. The file recovery should start.
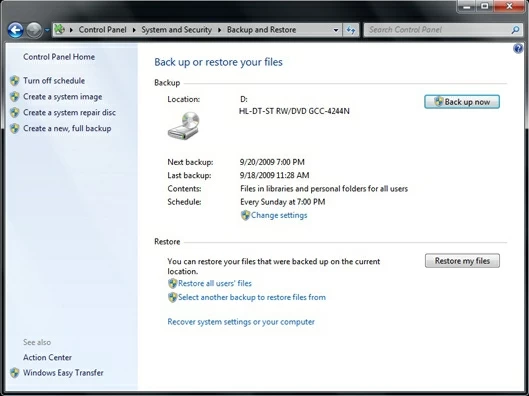
Windows 7's Backup and Restore feature is still available on Windows 10 or Windows 11 machine.
Start by running Command Prompt with an administrator privilege. In the Search box on the taskbar, enter "cmd", and select "Run as Administrator."
Type "chkdsk X: /f" in the Command Prompt window and hit Enter. Replace "X" with the letter of your hard drive.
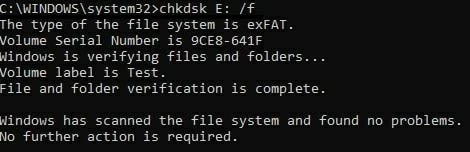
Type "ATTRIB -H -R -S /S /D X:*.*" and hit Enter on your keyboard. Remember to replace "X" with the letter that represents your hard drive.
![]()
if you use the command correctly, the recovery procedure should begin. Don't use your computer which the recovery is running because you will overwrite the lost Word documents and make them irretrievable.
Q1: How do I recover an unsaved Microsoft Word document in Windows 10?
Recovering unsaved Word documents requires only a few steps:
1. In MS Word's navigation bar, click File > Info.
2. Click Manage Document, then from its drop-down list, choose Recover Unsaved Documents.
3. A file explorer window opens with all files you didn't save in Word.
4. Locate your missing file and click it to open in Word.
5. Hit Save As button when prompted at the top.
Q2: Why has my Word document disappeared?
It's a great pain if a Microsoft Word document is disappeared. The loss of the Word files with the changes not being saved can be caused by a forced quit, accidently close, system crash, power interruption and other unexpected incidents.
Deleting Word document you didn't mean to or emptying the Recycle Bin can also result in file loss. The good news is that you're able to retrieve the Word documents, no matter they're missing before getting saved, or they're deleted.
Q3. How to recover unsaved documents for Word 2016?
Office 2016 application automatically saves the backup of the file in regular intervals, which allows you recover your unsaved document.
Q4. How to recover unsaved Word document office 365?
To recover Word document not saved in MS office 365, you need to use the Recover Unsaved Documents feature. You can find the option through File > Info > Manage Document.
Q5. How to recover unsaved Word document recovery on Mac?
Solution for unsaved Word document recovery in Mac: AutoRecover (It's enabled by default in Word for Mac.)
Step 1: Open Finder on your Mac.
Step 2: Type in AutoRecovery in the search field at the top. You will see a a list files. The file name should begin with 'AutoRecovery save of.'
Step 3: Find the Word doc you want to recover. Double click on the file to open it in Microsoft Word.
Step 4: Click File tab and choose Save As. Rename the recovered document and pick a folder to save it peacefully.
User can also navigate to AutoRecovery folder on Mac to find the lost document - even if you haven't saved it yet. In Finder window, select Go > Go to Folder. Then enter the following path:
/Users//Library/Containers/com.Microsoft/Data/Library/Preferences/AutoRecovery
If the Word doc was missing because you deleted it, you need to check the Trash and put it back to the folder where it was originally stored.
Find nothing in the Trash? Use the Time Machine backup or carry a data recovery software application to have the deleted Word files back. Data Recovery for Mac can scan your drive for free and display all files that can be retrieved.