
How to Screen Record on Windows 11

Is there any way for Mac users to record the computer audio easily? Check out this guide for simple and tested methods to record internal or external sound on your Mac!

What to do if you want to record computer audio on Mac:

Use either the pre-installed tool or third-party audio recorders to capture computer audio from Mac.
We're living in a time when a large number of events have been shifted to the digital world. The communications particularly business meetings, interviews, and educational lectures are being handled online, so there will be different scenarios where you'll need to record audio on Mac.
Regardless of the reasons, knowing how to record internal audio on Mac is a necessary skill. However, if you've ever tried to record computer audio on your Mac, you probably know that Apple doesn't allow users to capture internal sound from macOS for privacy and security reasons. But don't worry, in today's guide, we'll share various audio recorders for Mac users to capture the internal system sound, external microphone audio, or both.
Table of contents:
First of all, there's a built-in audio recorder on macOS - QuickTime Player - through which you can easily record computer audio on Mac and listen to it anytime. This convenient tool can record any audio from to your Mac's microphone (or an external one) and is able to record internal audio on Mac if you have configured the plugin Soundflower.
As QuickTime Player is already available on macOS, you can easily record computer audio on Mac to capture a speech or an interview. Also, it's absolutely free and user-friendly. You don't have to go through any complicated process to get computer audio recorded on Mac. What's more, it also allows you to edit the Mac internal audio recording before saving it for future listening.
Step 1. Launch QuickTime Player from your Mac's Applications folder. You may also search QuickTime in the Launchpad to open it.
Step 2. At the top menu, click on File and select New Audio Recording from the drop-down list.
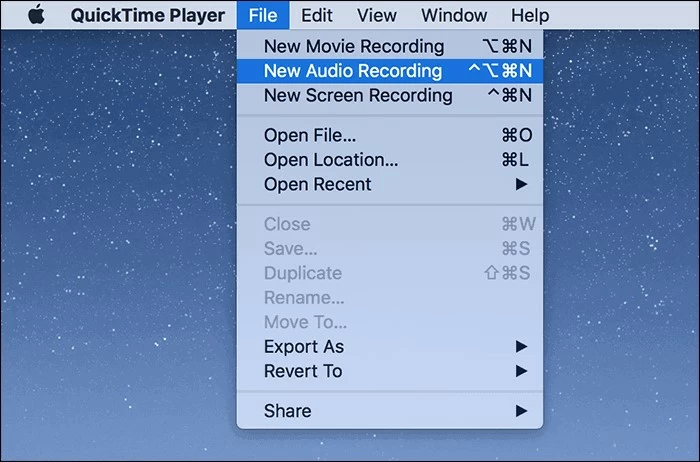
Open QuickTime Player and select New Audio Recording to record sound on Mac.
Step 3. Adjust the recording settings in Audio Recording controller.
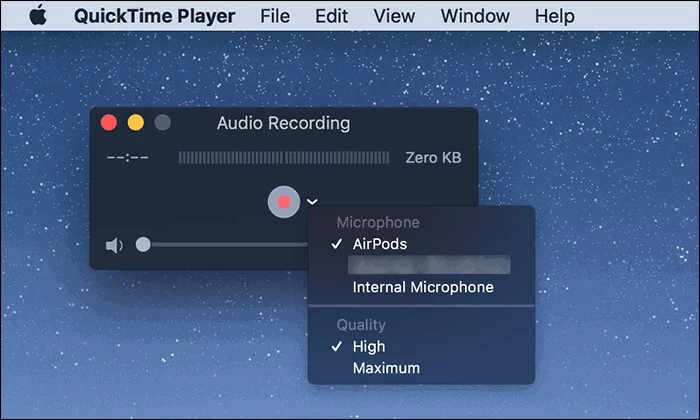
Set recording source and quality before starting Mac audio capture.
Step 4. When you're ready, click on the Record button to start. The floating toolbar will show you how long the recording is and how large the file size is.
Step 5. Once done, click the Stop button to exit recording mode. There should be a preview window where you're allowed to play, edit and trim the audio file you just recorded.
Step 6. Save the audio recording on your Mac. Go to File > Save to, rename the file and save the captured audio on your Mac.
While recording Mac audio with QuickTime Player
If you're looking for a convenient and efficient way to record computer sound or external audio in various formats, AppGeeker Screen Recorder is the perfect choice. This user-friendly tool simplifies the whole recording process, allowing you to choose whether you want to record your Mac audio, Mac screen, or capture Mac screen with audio at the same time.
With this Mac audio recorder, you can effortlessly record internal audio from your Mac while capturing your voice from the microphone, which makes it a great tool for recording system sound, media audio, online calls, video conferences, and more. Additionally, it offers the option to enhance and mix Mac computer audio and microphone inputs simultaneously, letting you export audio recordings in the desired format and quality (up to lossless).
How to record computer audio on Mac with AppGeeker Screen Recorder:
Step 1: Launch Screen Recorder on your Mac. To capture an audio-only recording, simply select the Audio Recorder option.

Step 2: Enable the System sound for Mac audio capture. If you need to add your own voice, turn on the Microphone option as well. For more audio recording settings, click the top gear button to configure the output format and audio quality.
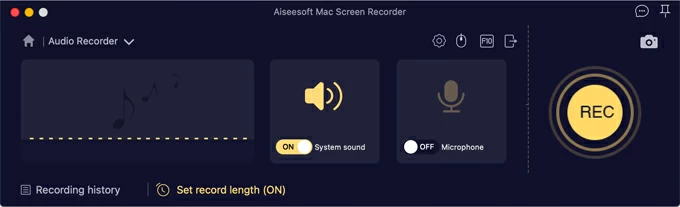
Record Mac's audio from system or microphone.
Step 3: Play the audio file you want to record and press the REC button to start. The floating bar shows how long the recording is and how much storage space it will take up.
![]()
You can pause and stop the Mac audio recording whenever you want.
Step 4: Once the audio is recorded, click on the Stop button. Play and clip the audio recording as you want, then export and save it on your Mac directly.
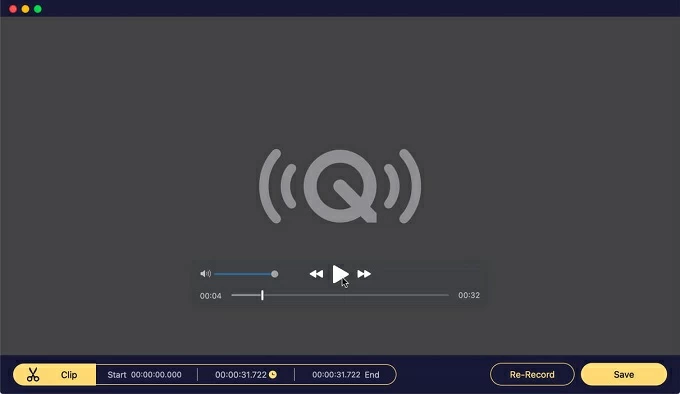
Play the recording result and click on Save option to save it on Mac.
Using this Mac screen and audio recorder, you can easily capture anything playing on your computer and record MP3 on Mac or in other audio formats. It also provides basic editing tools to create better audio and screen recordings.
Video guide for computer audio recording on Mac
Although Apple has its own built-in audio recording software for Mac users to make audio capture, it's not allowed to record Mac's internal sound directly. So, what to do when you want to record computer audio from Mac? Well, scroll down to check out these helpful and free internal audio recorders for macOS to capture computer audio or external sound with ease.
A popular audio recorder for Mac users is the third-party tool Audacity. It's an open-source application and generally used by those who want to record high-quality audio files and make basic audio editing. Audacity supports audio-only recording on Mac. If your work includes any screen-capturing task, try the last method above.
Audacity is capable of both audio and voice recording. However, to capture computer sound from a Mac, you'll need an extra helper – Soundflower. With these two on your Mac, you can now start recording computer sound from your macOS and export the captured audio file into different formats. Let's explore how to record internal audio on your Mac using Audacity:
Step 1. Install the Soundflower application on your Mac and open it.
Step 2. Click the Apple icon and go to System Preferences > Sound, where you need to click the Output tab and select Soundflower (2ch) as the output device.
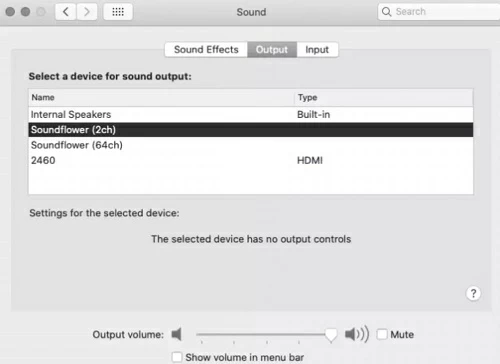
Use the Soundflower as the output device on Mac.
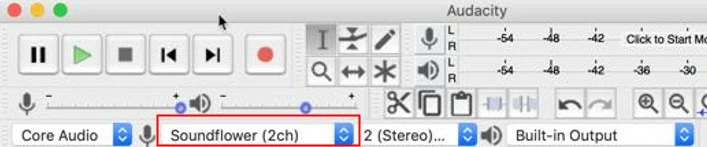
Step 3. Launch Audacity and set Soundflower as the recording device. To do it, click on the Audio Setup > Recording Device and select Soundflower (2ch).
Step 4. Now, press the Record button and play the audio that you wish to record.
Click on the Start button to record internal sound on Mac with Audacity.
Step 5. When the audio recording finishes, click the Stop button.
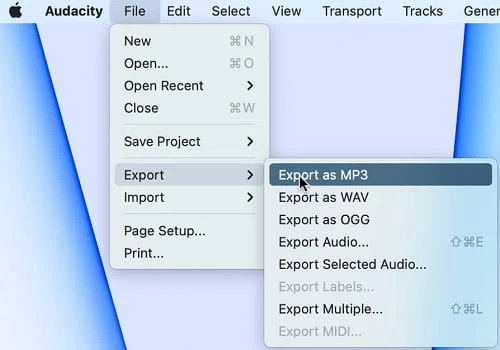
Step 6. Save the internal sound recording to your Mac by selecting File > Export. There are multiple formats available to export the audio file you just recorded on your Mac.
OBS is also quite a popular video and audio recorder that is frequently used by bloggers and influencers. It is a free application you can easily use for screen and audio recording audio on Mac. Different from other Mac audio recorders, OBS records both the screen and the audio on your Mac. It's not possible to record your computer audio alone. But the good news is that you can convert the captured video into MP3 or other audio formats after recording from your Mac.
Note: There's no direct access for OBS to capture system audio on Mac internally, so you may need an extra plugin like Soundflower to help, or use a more advanced tool to record internal audio on Windows 10, PC or Mac directly.
Step 1. Download and install OBS software on macOS.
Step 2. Open the Apple menu > System Preferences > Sound, and select Output > Soundflower (2ch) from the Output tab as the output device.
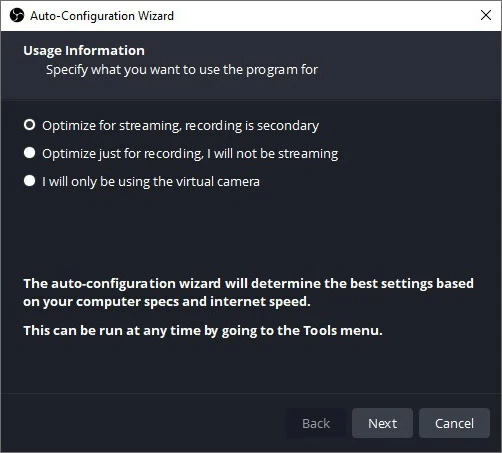
Step 3. Run OSB Studio and make basic settings. To make it easier, you may select Optimize just for recording, I will not be streaming to enable the auto-configuration wizard.
Step 4. Click the add + button at the bottom in the Source section and add a new recording source by selecting Display Capture. Rename it and click on OK.
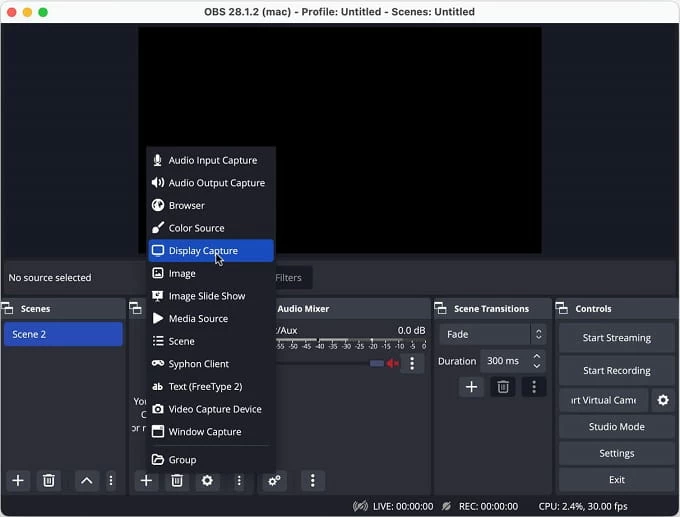
Select Display Capture from Source section to create a new recording source.
Step 5. From the left Controls, hit Start Recording button to begin audio recording. Once done, select Stop recording and save the file to your Mac.
As evident from its name, Easy Audio Recorder Lite is an audio recording application for Mac that allows users to record computer audio as easy as possible. It's a lightweight recorder you can easily get it online. The only drawback is that you will have to set up the Soundflower first before you can record system audio on your Mac.
To proceed, in Apple menu bar, hit the Apple icon > System Preferences > Sound, and choose Soundflower (2ch) as the output device. This will allow Mac audio recorder to capture the sound coming from macOS instead of the microphone. Follow the steps to record Mac internal audio:
This guide presents some of the best audio recorders for Mac users. You can compare them and choose which one is the most suitable for you. If you want a simply solution to record either internal or external audio on your Mac, don't miss the AppGeeker Screen Recorder which provides audio recording in lossless quality. And it's the only direct solution among the above methods to capture internal audio on your Mac computer without using additional add-ons.
Q1: How do I record internal audio on my Mac?
Mac users can try the following solutions to record the internal sound on computer:
Q2: How to capture internal sound with QuickTime Player?
To record internal audio with QuickTime Player, get Soundflower app on your Mac first. Then from the top menu bar, click Apple > System Preferences > Sound. Then select Soundflower from the Output option.
After that, run the QuickTime, select File > New Audio Recording. Click the drop arrow and select Soundflower as the source audio from Microphone. Once done, click on Record button to start recording. When finish, press the Stop button and save the audio file.
Q3: Can I record both computer screen and audio on Mac?
Record computer screen and audio simultaneously using AppGeeker Screen Recorder in 4 steps:
Once done, you can preview the screen recording and save it on your Mac.


