
How to Screen Record on Windows 10 Desktop and Laptop

When you're trying to record your screen on Windows 11, use the built-in screen capture tools or try the 3rd party Windows screen recorders to capture desktop activities.

Summary: To record your screen in Windows 11 with either the system audio or microphone voice, or both, you can use the embedded Xbox Game Bar screen recording feature, or run a new-added Windows 11 recording ability in the Snipping Tool. You can also use a dedicated app, something like Appgeeker Screen Recorder, to record everything on your computer with ease.
Screen record in Windows 11 PC with built-in capture capability as part of the Xbox Game Bar and the Snipping Tool.
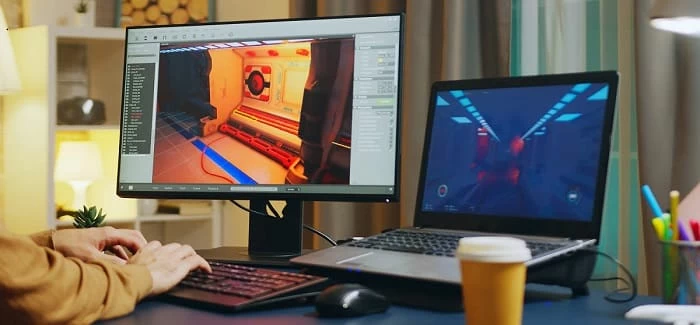
When you need to make an instructional video of the app on the desktop, or you want to share a wonderful moment while playing a game, screen recording in your Windows 11 will be the best and simplest option to capture what's happening on your computer screen. It may not be hard, but the process differs depending on what Windows 11 screen recorder you're running.
So if you've been wondering how to record screen on a Windows 11 desktop or laptop, this article is ready for you. we have put together several ways to help you expand your idea and capture the screen activity in your Windows 11. Also, for Mac users, Here's our detailed walkthrough on screen recording on Mac.
Table of Contents
When it comes to capturing screen in your Windows 11, Microsoft already includes a video recording tool that's built into Xbox Game Bar. The tool is mainly used for recording gameplay on Windows 11, but it can also take a screen recording of your other desktop activities. Through the Gallery entry in the Game Bar, you can easily access, view, manage and share the capture you saved, which ends in MP4 file extension, under a dedicated folder on your PC.
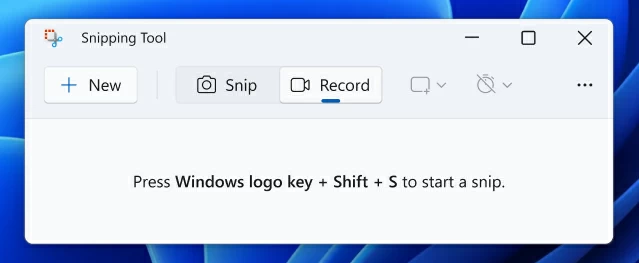
Update: the recent Snipping Tool update for Windows 11 PC's is integrated with a built-in screen recorder to produce a recording video of the entire desktop or an app. And you can now select and refine the part of the screen being captured before you start recording screen activity.
Tip: If there is no screen capture capability in your Snipping Tool, you can find the update of the tool on the Microsoft Store's Library.
If you're new to Xbox Game Bar, follow these steps to enable the tool in Settings and capture the screen with on your Windows 11 PC. You'll want to tweak some Xbox Game Bar settings to enhance your recording experience.
Pro:
Cons:
Set captures location
In your Windows 11 laptop or desktop, go to Settings > Gaming > Captures. You will get a list of options you can change for your Windows 11 screen recording.
By default, your captured videos will be saved in your user folder under Videos\Captures. If you'd like to change that default save location to somewhere much easier to access before recording activity, you can click "How to save to a different folder" link to learn how to do.
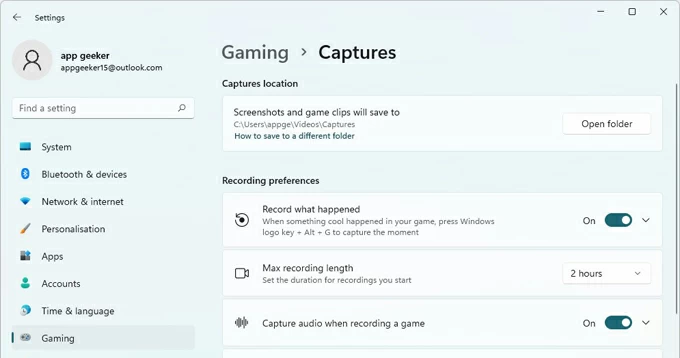
Change the location for your screen recordings in Settings.
Enable recording options
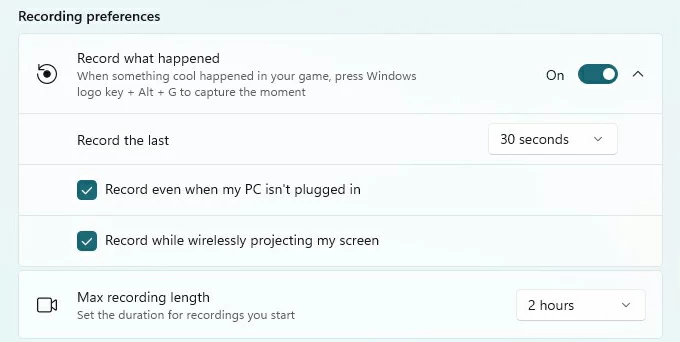
In "Recording preferences" section, you will want to toggle for "Record what happened" to On position. This will grant permission for Windows 11 to record screen activity in the background.
You can then determine how long you'd like the Xbox Game Bar to do its background recording. By default, it will capture the moment of the last 30 seconds of recorded sessions, but you can click the "Record the last" button and set the time to anywhere from 15 seconds to 10 minutes from the drop-down menu. This can be great for when you do something on your computer and then wish to save a short clip that just passed.
This neat feature comes with a Windows logo key + Alt + G shortcut to record the activity.
Customize the recording options before using Xbox Game Bar.
Next, if required, you may check the boxes next to "Record even when my PC isn't plugged in" and "Record while wirelessly projecting my screen."
Go ahead and define the value of "Max recording length." You can set the duration for a recording to 30 minutes, 1 hour, 2 hours, or 4 hours. Once your screen recording on Windows 11 goes to the maximum of the length, Xbox Game Bar ends its capture task automatically.
Control the audio during a screen recording
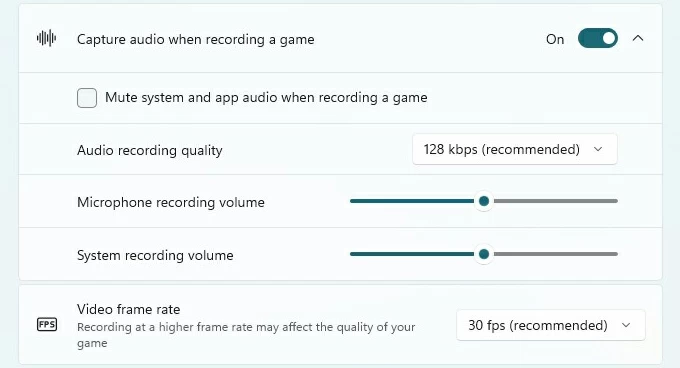
In most cases, you do want to include audio in your Windows 11 recording screen jobs. Simply move the toggle for "Capture audio when recording a game" to On position to enable it. You can then further tweak the audio recording options by clicking the drop-down arrow.
In the expanding panel, you're able to choose value from "Audio recording quality." It defaults to 128 kbps, but you can change it to 192 kbps from the list.
It also enables you to slide the scroll bar to adjust the volume for your microphone, and the recording volume for your PC internal sound separately.
capture and control how you can want to record audio.
Tip: If you're capturing a gameplay on your Windows 11 and don't want system and app sound to be captured, you may tick the "Mute system and app audio when recording a game" option to turn off all of the non-game sounds..
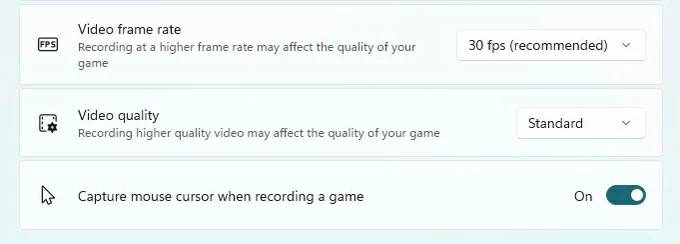
Control the video during recording screen
In this part, Xbox Game Bar gives you ability to control the performance of the video while capturing the screen on Windows 11. You can set the video frame rate (fps) and video quality as you like. We highly recommend you leave it at the default settings, which are good enough for most screen recordings.
Disabling "Capture mouse cursor when recording a game" feature or not depends on whether you're going to grab a gameplay or just record a common application. If you're in a video presentation or a meeting, keeping and highlighting mouse cursor is a great way to help your viewers to follow you.
Also Reading: How to record videos from YouTube on Mac
Define whether to capture mouse cursor or not during screen capturing.
Once you've get everything ready, it's time to learn how to record your screen on Windows 11.
For Windows 11 users, the inbuilt Xbox Game Bar lets you capture from screen and gives you options to grab audio from system or/and your microphone, or mute the voice while recording at your wish. Let's see how it works.
1. Run the app that you want to capture on Windows 11 desktop.
2. To start a screen recording, press the Windows key+Alt+R shortcut.
You will see a small float bar appear on the screen showing capture process.
Alternatively, you can launch the Xbox Game Bar and capture the screen the normal way. To do so, press the Windows key+G to open the tool on your Windows 11 PC, and its top toolbar should appear, looks like the image below. It includes a list of different menus, such as Widget, Audio, Capture, Performance, Resources, and Xbox Social.
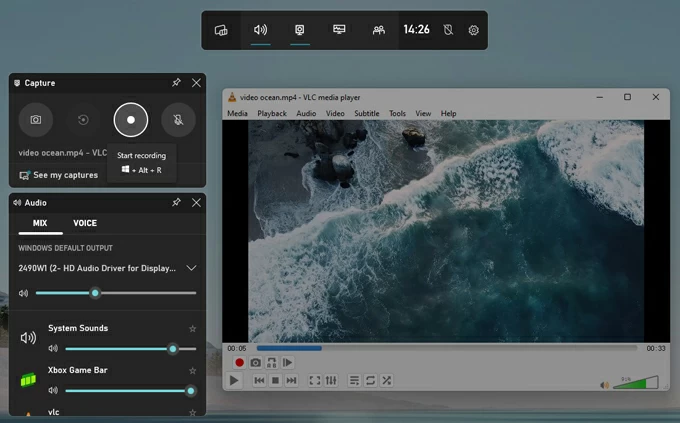
Open Game Bar on your app screen.
Then click the camera icon on the toolbar to open the Capture widget. From there, click the Record button (a white circle with solid dot in it) to begin a recording.
3. Perform the screen activity, and enable audio recording with your microphone.
You'll want to keep both the Capture and Audio widgets appearing on the screen while recording on your Windows 11, this way you can have a quick start, pause, and stop the capture, as well as control when audio is recording or excluded during your screen capture.
While capturing your screen activity, a small recording float bar appears in the upper right corner of the app screen you're recording, and shows the amount of time it has recorded.
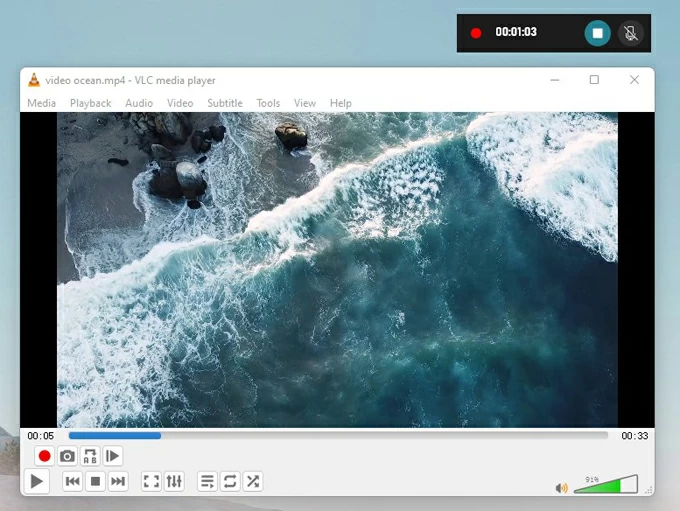
You will view a small float bar to monitor your recording on the screen.
4. Press the Windows key+Alt+R to stop the recording.
You can also hit the Stop button in the Capture widget when you no longer need to capture the screen activity any more.
That's it! You've successfully completed screen record on Windows 11 machine.
Also Reading: How to transfer videos to iPhone from Windows 11 PC
There are two ways to access and preview your new recording created with Xbox Game Bar.
In Xbox Game Bar Gallery
When you stop recording activity, it will pop up a "Game clip recorded" message immediately.

If you click on that message (or press Windows key+G), it will get you into a dedicated folder named Gallery where you can check the details of the recording you just created, including name, date and time. You then can play, rename, delete, and share to social media.
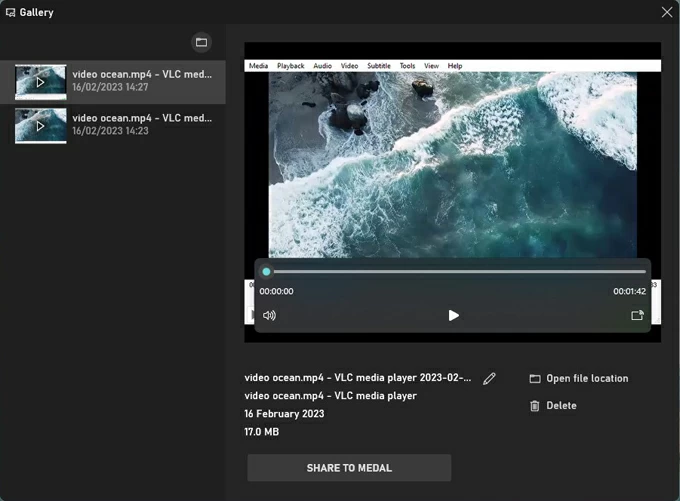
Access your recorded video clips.
You can also use Windows key+G to re-open the Xbox Game Bar, then click Gallery from Widget menu to view your recorded videos; or click "Show All Captures" at the bottom of the Capture widget.
Use File Explorer
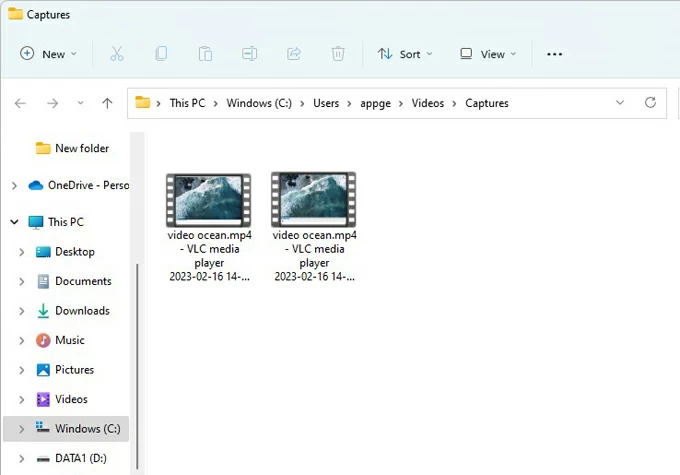
Alternatively, open File Explorer on computer, under This PC click Videos in the left navigation pane, then click Captures folder. There you'll find all the recordings saved as MP4 files.
Your captured videos are stored in c:\users\[username]\Videos\Captures on Windows 11.
Xbox Game Bar saves your recordings in Videos\Captures by default.
Using the various keyboard shortcuts makes the whole process of recording the Windows 11 screen activity more easier and convenient. One of the most handy features in Xbox Game Bar is the ability to tweak several keyboard shortcuts to control your screen capturing tasks.
In Windows 11, open the top toolbar of Xbox Game Bar, click the Settings icon on the far right side. You then can view and set up your own custom shortcuts.

The following are the default shortcuts for Xbox Game Bar recording.
Taking high-quality screenshots of a Windows 11 computer can be very simple with its built-in Snipping Tool. And now with the new update of version 11.2211.35.0 in this screenshot utility, you are able to capture screen of the entire desktop or an application you're running.
Below we'll walk you through how to record your screen on Windows 11.
Pro:
Cons:
To use this Snipping Tool screen recorder on Windows 11, follow these steps:
1. To get started, open Start menu on Windows 11.
2. Search for Snipping Tool and click the top result from the Best match section to open it.
3. In Snipping Tool interface, Click the Record button.
4. Next, click the New button.
5. Drag to select an area on the screen to capture.

6. Click the Start button to begin Windows 11 screen recording session.
7. When it's finished, hit the Stop button.
8. Preview your recording in the opening window.
9. If you are satisfied with the screen recording, Click the Save button in the top right corner.
10. Navigate to the location where to store it, and click the Save button again.
You will get a recording file with MP4 format that you can then play, save, and share with others.
While you can choose from built-in Windows 11 screen recorders for recording something that is happening on your computer, there are many of excellent third-party applications available to capture screen activity. Among them, Appgeeker Screen Recorder is our favorite because of its rich functions of recording and flexible controls.
Pros:
Cons:
Step 1: Launch the application on your PC, and run the app you want to record.

Step 2: Click "Video Recorder" tab in the main interface.
Step 3: In the next window that opens, select your recording option.
First, you'll want to select the recording area. You can choose a Full Screen mode, or choose Custom mode and then drag to refine the section of the screen you wish to record.

Next, select what type of audio to grab along with your screen capture on Windows 11. By default, it records background sound from system, but disables the voice from your microphone. You can change that if necessary.
If you want to include a webcam in your recording to create picture-in-picture video, make sure enable "Webcam" tab.
Step 4: You're now ready to start recording! Click the orange "REC" button located on the right corner. The screen capturing begins and shows you a float bar monitoring the process. You can now perform any activities on the screen until you have captured what you want.
![]()
Step 5: Press the "Stop" button when you want to end recording.
Step 6: Review, trim, edit and save the recording file.
For full instructions on how it works, see this detailed screen recording user guide.


