
How to Screen Record on Windows 10 Desktop and Laptop

Using the native or 3rd-party audio recorders for Windows and macOS, you can record sound from your computer and save the audio files in high quality and in various formats.

What to know for sound recording from computer:

Recording sound from computer is quite easy if you use a proper tool on your Windows or Mac.
We cannot deny that every one of us, once in a while, needs to record sound from computer for later use. You may want to record audio from a YouTube video, or capture sound from an online meeting, or you'd like to record your own voice or music and keep sound tracks on your computer.
Undoubtedly, the sound recordings benefit us a lot as they contain much useful information that we can access at any time. In this guide, we'll show you how to record sound from computer in a few different ways. You can follow proper steps to capture sound on your computer with ease:
In fact, various methods can be used to record your audio on computer. Using the built-in tools on your computer is probably the easiest one through which you can capture the sound easily without requiring any additional applications.
If you're using a Windows PC, you can access the pre-installed Voice Recorder (Sound Recorder) on your computer. The Voice Recorder has the ability to detect the sound from your computer's microphone and convert the captured audio into digital sound.
You can open the Voice / Sound Recorder on your PC and use it side by side with other applications running on your computer. To create a new sound recording, follow the steps:
1. Open the Start menu and find the Voice Recorder.
You can also search for Voice Recorder in the search bar at the bottom.
2. Click it to open the voice recording program.
A blue colored microphone icon will show up in the center of your computer screen. In case you have used the recorder in an earlier time, the icon will appear on the bottom left corner.
3. The audio recording will begin by clicking on the blue microphone button.
Your computer will record the sound through its own microphone or an external one. The recording length will also be visible. Click on the Pause button if you want to pause the recording and start it again after a while.
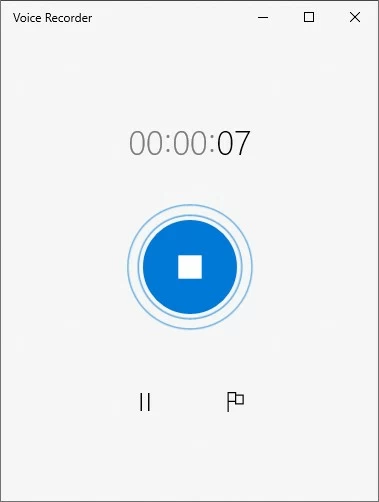
Record sound with Voice Recorder on computer.
4. Press the Stop Recording button to stop recording your microphone audio.
The recorded file will emerge in the left sidebar. You can play and share the recording, or trim and rename it as you want. To access the location of the saved audio on your computer, click the horizontal dots at the bottom and select Open the Location option. You will find your newly created sound recording in M4A format in the folder.
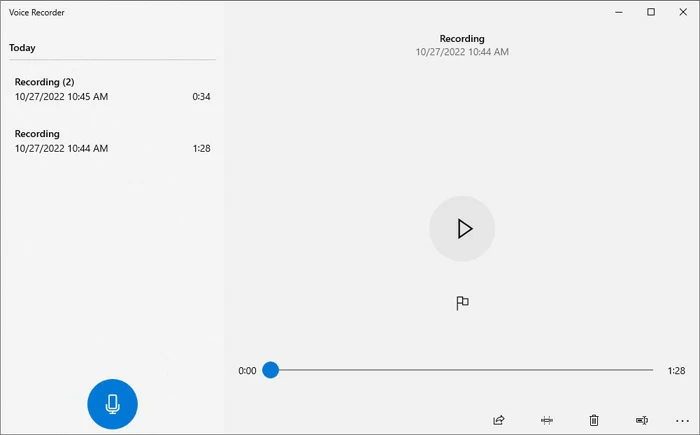
You can record audio, and play, share, trim, delete, or rename the recording results in Voice Recorder.
If your computer does not have any attached microphone, the sound recording will not be able to start. Make sure that the microphone is connected before you start recording.
Also see: How to Screen Record on Windows 11 Quickly
Just like Windows has a local sound recorder, macOS has its own audio recording application. That is the QuickTime Player. It's not just a media player, but also a convenient recorder for audio, screen and movie recording. To capture the sound from your Mac computer, follow the simple steps below:
1. Open the QuickTime Player on your Mac by looking for it on the search bar in Launchpad.
2. Select File > New Audio Recording from the top menu bar after QuickTime Player display shows up on your screen.
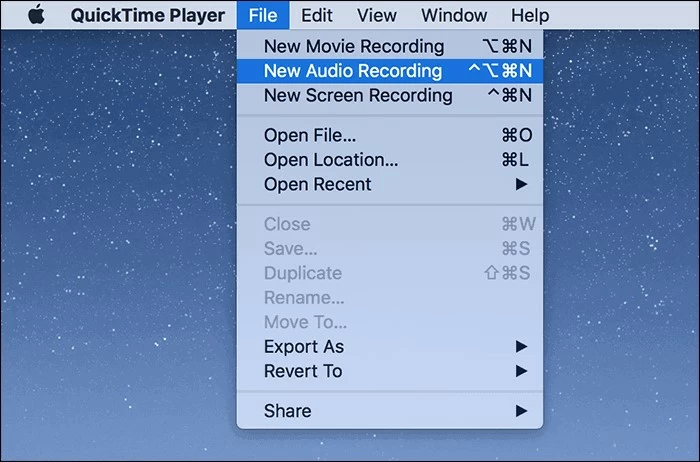
Create a new audio recording using the QuickTime Player on macOS computer.
3. When the Audio Recording control panel pops up, select a source microphone and adjust sound quality by clicking on the down arrow next to the red button. You can also adjust the volume you want to hear in your recorded sound files.
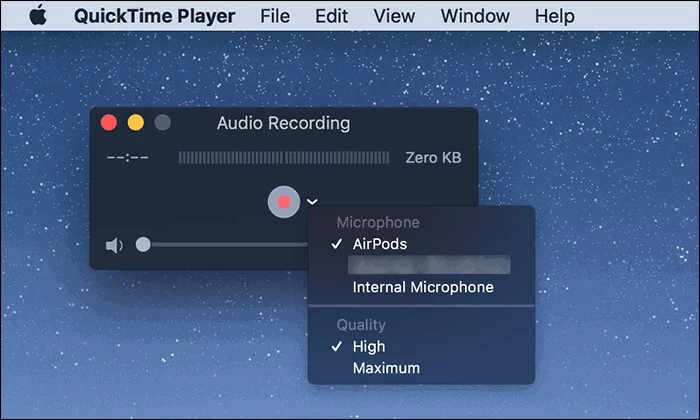
Select source microphone and adjust the sound quality before starting to record.
Note: In case you are using more than one microphone, select the right one for your recording. If you want high-quality recordings, the uncompressed file will be produced, requiring ample space for storage.
4. Start recording sound on your Mac by clicking on the red-circle icon.
5. Press the Stop button to stop recording. There is also an option to pause the recording and resume it again if you don't want end it.
When it's done, click on File option again, and select Save to save the sound recording on your computer. Also, you can trim the voice recording into multiple clips and make basic editing after saving it. Besides, the QuickTime Player also helps you record screen and audio simultaneously.
The built-in audio recorders on computer are pretty easy to use, but they usually lack advanced features and are only available for basic voice recording on computer. If you are recording the sound on your computer only for personal use, and the quality or editing isn't your priority, then the native sound recorder apps are suitable for you.
However, if you're searching for how to record the internal sound that comes from your computer, you'll want to check out the alternative sound recorders below.
If you want to record sound on a computer, make sure to get a recorder with both system sound and microphone audio recording options built-in. The Screen Recorder from AppGeeker is one of the most professional and popular software used to record computer sound, screen, videos and webcam on a Windows PC or Mac.
The Screen Recorder can help you record audio from both computer system and microphone. It also allows for recording and exporting the sound and video files in various formats and different quality. Apart from that, this powerful tool is capable of recording your computer screen along with the audio and videos at the same time. You can basically record any sound coming from your computer system, apps, media players, and the microphones you use.
Step 1: Activate AppGeeker Screen Recorder after it's installed on your computer.

Select Audio Recorder for sound recording on a computer.
Step 2: Enable Audio Recorder and choose the source sound. You will be given two options: System sound and Microphone. Choose either or both of them; drag the slider to adjust volume.
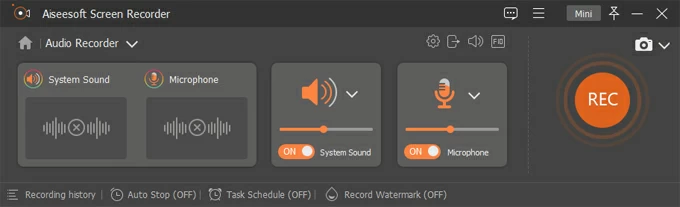
Select System sound or Microphone as the source sound to record.
Step 3: Adjust settings for sound recording.
Click the downward arrows to make audio adjustments. The dropdown options contain features of noise cancellation, audio enhancement, sound check and volume mixer. Hit the Output settings button to set up the format and quality you want for the sound record.
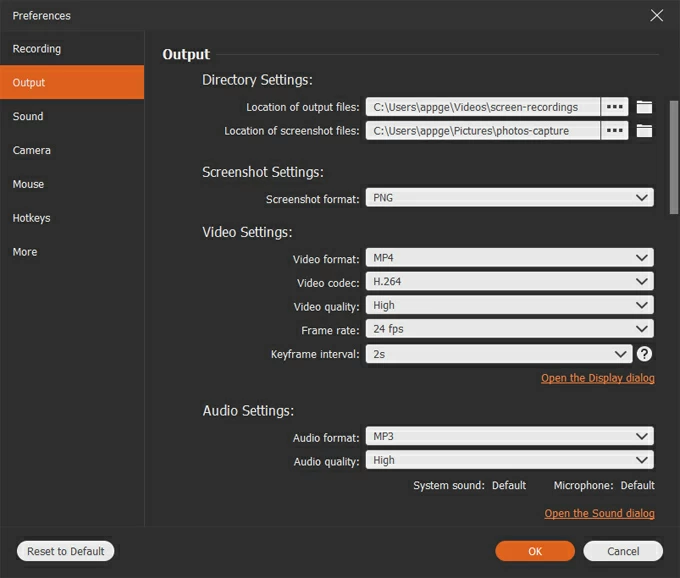
Decide the audio format and audio quality for the sound recording.
Step 4: Play the audio, press REC button to start and click Stop button to end recording.
Preview the recording after it stops. You may want to trim the sound file before saving it on your computer by clicking on the Done / Save button.
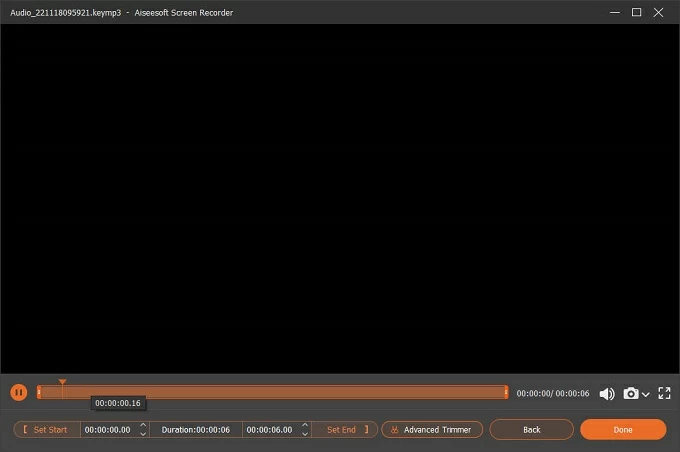
Use Advanced Trimmer to trim the sound file or click Done button to save the recording.
Suitable for both Windows and macOS, Screen Recorder is a professional and easy-to-use program with excellent audio and screen recording features. If you want to record high-quality sound from your computer, consider downloading the AppGeeker Screen Recorder and performing audio recording in straightforward steps.
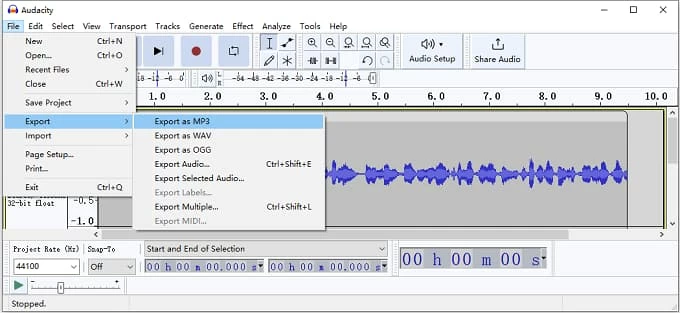
Another method to record audio files from computer is by using the third-party software Audacity. It's an open-source app that can help you record live audio through any microphone source or record internal sound coming from the computer. It works for both Windows and Mac to record and edit multi-track audio. Here's how to record computer sound with Audacity:
Record sound tracks and export the recordings in different formats on computer.
In case you're using a Mac, there's one more add-on app Soundflower you need before you're able to record the internal sound on computer.
Quick steps to set up the Soundflower on Mac:
After installing the Soundflower, head to the top menu, click File > System Preferences > Sound. Select the Soundflower (2ch) from the Output option.
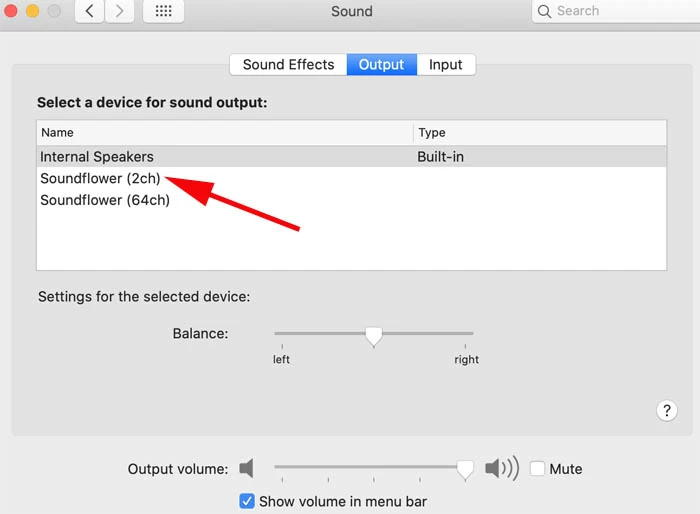
On your Mac, select Soundflower (2ch) as the output device in Sound.
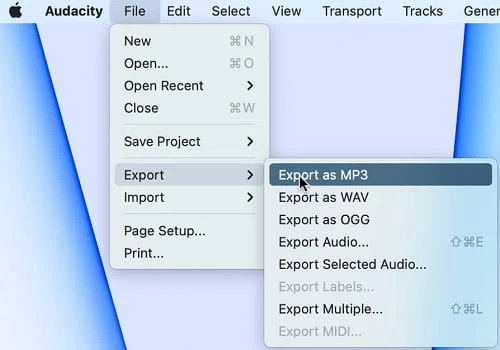
Export the recorded sound tracks as MP3 or other audio formats.
And this is how you can record the internal sound from your computer. The steps vary depending on which operating system you're using. Make sure you follow the right steps to record the meetings or music being played on your computer.
How to record audio from a computer?
If you're going to record audio from a computer, simply use the following methods below.
To record your audio through microphone:
To capture the internal sound from computer:
How can I record internal audio on my computer?
How to record audio on computer for free?
Can you record screen with audio on computer at the same time?
Yes. There are many screen recorders that allow you to record computer screen with audio simultaneously. You can use the OSB Studio software that is functional with multiple video recording and editing features. Or try the AppGeeker Screen Recorder which offers a wealth of options, letting you record your screen activities, media players, YouTube videos, active apps and almost everything happening on your computer.


