
How to Capture Computer Audio on Mac

Using a Mac to record your screen and audio during FaceTime call is pretty simple and works if you have the permission of the person you are faceTime-ing to.

You can record while you're having a FaceTime conversation. That's all thanks to the video-call recorders, and here's how to record FaceTime call on Mac in high-quality video. You'll also learn step-by-step instructions on how to record FaceTime with audio on an iPhone or iPad.

Have a FaceTime recording app handy should you ever need to capture the video of your FaceTime session.
FaceTime is a great way to connect with anyone through video and audio, and when you have an important call coming up, you'll want to record and save the call. Whether it's an interview or an online class taking place on FaceTime with audio, a work call explaining construction project or a conversation with a loved one, taking a recording of FaceTime call can be helpful.
Don't Miss: How to Record Internal Audio on Mac
Although FaceTime does not have the native ability to get the call to record on either a Mac or an iOS device, you can use the built-in screen recording function or even turn to a third-party tool like the all-in-one Screen Recorder to record FaceTime Calls with Mac machine. It's not tricky even you own an iPhone to capture audio from FaceTime.
This Facetime Video Recording guide covers:
Is it illegal to record FaceTime calls?
Different countries or states have set certain policies for audio and video recording. In many places, it's illegal to record a FaceTime conversation without the expressed consent of the person being recorded.
Whether you're going to record the personal call or record a call over a business meeting or published content online, you should get the permission of the other party to the chat before recording - FaceTime does not alert the other person whenever you start to record.
Apple has been set recording restrictions that audio is not being recorded using the built-in Screen Recording tool while there is a FaceTime call in progress even if the microphone is ON.
Mac has come up with its own way to record FaceTime Calls. The FaceTime recording with audio is done straight from the official Command + Shift + 5 screen capture facility in macOS Mojave or later, or QuickTime's "New Screen Recording" feature in earlier macOS versions.
Once you get the program ready, you simply need to enable the audio using the internal microphone in a way of screen recording FaceTime video and sound on your Mac, which is relatively easy to do:
1. Open the FaceTime app on the Mac.
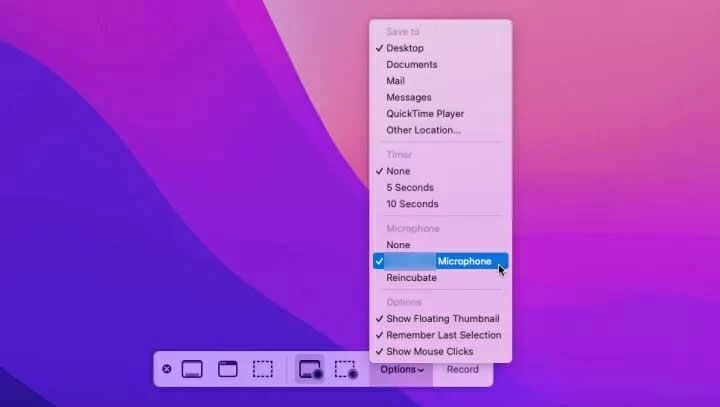
2. Press Command + Shift + 5 and the stock macOS Screenshot toolbar to use call recording shows up.
Only if you activate the microphone can your Mac record the audio talking over on a Facetime video chat.
3. Click Options and choose your computer's Microphone to capture the audio of the FaceTime session in the screen recording at the same time.
4. Use the Record Entire Screen, or Record Selected Portion to place your capture area around the FaceTime window in a flexible size.

Calls are recorded on the Mac after you highlight the area of the screen and hit Record.
5. Click Record button to initiate a new recording of the screen.
6. As soon as your Mac is recording, make your call in FaceTime.
7. When the call is ended, make sure to click the Stop button from the menu bar to stop the FaceTime call recording.
The recorded FaceTime videos are stored on macOS desktop by default if you never changed the save location from the Options menu. You can open to review the recording, which includes the audio too.
If you are using a macOS version earlier than Mojave, choose File > New Screen Recording after you launch QuickTime Player, check the Internal Microphone from the recording menu, and then hit the red Record button, followed by making a FaceTime call. QT will record both the sides of the conversation until you stop it. Read: How to Record Mac's Screen with Audio in QuickTime
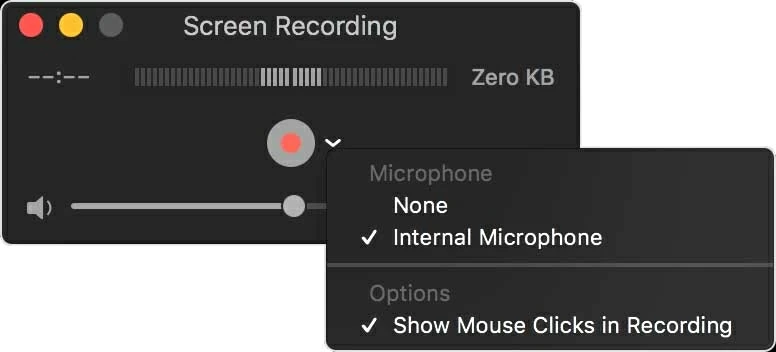
To record a video session of Facetime with audio, ensure the microphone is selected.
Screen Recorder is another effective way for recording FaceTime that actually works:
With a few clicks, you can capture what's happening on the Mac with the screen and audio at the same time, such as video calls in FaceTime or Skype, online meeting, streaming videos and other activities. The built-in audio recorder allows you to get the internal sound and microphone audio to record in one file.
The software offers optional recording settings in a way of recording videos in high-end quality and best resolution. You're able to save your recording of a FaceTime call in 4K 1080P, 720P and so on.
To make Mac Screen Recorder record a FaceTime call with audio in it, do the following. The process will demonstrate how to include the macOS system sound in your FaceTime video recording.
Step 1: Open FaceTime and ready to make a call (or receive a call.)
Step 2: Launch the software, and once it opens, choose Video Recorder tab.

Step 3: Select the FaceTime window to record. If the app is in full mode, click "Full" option to have the entire FaceTime screen selected. Otherwise, click "Custom" option and drag to select a certain area where the app occupies on your Mac's screen.
Step 4: Enable "Microphone" toggle to capture the FaceTime audio when you're on a call. If you want the internal sound recorded, simply click on the switch for "System sound" to turn it on.
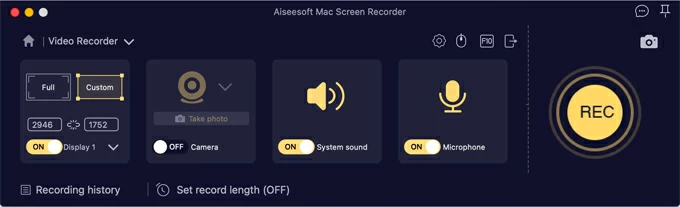
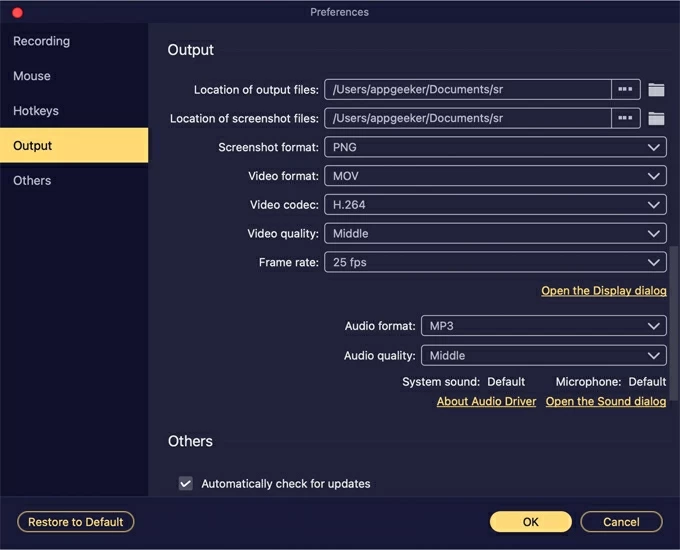
Click the tiny gear icon right above the "Microphone" tab should you access the Preferences window. You can also select which format you wish your recording of FaceTime call to be in. Plus you can change the save folder, video quality & codec, frame rate as well as audio format & quality. Click OK when finished to confirm your changes.
Step 5: Click the big REC button.
Step 6: Initiate or answer the FaceTime call you intend to screen record.
Step 7: Once you want to stop the recording, press Stop icon on the floating bar.

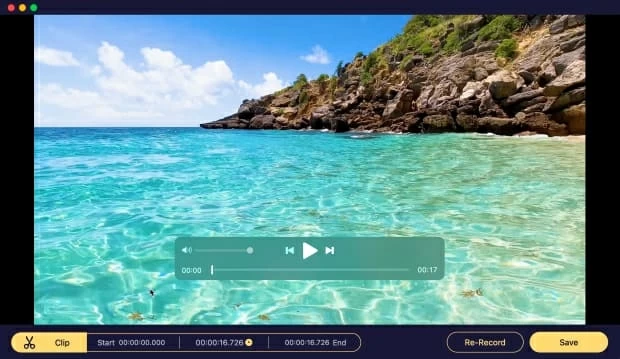
Step 8: View what you've recorded from your FaceTime session on the software window. Save your recording on your Mac by selecting Save button. This takes you to screen where you can access a list of all saved recorded calls.
When you Screen Recording FaceTime on your iPhone, you may notice that there isn't any audio in the recording. Internal microphone is muted to prevent piracy - even though the mic is enabled.
That's true. Apple has stated the video call recording policies that "Some apps might not allow you to record audio. You can't record your screen and use screen mirroring at the same time."
FaceTime may be one of the applications that does not allow you to capture audio during a recording, but if you do not need to record the audio on the FaceTime calls, just record your image on the phone screen with the inbuilt camera, then the stock Screen Recoding tool available in iOS 11 or later should be your option.
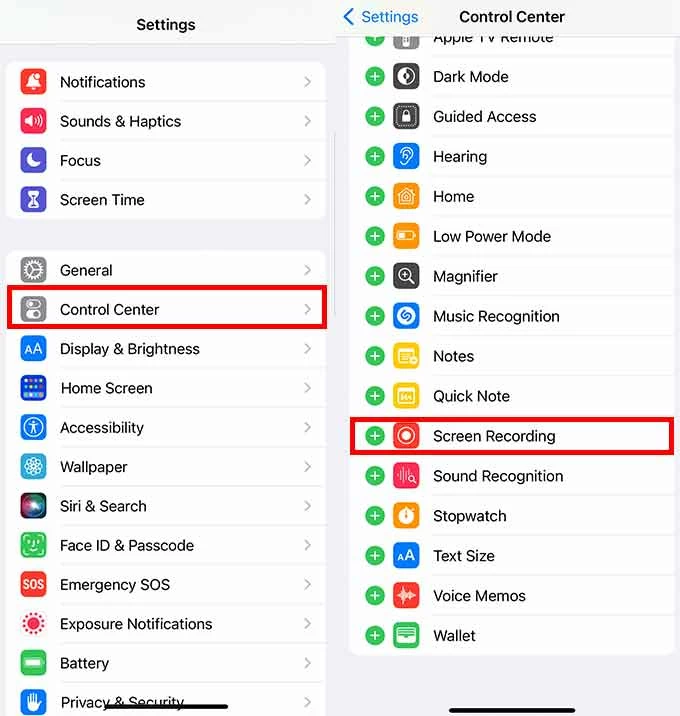
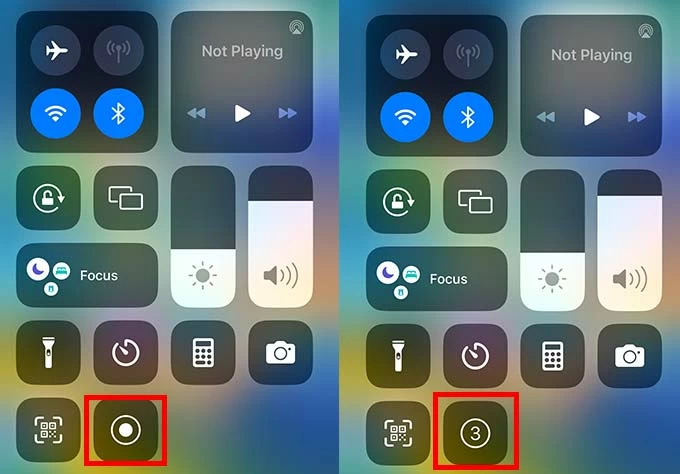
First, activate Screen Recording and add it to Control Panel. Go to Settings > Control Center. Scroll down and find Screen Recording. Tap on the green "+" icon and you're good to go. Then you can freely use it on your iPhone to make a Facetime and screen recording.
Related Article: How to Fix iPhone Screen Recorder No Sound Issue
To get around the limitation of iPhone actually not recording audio while using FaceTime, simply employ QuickTime's New Movie Recording as well as Mac's microphone to record both video and audio coming from video call. All you need to do is connect your phone to Mac computer to mirror iOS FaceTime screen onto Mac.
1. On your iPhone or iPad, open FaceTime app.
2. Plug your iPhone into your Mac using the lightning cable. Tap Trust on the phone screen when prompted.
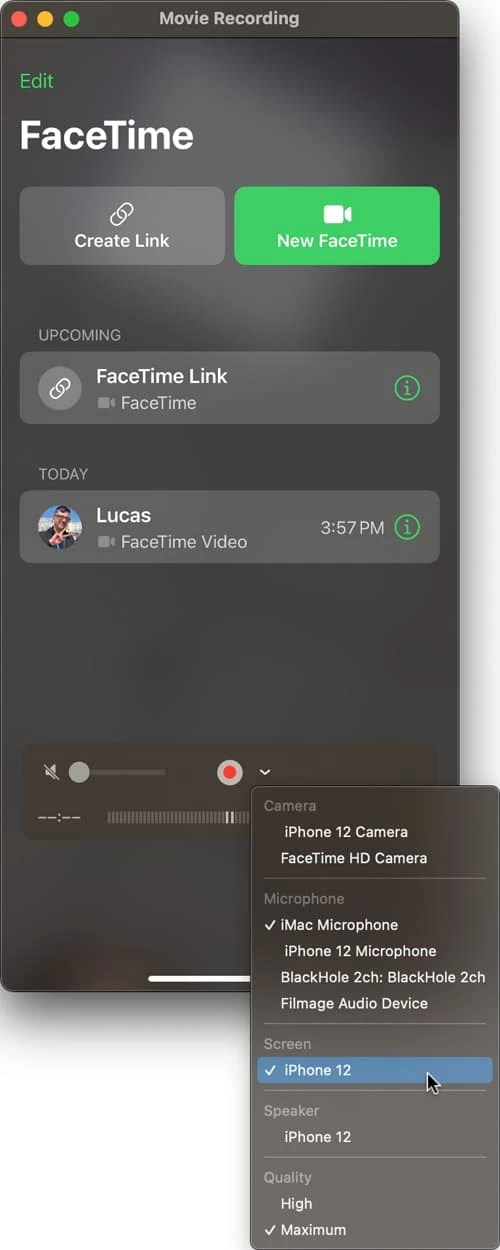
3. Open QuickTime Player, then click File and choose New Movie Recording from its menu bar.
4. Click the inverted arrow next to Record button, then select your iPhone or iPad under Screen section. You will see your device screen display on Mac, in an exact shape of your iPhone screen.
5. In QuickTime click Record button and simultaneously start a FaceTime call on the iOS device. Now your Mac is recording FaceTime with sound and capture everything happens over the session.
6. When the call is over, hit the Stop button from the menu bar to end the recording as well.
Tip: If you have a Windows computer and need an iPhone FaceTime screen recording, then you can use AppGeeker Screen Recorder. It comes with iOS Recorder by which to easily and seamlessly screen record FaceTime calls in high audio and video quality - as long as you activate Screen Mirroring on your iPhone and make a connection with the PC.
1. Can FaceTime audio be recorded when making a FaceTime Call from iPhone?
Basically, Apple has introduced Screen Recording tool since iOS 11 and enable users to capture video and audio on iPhone/ iPad by turning on the microphone recorder. However, when regarding calls, it gives no entry for users to recording audio along with your screen-recorded FaceTime video and thus you will get a muted FaceTime recording.
If you have a concern with audio not recording when recording your screen during a FaceTime call, you need to take QuickTime or other recording apps to complete the task.
2. How to screen record on FaceTime with an iPad?
To record the FaceTime call in iPad with the stock screen recorder:
One caveat to bear in mind: Your iPhone records the video of your conversation, but it will not record the sound from the FaceTime chats, for privacy reasons.
3. Can you record FaceTime video calls?
Yes. You have a few effective means to record a FaceTime call on your Mac or iPhone & iPad.
In a way of FaceTime recording on Mac, open QuickTime, choose File > New Screen Recording, then turn on your microphone from the recording options. After that, set up your FaceTime call using your iOS device and hit the Record button in QuickTime.
4. How to record FaceTime on Android after joining in the session?
Android users cannot use the FaceTime app, but they can join and record a FaceTime chat by clicking the link receiving from Mac and iOS users.
Once an Android users get FaceTime invite from iPhone, iPad or Mac, open the call in Google Chrome and grab a call recorder for FaceTime in Google Play store to capture FaceTime session with audio on an Android phone or tablet. You can also use Android Recorder within AppGeeker Screen Recorder toolkit for video recording FaceTime conversation with sound and screen.
Read Next: FaceTime SharePlay Is Not Working on iPhone? The Fixes


