
How to Record Internal Audio on Windows 10

To find a proper way to trim videos using VLC, you may need to read this article thoroughly. Here we will provide steps to help you trim videos with VLC quickly.


This article includes steps to trim video using VLC on Windows and Mac.
As you may already know, VLC Media Player is a highly popular and widely used media player software. It has compatibility with a wide range of audio and video formats such as MP3, AVI. If you need to remove unwanted sections after screen recording on Windows, VLC is a great tool for you to trim your videos. But you may wonder how to trim videos in VLC.
Well, it is not that complicated. In this post, we will provide steps and tips to teach you how to trim videos with VLC. Whether you are a Windows or Mac users, you can find solutions to trim your videos using VLC from this post.
Using VLC Media Player to trim a video and make a clip on your PC is not as difficult as you might think. The following steps will be of great use to you to trim videos in VLC quickly.
Free download the latest version from the VideoLAN official website and run the VLC media player by double-clicking VLC software.
After opening the VLC, you need to find and import the video file you want to trim. Go to "Media" > "Open file" to locate and select your desired file and click "Open" or you can press the keyboard hotkey "Ctrl+O". Alternatively, you can also drag and drop a file onto the VLC window to open and play it immediately.
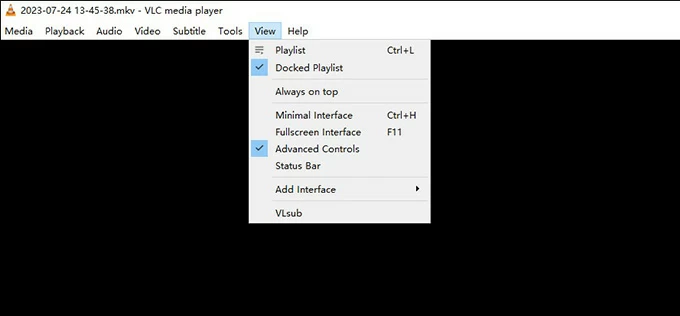
Once the video is loaded, click on "View" in the menu bar and check if the "Advanced Controls" is ticked to provide additional control button. Then play the video and pause it at the starting point of the section you want to trim. Click on the "Record" button (red circle) in the Advanced Controls section or press "Shift+ R" as a shortcut to start recording the clip.
Then continue to play the video and pause it at the ending point of the section you want trim. You can press "Frame by frame" to edit your videos in VLC in a more accurate way. Click the "Record" button or press "Shift+ R" again to finish recording.
The trimmed video clip will be automatically saved in your default Videos folder with a filename like "vlcrecord-2023-8-18-10h28m35s.mp4". You can find your VLC trimmed videos at C:\Users\Username\Videos.
If you want to record videos and edit them on your Windows or Mac, Appgeeker Screen Recorder, a software that combines recording and editing features, can fulfill your needs. It can record HD video, audio, webcam, etc. It also has video editing features such as trimming, separating, adding clips, etc., which allow you to cut the video into small clips.
If you want to trim videos after record video on Mac, VLC is also available for you to trim your videos. Here's step on how to use VLC to trim videos on Mac.
Similarly, you should download the software from the official website first, please note that select "macOS" system from the download drop-down menu.
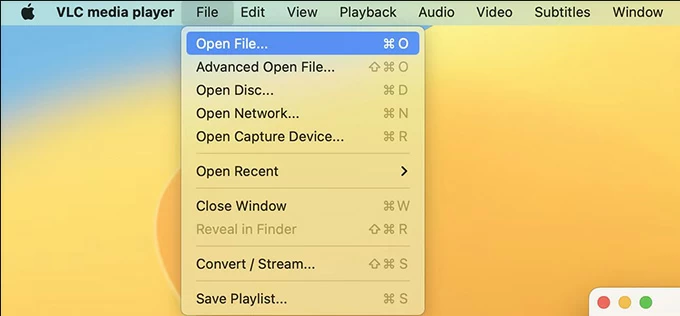
Go to "File"> "Open File" or press "Cmd+O" as a shortcut to search for and open the wanted video file. Likewise, you can drag and drop a file onto the VLC window to open it.
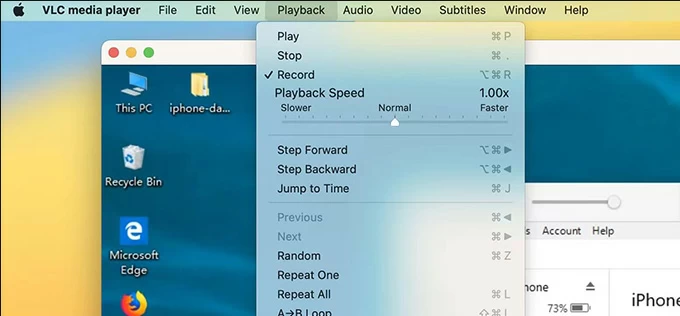
Now, click "Play" button to play the video and click it again to pause the video at the starting point you want to trim. Then navigate to "Playback" > "Record" or press the hotkey "Option+ Cmd+R" to start recording. Replay the video until you reach the point you want to trim and tap "Record" or press hotkey "Option + Cmd+ R" to finish recording.
If you haven't changed your settings in the VLC Preferences menu, the trimmed video should be stored at the default Movies folder.
Tip: You can also screen record on MacBook using VLC. Go to "File" > "Open Capture Device" to choose "Screen" from the "Capture mode" options. Then adjust the frame rate to your preference and click on "Play" button to start recording your screen. After finishing the recording, click on the "Stop" button in the VLC control panel. Finally, go to "File" > "Save playlist" to save the recorded video.
Conclusion
Here we have come to the end of this article! I hope you have successfully trimmed your videos in VLC with any of the methods stated above.
1. Why does VLC not play video?
It is probably because that video component of VLC is not enabled. To enable video component of VLC, go to "Tools" > "preferences" > "Video" to check the "Enable video". Then click on "Save" to apply the changes and restart VLC.
2. How to cut a video on VLC Media Player?
Drag and drop the videos you want to cut in VLC. Go to "View" > "Advanced Controls". Then click the "Record" red button at the start of your fragment and click "Pause" at the end of your fragment. Then the trimmed videos files will be saved automatically at your documents folder or your user folder.
3. How to play YouTube video in VLC?
Launch VLC and navigate to "Media" > "Open Network Stream". Then paste the URL address of the YouTube video you want to play in VLC and click "play".


