
How to Record YouTube Live Stream

Explore the easy ways to screen record on any MacBook Air and MacBook Pro: QuickTime Player, Screenshot toolbar, a 3rd-party screen recorder for macOS.


Recording a video of your MacBook's screen just takes a second.
There are a variety of occasions when you may need to record screen on your MacBook. Whether you're making an instructional video or game tutorial, creating a presentation, or recording a zoom meeting, screen recording on MacBook is a useful way to take video captures or screenshots of any activity on your screen.
While you can record screen on a MacBook using the Screenshot Toolbar or QuickTime Player that comes with your MacBook, for more recording control, you'll need third-party MacBook screen recording software. Here we will cover in details how to screen record on MacBook Air or MacBook Pro.
Table of Contents:
As a macOS pre-installed tool, if your MacBook Pro or Air is running macOS Mojave 10.14 or later, you can use Screenshot Toolbar to record screen on MacBook for free. Here's how to screen record on your MacBook using Screenshot Toolbar.
Step 1. Check macOS version and install the latest version
After clicking Apple Menu, choose "About This Mac." From the window that appears, you'll find your macOS version. Make sure your MacBook is running macOS Mojave or later!
Step 2. Enable Screenshot Toolbar on your MacBook
On your keyboard, hit "Shift + Command + 5" to open the Screenshot Toolbar. It is a toolbar that displays multiple controls at the bottom of the screen, including taking screenshot and recording screen.

Start Screenshot Toolbar by using Command key, Shift key and 5.
Step 3. Select the screen recording range
According to the needs of the screen activity, choose to record the entire screen or a portion of the screen. If you only record a part of the screen, drag the mouse to select the area you want.
Step 4. Change other recording settings
By clicking "Options" on the toolbar, you can configure mouse recording, save destination, timer, microphone and other options.
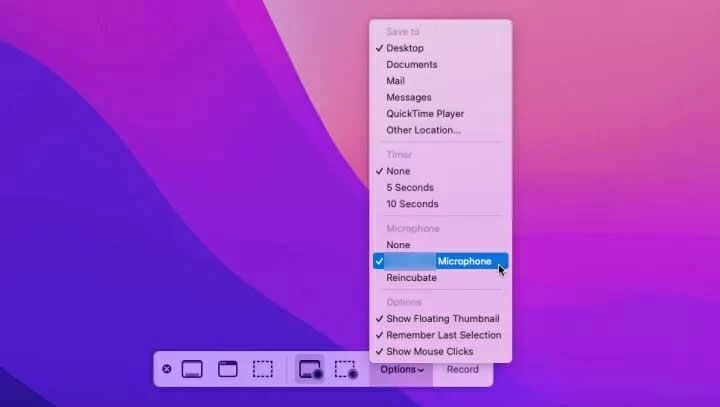
Click on Options to access its menu and make your choices for your MacBook screen recording.
Step 4. Start the screen recording on MacBook
Once you're done, click "Record" to start a video recording of the screen. Screenshot Toolbar screen recorder will capture whatever on the whole screen or the specific screen area on your MacBook.
Step 5. Stop screen recording
To end your recording on the MacBook, click the "Stop" icon in the macOS menu bar at the top of the screen. Or use the "Command + Ctrl + Esc" hotkeys to stop recording.
The new video will be automatically saved in .mov format on your desktop or in a saved location of your choice.
Quick Tip:
The QuickTime Player built into your MacBook has a screen recording feature that allows you to record the screen and your activities without installing any other software. If you want to use the MacBook's built-in microphone or a connected external microphone to capture sound while you record your screen, you can't go wrong with QuickTime!
Any version of MacBook can use QuickTime for screen recording, but it is especially suitable for those running older versions of macOS. Here's how to screen record on MacBook Air with sound using QuickTime Player:
1. Launch QuickTime Player on your MacBook. You can find it in the Applications folder, or use the Spotlight to search it.
2. At the menu bar, click File > New Screen Recording.
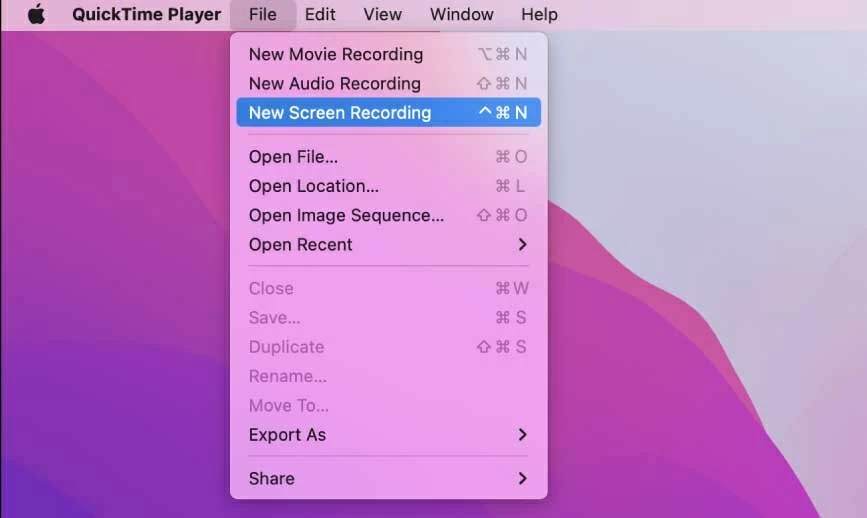
Pick "New Screen Recording" option from the QuickTime File menu.
3. Click the "arrow" icon next to the red button to access the recording controls. To record screen with audio on MacBook, check "Internal Microphone."
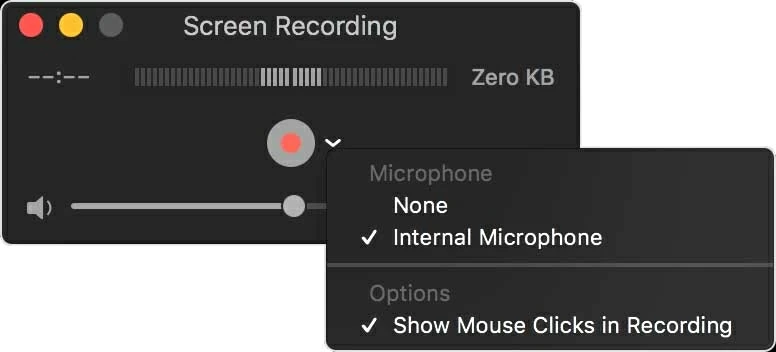
You're given a few options for your recording.
4. Hit the red "Record" button, then click anywhere to record video of the entire screen, or drag and select an area of the screen to record that specific area.
5. When you're finished, click "Stop" icon in the menu bar, or press "Command + Control + Esc."
As mentioned above, QuickTime and Screenshot Toolbar can only capture the audio from microphone. Although they offer basic screen recording capabilities, more advanced editing functions are not available. And they only support outputting video to .mov files.
In order to overcome the limitations of the native screen recording software on MacBook, it's necessary to seek out more specialized third-party screen recorders!
As an all-in-one screen recorder, Appgeeker Screen Recorder gives you more flexibility to record video and capture what's on your MacBook screen in HD quality. With a simple click, you can set your screen recording to include both system sound and microphone audio, as well as access more output formats than just MOV, such as MP4, MOV, and GIF.
The software also ships with a sophisticated editing solution, letting you to draw on your footage while recording, trim, add meta information, and so on. All features will come in handy especially when you are recording instructional videos.
Follow the instructions to learn how to screen record on your MacBook:
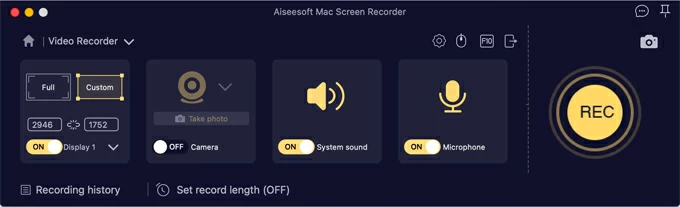
1. Launch Screen Recorder on MacBook and choose "Video Recorder" tab on the main interface.

2. Select the recording area. The tool is able to record in full-screen mode and partial-screen mode, as well as support audio from your MacBook or a microphone. Assuming that you tend to screen record a YouTube video playing on Mac (for educational purposes), ensure that you turn on the "System sound" option.
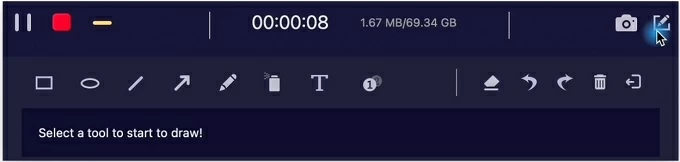
3. When you're ready to capture screen on MacBook, press the "REC" button to the right of the interface. The software will instantly capture any activity taking place on your MacBook screen, and you can also annotate it using the editing tools in the floating bar.
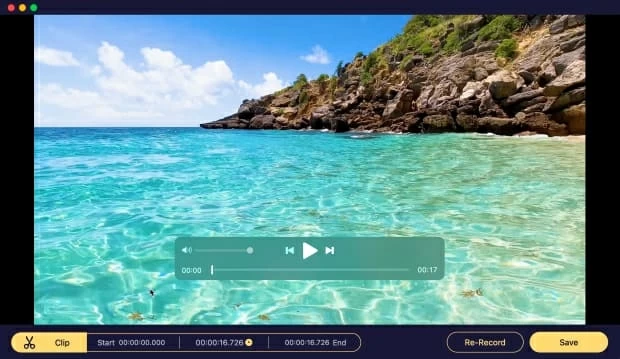
4. Click Stop icon when you're done. Preview the video, cut the unwanted part, and finally save the MacBook screen recording to any folder of your choice on the computer.
Pros:
Cons:
OBS studio, as one of the most popular free and open-source screen recording software, is able to fulfill most of your screen recording needs on MacBook Pro, such as recording full screen, recording part of the screen, recording webcam and audio.
Users can add and combine various elements with different sources, such as video, graphics, and audio to create professional-grade recordings. This MacBook screen recorder is also capable of sharing your recordings to YouTube, Facebook, and other platforms!
Pros:
Cons:
Snagit is famous for its excellent screenshot feature that captures everything on the screen, such as small areas of the screen, wide panoramic scrolling, infinitely scrolling web pages, and more. Besides, it can also record video with audio on your MacBook Air. And your recordings are automatically uploaded to the cloud drive for easy storage and retrieval.
Pros:
Cons:
Whether it's the screen recording program that comes with the MacBook or a third-party screen recording tool, they each have their own strengths to meet your different recording needs. To pick the best screen recorder for your MacBook, consider the features and performance of the software.
Whether it is free or not: The local screen recorders on MacBook are free to use and don't require installation, while some third-party screen recording software requires a fee to get full functionality.
Screen record with sound on MacBook: QuickTime and Screenshot toolbar can only capture the sound from the microphone while recording the screen. If you want to capture the sound from MacBook, you need to choose a third-party screen recorder software, such as Appgeeker Screen Recorder.
Editing function: The built-in screen recorder of MacBook only has simple editing function, such as trimming the video. For more rich editing tools, like adding clips, adding annotations and filters, splitting, etc., you should select Appgeeker screen recorder or OBS.
Easy to use: Try to choose a MacBook screen recording program that is easy to use and has a wizard to guide you through the process.
Q1. Can I screen record screen on MacBook using shortcut keys?
Certainly Yes. The Screenshot Toolbar enables you to use Shift + Command + 5 on the keyboard to screen record on MacBook Air / Pro.
Q2. How to screen record in MacBook with sound?
To screen record on a MacBook with audio, you can use pre-installed QuickTime Player. However, you should note that by default, QuickTime can only capture the sound from the microphone, but not the sound that is playing on the MacBook.
1. Run QuickTime Player on your desktop and navigate to File > New Screen Recording.
2. Click the "down" arrow in the pop-up window.
3. In the microphone tab, select "Internal Microphone" or your connected microphone device.
4. Click the "Record" button, drag the frame to adjust the position, and then click "Start Recording."
5. To end recording, click the "Stop" button in the menu bar.
Q3. How to grant QuickTime permission for recording screen in MacBook?
Apple computers give you options to turn screen recording on and off for apps, and to enable the access for QuickTime Player on MacBook, do the following steps:
1. On your MacBook, choose Apple Menu > System Preference.
2. Click "Privacy & Security." On some MacBook, you need to click "Security & Privacy" and then select "Privacy."
3. Click "Screen Recording."
4. Locate QuickTime Player from the list and enable the permission on recording your screen. In case you need to turn off the access, simply deselect the checkbox.


