
How to Convert .aac File to .mp3 File on Mac Machine


Let's say you have a bunch of video footage in .mts recorded by your camera on a trip. You want to use Final Cut Pro to do some editing on those MTS video clips, like cutting the video to keep the dazzling parts, selecting ranges to adjust timing and volume, grading image, or adding some special effects before you post to Facebook page viewable by fans.
The problem is, although your clips can be opened in Final Cut Pro X on a Mac, MTS format is not an appropriate container format suitable for editing in FCPX application. You would convert the camera's AVCHD .mts files to ProRes, a proprietary I-frame format from Apple designed for use during video editing, prior to import into Final Cut Pro X on Mac.
Converting MTS (or any other file format) to the edit friendly ProRes to be editable in Final Cut Pro X is possible and easy. If you find yourself spending any amount of time editing your video footage or movies using Final Cut Pro X then you might find yourself on the lookout for a reliable and efficient tool to handle this job. The App Store is full of MTS to ProRes converters that let you change video from .mts to ProRes .mov file, along with some extra features.
In this article, we'll show you an excellent program called Video Convert for Mac, which stands tall as one of the best video converters for Mac platform. It converts .mts to ProRes .mov format that you can work well on FCPX, and many other video files from one kind of video format into another. And one of the most useful features is it includes a wealth of pre-defined profiles, including Apple ProRes 422 and ProRes 444 families. This makes it incredibly easy to directly convert your movie files to multimedia devices, desktop applications, game consoles, social networking sites with optimized settings.
Step 1: Open up the program and add MTS footage
To get things started, we need open MTS video files in the program. You can do this in two different ways. The first and easiest method is to simply open the local folder containing .mts files, drag them and drop onto the program window. The other way is to use the Add File option at the toolbar of the program, in opening dialog box, locate the MTS videos you wish to convert. Double-click to select it. Then click "OK" to finish browsing.

Batch conversion is supported, here you can add a slew of MTS files simultaneously.
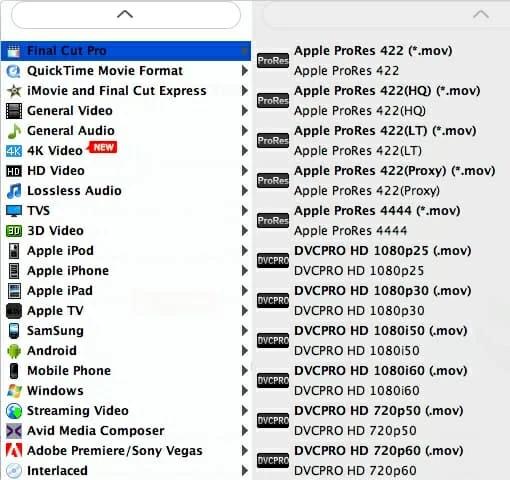
Step 2: Choose Apple ProRes 422 LT from the "Profile" menu
Once you've MTS imported, click Profile drop down menu at the bottom of the interface. This will bring up the format selection dialog. You then select "Apple ProRes 422(LT) (*.mov)" (Recommended!) there under "Final Cut Pro" column as shown below.
Alternatively, if you don't want to go with Final Cut Pro preset option mentioned above, you can choose a specific "ProRes LT Video (*.mov) option under "General Video" column.
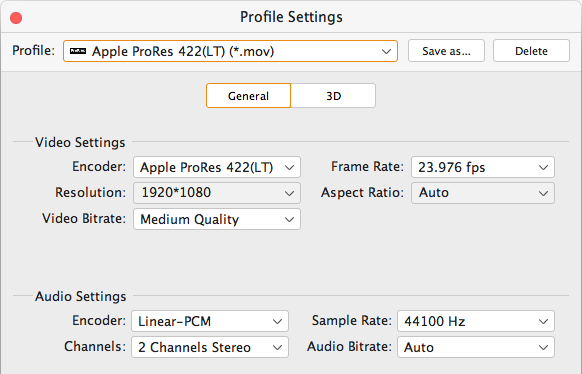
For advanced user, you can click Setting beside Profile menu and spend a few minutes configuring the parameters like Bitrate, Sample Rate, resolution and other things. If you don't want to be bothered by that, just leave them alone.
After you have configured the output settings, back to the main interface and click the "Browse" button at the bottom center (next to "Destination" field) to specify a local folder where the output Apple ProRes MOV files will be saved.
Step 3: Initialize Conversion from MTS to ProRes in Mac
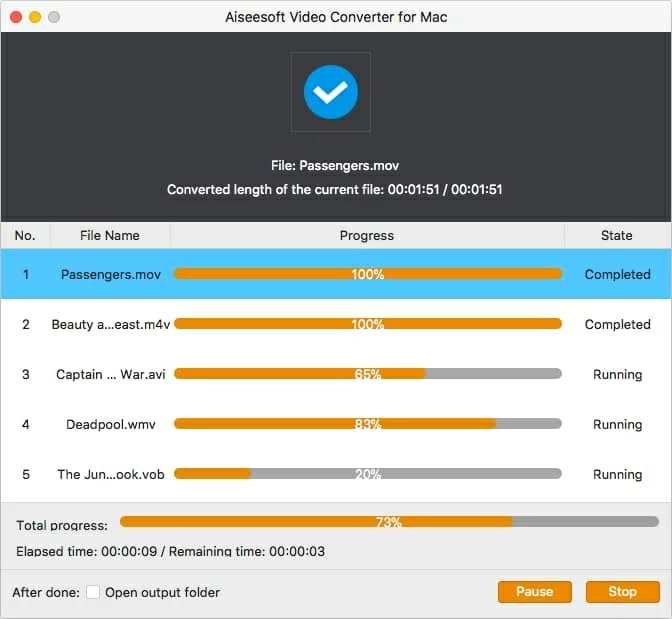
Finally, all left to do is click the big orange Convert button located at the lower right side of the screen. This way, your AVCHD .mts video files will be converted to MOV with ProRes 422 LT codec on Mac.
In the opening status window, you can take a look at "Total progress" bar and "remaining time (estimated) to see roughly how much time you have to go out.
After the conversion process has completed, navigate to the folder you specify previously, they're right on the drive themselves.
Done! Now you can create a new FCPX project and import your ProRes MOV files.
Happy video editing!
Brief Introduction of the Apple ProRes
Apple ProRes is a high quality video intermediate codec developed for professional post-production in Final Cut Pro X. It offers an unparalleled real-time editing performance, capable of taking full advantage of multicore on computer to edit full-frame, 10-bit HD, 2K, 4K, 5K and even larger video files in FCPX.
In comparison to uncompressed video format, Apple ProRes comes with a combination of impressive image quality, multistream, and reduced storage rates. It includes two main branches: the Apple ProRes 422 Codec Family and the Apple ProRes 4444 Codec Family. Both of them support interlaced and progressive scanned images.