iPhone is disabled and won't connect to iTunes


You can't always rely on a lightning-fast Wi-Fi connection. If you just want to enjoy songs stored on your computer, here are a few ways to transfer music to your iPhone 18.

You have various ways for transferring music from a computer to an iPhone 18 or any other model.
You can't always stream from the cloud. If you've spent years ripping CDs, buying downloads, or hoarding FLACs on your computer—and now want that exact library sitting offline on your iPhone 18 (Pro, Pro Max)—moving files isn't as automatic as Apple makes it look.
iTunes is gone on Mac and replaced by Finder and by the Apple Devices app on Windows, while Sync Library only helps if you're paying for Apple Music or iTunes Match. So whether you're doing a first-time bulk move over USB or just dropping in a few new albums over Wi-Fi, here's how to get music from your computer onto an iPhone 18.
If you're looking for an easy and fast way to handle your music transfer tasks without tedious steps, Appgeeker iPhone Data Transfer is worth considering. Instead of mirroring the computer library onto the iPhone 18 that Apple paths do, it does true incremental transfer: drag a folder of MP3/FLAC/WAV/M4A straight from Explorer or Finder into the phone's native Music app, auto-converts the odd formats on the fly, keeps album art and ID3 tags intact, and—critically—leaves the songs already on your iPhone 18 alone.
Below we walk through both routes: the stock Finder/Apple Devices sync for people who want one clean source of truth, and the AppGeeker drag-and-drop route for everyone who just wants to put music from PC or Mac onto the iPhone 18 without losing what's already there.
On Windows 10 and 11, Apple has retired the old all-in-one iTunes sync flow. Local music now lives in the Apple Music app, and device syncing is handled by the Apple Devices app. Together they replace iTunes—but the logic is still the same mirror-style sync: whatever isn't checked on the PC gets removed from the iPhone 18 on the next run.
Before the actual process of syncing music from your computer to iPhone 18:
Also see: How to fix iPad unavailable
Follow these steps to transfer music from Windows computer to iPhone 18:
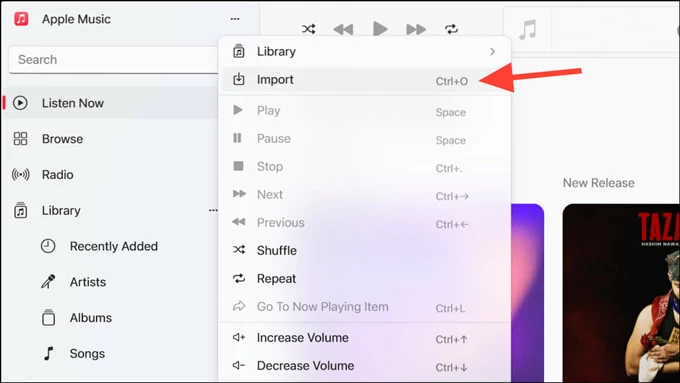
1. open Apple Music, head to Sidebar Actions > Library > Add Files to Library (or drag a folder in). Confirm tracks show under Songs.
2. Connect the iPhone via cable. Unlock it and tap Trust; enter passcode if prompted.
3. Open Apple Devices app. The iPhone appears in the left sidebar under Locations.
4. Click Music in the sidebar.
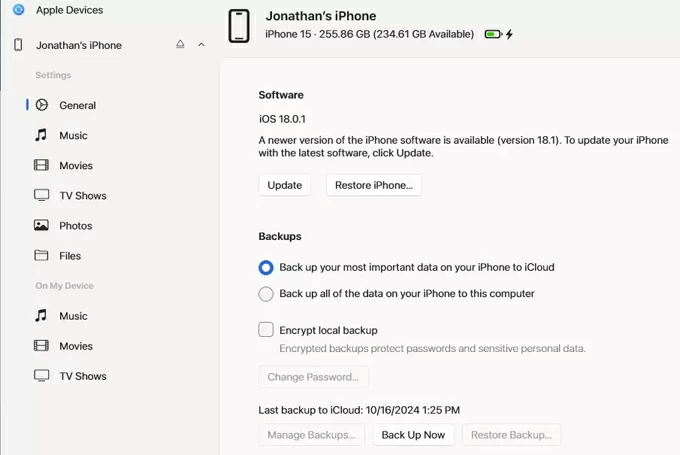
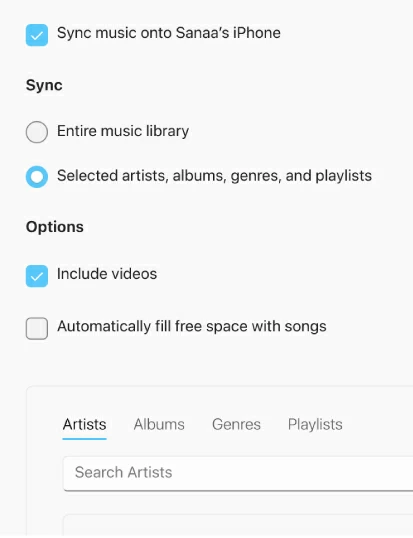
5.Tick Sync music onto [iPhone name].
6. Choose from Entire music library or Selected artists, albums, genres and playlists.
7. Click Apply to begin transferring songs from your computer to your iPhone 18. Don't unplug until the progress bar finishes .
Once done, open Music app on your iPhone 18, go to Library > Songs. Your selected computer's tracks should be there.
If the Apple Devices mirror-sync model drives you crazy—you just want to add a few favorite songs, not rebuild my entire library—Appgeeker iPhone Data Transfer is the fix. It does incremental, additive transfer: whatever is already on the iPhone 18 stays put, and the new files just land next to it. No library mirroring, no forced conversions that strip metadata.
Benefits:
Here're steps to add your music from Windows or Mac computer to iPhone 18. We take Windows as example.
Step 1. Run iPhone Data Transfer on your source PC or Mac.
Launch Appgeeker iPhone Data Transfer on your computer.
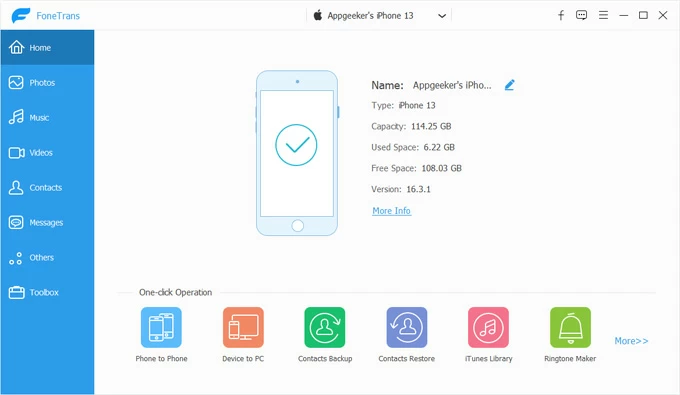
Step 2. Connect your iPhone 18 with a USB cable.
Unlock the phone and tap Trust when prompted. The app detects the device within seconds—you'll see storage info and a sidebar of data types.
Step 3. Open your iPhone 18's music library
In the app's sidebar, click Music. This opens the iPhone's current music library—read-only view, so you can see what's already there before adding anything.
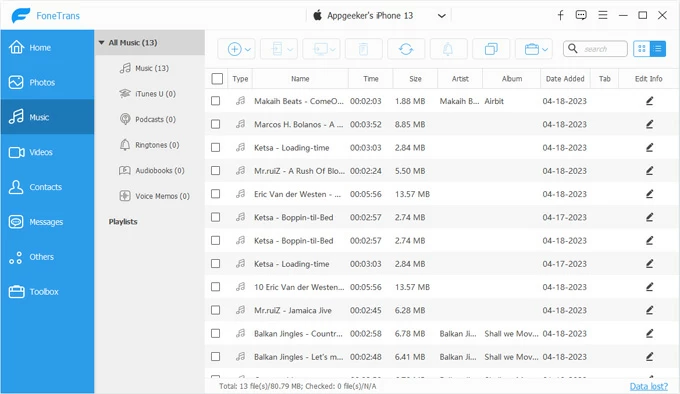
Step 4. Add music from computer to iPhone 18
Simply open File Explorer (Windows) or Finder (Mac), select your music files or whole folders, and drop them into the AppGeeker window. No pre-import to Apple Music required.
Or click the Add button (usually a + icon or Add File / Add Folder). Browse to the folder or individual tracks on your computer. Select what song you want and confirm.
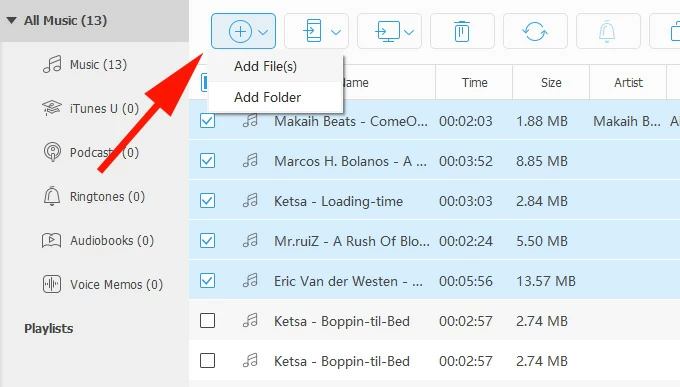
If a format needs conversion (e.g., FLAC, WMA, MKA, APE), it happens automatically.
When complete, open Music app on your phone, go to Library > Recently Added to confirm the new tracks are there—right next to everything that was already on the phone.
Additionally, this tool also enables you to transfer photos, videos, movies, TV shows, ringtones, documents, and more to your iPhone 18.
As a versatile tool, AppGeeker iPhone Data Transfer also lets you delete individual tracks or playlists from the iPhone side, or export media files (songs, videos, photos) from the phone back to the computer—something Finder and Apple Devices can't do without a full restore.
Also see: Photos disappeared from iPhone
If your Mac runs macOS Catalina (10.15) or later, iTunes no longer handles device syncing—Finder does. This is still the cleanest way to push a locally managed Music-app library onto an iPhone 18 series without touching iCloud .
If you subscribe to Apple Music and have Sync Library turned on, Finder will hide the music-sync checkboxes. You will have to turn Sync Library off first (Settings > General).
When you're ready, you can now sync songs from your Mac to your iPhone 18.
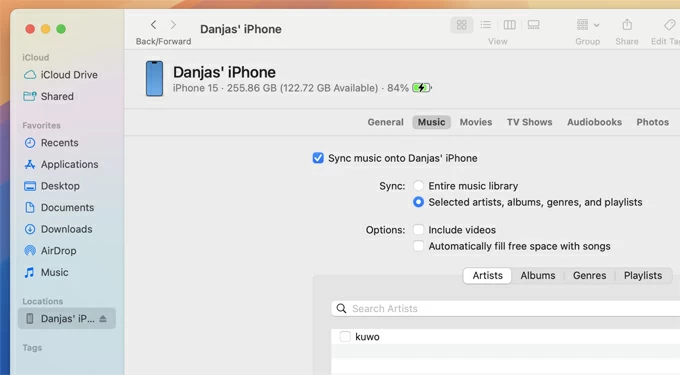
Note that Finder sync is library-mirroring, not additive upload. Delete a song from the Mac Music library, sync again, and it disappears from the iPhone 18 too. If you just want to drop a few new albums in without risking the rest of the phone's library, use Appgeeker iPhone Data Transfer.
If you already pay for Apple Music and want the same library on your Mac/PC and iPhone 18 without ever plugging in a cable, the native answer is Sync Library—what older guides still call iCloud Music Library. All you need to do is sign both in with the same Apple Account, your ripped CDs, imported MP3s and playlists then will get matched against Apple's catalog or uploaded as-is, then appear in the Music app on the iPhone 18 ready to stream or download for offline.
1. Open Music app, go to menu bar, select Music > Settings > General.
2. Tick Sync Library. Wait for Updating Cloud Library to finish at the bottom of the sidebar.
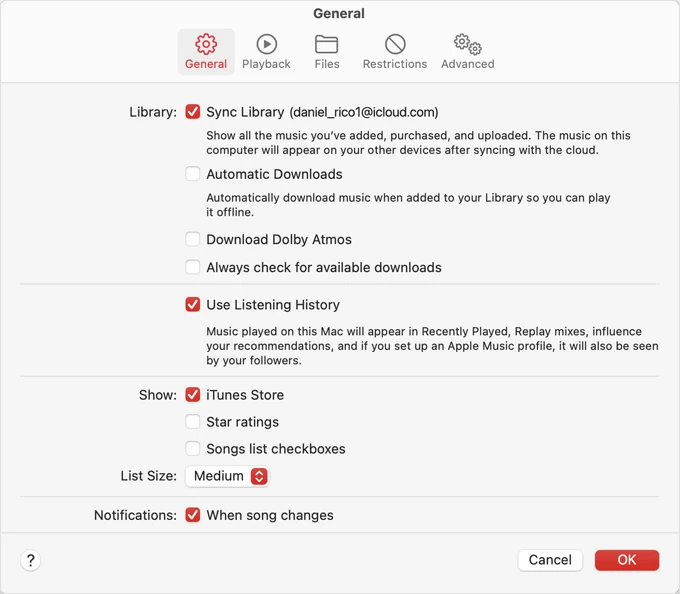
3. On iPhone 18: navigate to Settings > Apps > Music > turn Sync Library on.
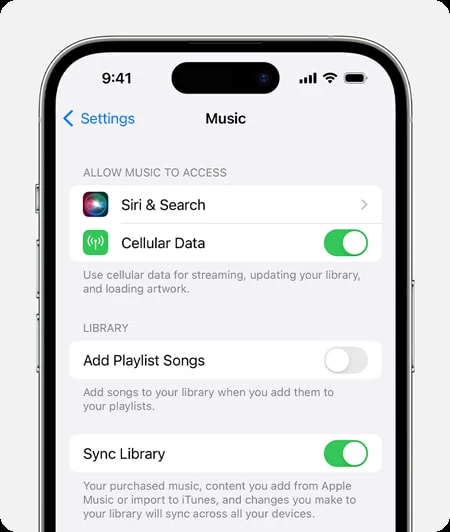
4. Wait for your songs stored on the computer to appear in Music app on the phone.
1. Open Apple Music app, go to sidebar account, select Settings > General, then enable Sync Library option.

2. On your iPhone 18: go to Settings > Apps > Music, turn Sync Library on.
If prompted about existing music, choose Keep Music if you previously cable-synced from another PC; choosing Delete & Replace wipes the phone's synced tracks.
Also see: How to download photos from iPhone to MacBook
Choosing the right workflow really comes down to one question: do you want to mirror a library or simply add to it?
If your goal is to keep a perfectly synced, master library across devices and you already pay for Apple Music, Sync Library is the most seamless wireless choice, though it will replace any music manually synced from another computer.
For a strict, cable-based mirror on a Mac, use Finder; on Windows, the Apple Music and Apple Devices apps achieve the same local sync without a subscription, but be warned—all three official methods above are destructive mirrors that will wipe songs currently on your iPhone 18 if they aren't in the source computer's library. That's precisely why AppGeeker iPhone Data Transfer is worth considering for the "just add music" crowd: it lets you drag-and-drop MP3s or FLACs onto the phone without erasing a single track already there.