How to unlock iPad without Apple ID


Is your iPhone 14 missing your favorite desktop music tracks? It might just be a matter of adding them from your PC or Mac. Here's how to transfer music from computer.

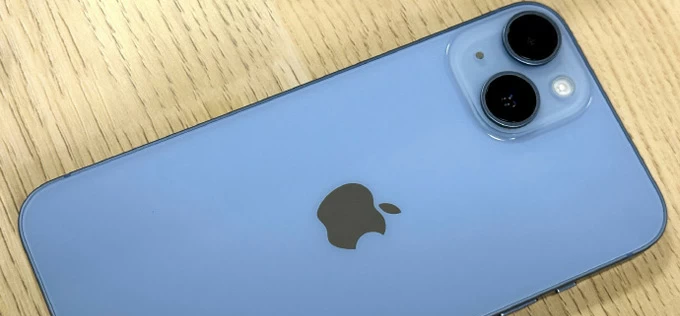
Transferring songs from computer to your iPhone 14 helps take your playlist on the go.
Imagine this: Plug your iPhone 14 into the computer, open the DCIM folder, try to drag and drop your local songs into it, but they don't copy to the phone - nothing happens.
Moving your music collection onto an iPhone 14 can feel surprisingly complicated. Ever since Apple discontinued iTunes on modern operating systems, local file management has split into a confusing maze of different apps depending on whether you use a Mac or a Windows PC. If you have years of curated MP3s, high-quality FLAC files, or custom live tracks sitting on your computer's hard drive, simply figuring out how to transfer those music files into your iPhone 14's queue can be a major headache.
The good news? You do not have to settle for streaming or leave your local media behind. Whether you are rocking a Mac or a Windows PC, there are some proven ways to move your music to your iPhone 14: the official Apple Devices app, the native macOS Finder, the reputable third-party tool Appgeeker iPhone Data Transfer, or flexible Cloud services.
Table of Contents
Best for: Windows users looking for a free, official Apple tool.
Where songs land on iPhone: Native Apple Music app
Format handling: Requires native formats (MP3, AAC, ALAC).
Major drawback: Rigid library sync structure; can feel slow.
For Windows users, the era of bloated iTunes installations is officially over. Apple has replaced it with a streamlined, lightweight desktop program called the Apple Devices app. It is built specifically to handle backups, updates, and local media syncing for devices like the iPhone 14 without all the extra store clutter.
To sync music from your computer to iPhone 14, just launch Apple Devices app, select Music from the left pane, check sync music onto phone and selected the artists, albums, genres, playlists. Then I you want to load.
Note that the sync process will wipe out my phones music library except the newly selected items.
Prerequisites & Setup
Operating System: Windows 10 or Windows 11
A standard USB-A to Lightning cable to connect your iPhone 14
Ensure your music files are organized on your PC, ideally inside your default "Music" folder system.
Steps to transfer music to iPhone 14 from PC
1. Import songs to the Apple Music App. (If you haven't installed it on your computer, search and download it from Microsoft Store.)
To add music files, open the Apple Music app for Windows, click on File, select Add to Library, and choose the folders containing your tracks.
2. Connect your iPhone 14 via USB cable.
If a prompt pops up on your phone screen asking you to Trust This Computer, enter your device passcode to confirm the secure link.
3. Open Apple Devices and locate your phone
Your iPhone 14 should appear in the left-hand sidebar menu under the Devices category. Click on its name to open the general management overview page.
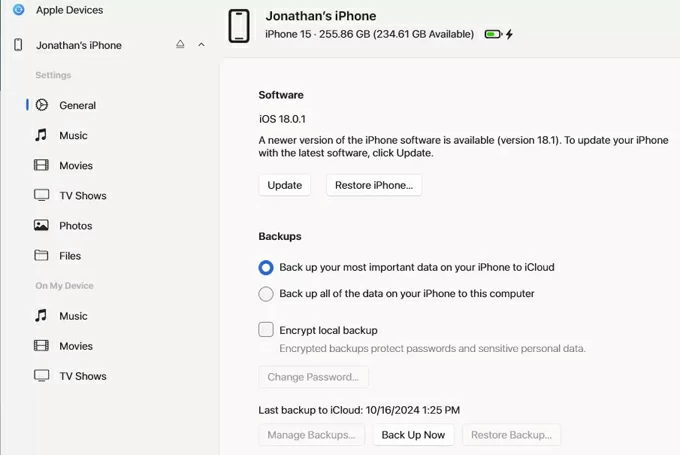
4. Check your Music Sync options
Click on the Music tab located in the sidebar category. Check the box next to Sync music onto [Your iPhone Name]. From here, you can choose to transfer your entire music library or select specific artists, albums, genres, and playlists.
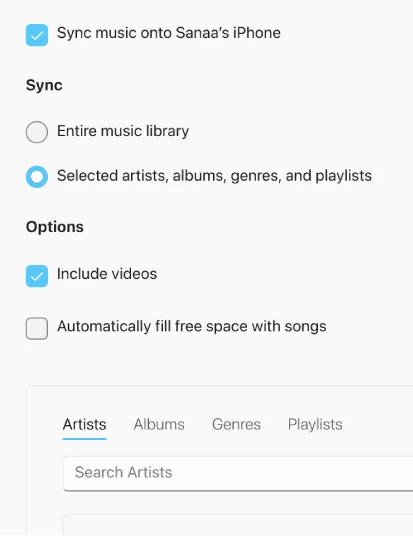
5. Execute the transfer
Click the Apply or Sync button located in the bottom-right corner of the desktop window. The process of syncing music on computer with iPhone 14 will begin.
Keep an eye on the status bar at the top of the screen, and do not disconnect the cable until the progress wheel finishes spinning completely.
Best for: Power users wanting true drag-and-drop freedom without sync rules.
Where songs land on iPhone: Native Apple Music app
Format handling: Converts incompatible audio files automatically.
Major drawback: Need to install on the computer
Sometimes, official Apple utilities feel a bit restrictive. If you want to bypass the rigid, structured sync process entirely—meaning you want to drag a folder of MP3s from any random directory directly on computer to your iPhone 14 without altering the rest of your phone's contents—you need a third-party device manager. Appgeeker iPhone Data Transfer is widely considered the gold standard for this type of task.
Why choose Appgeeker iPhone Data Transfer?
Unlike Finder or Apple Devices, Appgeeker iPhone Data Transfer does not use a master library approach. It treats your iPhone 14 like an external hard drive while maintaining full compatibility with the native iOS Music app. This means you can add songs from computer without encountering that annoying "Erase and Sync" warning that Apple's official tools throw at you.
The utility enables you to transfer media files, including photos, music, videos, to and from iPhone, and it implements both drag-n-drop and click-to-add features. You can even export your personal information (Texts, iMessages, contacts, WhatsApp chats, notes, etc.) locally.
Here's how to drag-and-drop music from computer to iPhone 14. It works on both Windows and macOS computer.
1. Open the utility on your either Mac or Windows PC, and connect your iPhone 14 via USB.
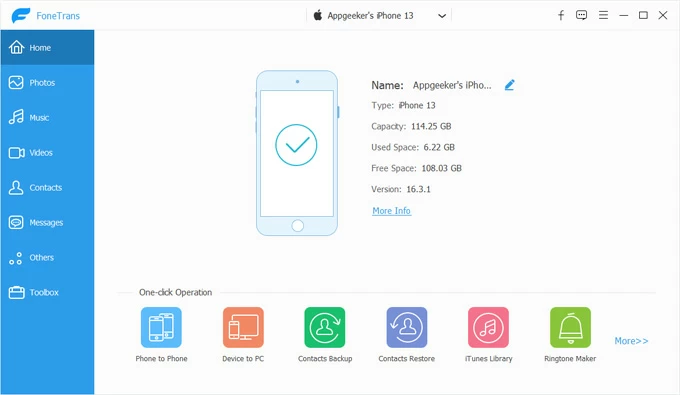
2. Once connected, click on the Music icon in the left sidebar. This should open your phone's music library, and display all albums and playlists.
Click "All Music" or a specific album where you want to store the music.
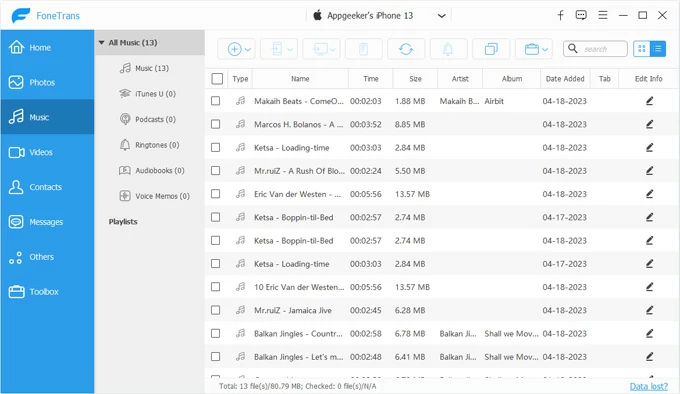
3. Open your computer's local file explorer (Finder on Mac, File Explorer on Windows) and locate your songs.
Next, highlight the tracks or folders you want, drag them across the screen, and drop them directly into the main interface window.
Appgeeker iPhone Data Transfer will read the files, verify their metadata tags, and safely inject them straight into your iPhone 14's native Music app storage container.
One of benefit of using this tool is that you don't worry about the format of the original track, it automatically converts the incompatible files (i.e. FLAC, WAV) into iPhone's playable format.
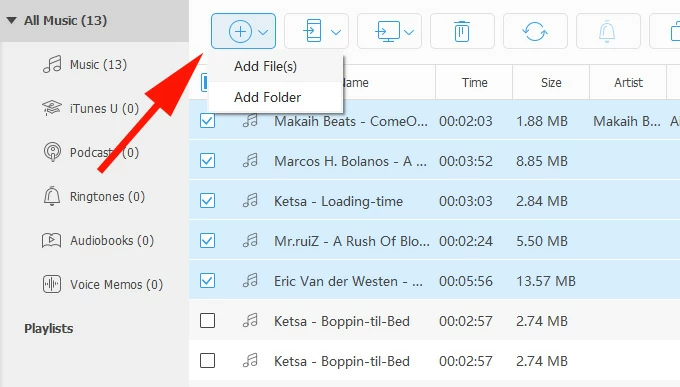
Alternatively, click "Add File(s)" or "Add Folder" button on the top menu bar, from the opening dialog, navigate to your computer and import your songs.
Disconnect your phone and open Apple Music. Your tracks will be sitting under Library > Recently Added, complete with all their original artwork and track tags.
Best for: Mac users who keep a clean, local desktop media library.
Where songs land on iPhone: Native Apple Music app
Format handling: Native Apple formats only; flags errors on FLAC.
Major drawback: Will attempt to overwrite existing device media if libraries mismatch.
If you are using a Mac running macOS Catalina or any later operating system version, you won't find an iTunes or Apple Devices app anywhere. Instead, Apple integrated all local hardware management right into the system's core file manager: Finder.
This method is exceptionally reliable because it is completely native, meaning it handles music transfer for the iPhone 14 seamlessly in the background.
Follow these steps to import music to an iPhone 14 from a Mac computer.
1. Ensure your local tracks are loaded into your Mac's native Music app library (File > Import).
2. Attach your iPhone 14 to your Mac using your cable.
3. Open a new Finder window.
4. Look at the left-hand sidebar under the Locations category. Select your iPhone 14. If this is your first time connecting them, click the white Trust button on your Mac screen, then tap Trust on your iPhone 14.
5. Once the device management screen populates, click on the horizontal Music tab running across the top portion of the window.
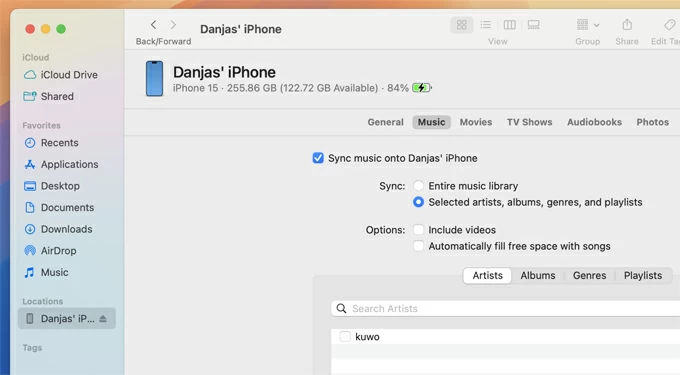
6. Check the box that says Sync music onto [Your iPhone Name]. Toggle between syncing your entire music collection or manually picking specific artists, albums, or curated playlists.
7. Click the Apply button in the lower right-hand corner.
A circular sync icon will appear next to your iPhone's name in the Finder sidebar. Once that icon disappears, your transfer is complete, and you can safely eject your phone.
Best for: Completely wireless transfers or managing uncompressed audio.
Where songs land on iPhone: Files App / Third-Party Media Player
Format handling: Plays almost any file type depending on the playback app.
Major drawback: Cannot integrate tracks into the native Apple Music app library.
If you completely despise messing around with physical cables or managing desktop client software, Cloud Services offer an excellent, wireless workaround. By leveraging platforms like iCloud Drive, Google Drive, Dropbox, or OneDrive, you turn your online storage space into a bridge to send songs over Wi-Fi.
Keep in mind that uploading raw music to a cloud drive and downloading them on your iPhone 14 does not inject those tracks into your native Music library. Instead, the tracks remain inside that cloud app's sandbox.
To play them, you will either listen to them directly through the cloud provider's app interface, open them from your iPhone's built-in Files app, or point a robust third-party iOS media player (like VLC for Mobile) toward those local storage folders.
Steps to move music from PC or Mac to iPhone 14 via cloud service:
1. Open your web browser or cloud desktop application on your computer.
2. Upload your music folders into a dedicated directory (e.g., creating a folder named "My Music Collection" inside Google Drive or iCloud Drive).
3. Let the files upload completely. Once finished, grab your iPhone 14 and open the corresponding mobile app (or use Apple's native Files app if you uploaded everything to iCloud Drive).
4. Navigate to your music folder. Tap the three dots option icon next to your tracks or albums, and select Make Available Offline or Download.
This saves music files onto your iPhone 14's physical storage, ensuring you can listen to them even when you are totally disconnected from cell service.
For a much better listening experience, download a free media player app like VLC for Mobile from the App Store. Open VLC, head to its network or file sync settings, and link it directly to your local file directories or cloud accounts to browse your music library with a clean, continuous playback interface.
The iPhone 14 handles common audio formats like MP3, AAC, and ALAC (Apple Lossless Audio Codec) effortlessly within its native Music app ecosystem. However, if your computer library consists of raw FLAC (Free Lossless Audio Codec) or WMA files, Apple's native sync engines will simply skip over them entirely during a transfer session.
If you want to use Finder or the Apple Devices app, you must first convert your FLAC files into ALAC or high-quality MP3s using an external utility like HandBrake or Foobar2000.
Alternatively, utilize Appgeeker iPhone Data Transfer (which converts files automatically during the migration process) or push the raw FLAC files directly into a cloud drive and play them back via the iOS VLC app, which features built-in FLAC decoding engine support.