
How to Fix iPhone Security Lockout

Your comprehensive guide on importing photos from iPhone 14 to PC is ready. Explore both wired and wireless ways for a smoother transfer across platforms.

If your iPhone has a large photo library and your Windows PC needs them, the most reliable and fastest way is to use Appgeeker iPhone Data Transfer. This is a USB-based transfer route to let you preview, select, and export iPhone photos to PC (or vice versa) more efficiently than with built-in tools.
There is more than one reliable way to move photos off an iPhone and onto a computer efficiently and without quality loss.
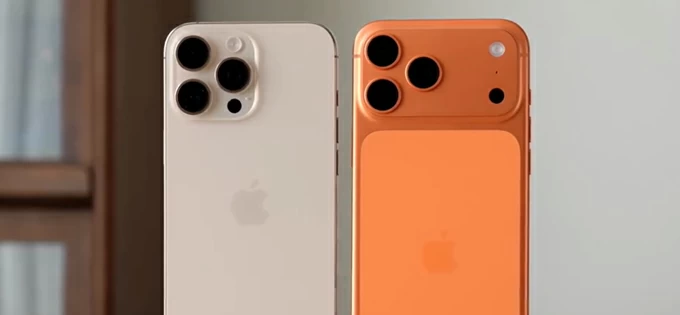
Whether you are rocking the standard iPhone 14 or 14 Plus or the professional-grade iPhone 14 Pro or Pro Max, you are likely taking advantage of one of the best camera systems ever put in a smartphone. With the 48MP main sensor, your photos are breathtakingly detailed—but they are also massive to easily choke your device's storage.
This is often why many users are wondering how to transfer photos from iPhone 14 to PC, in an attempt to offloading those memories to the computer's drive. Luckily, copying photos from iPhone 14 to a Windows computer is simple, and you can take multiple ways for the move—from fast cable transfers to wireless cloud syncing.
In this guide, we break down five proven methods for seamless iPhone 14 photo transfer to PC in minutes, ensuring that you can get your high-resolution shooting off your phone and stay local safely.
Table of Contents
Before starting the photo imports from the iPhone 14 to PC, we first need to deal with the HEIF photos (.HEIC). By default, the iPhone captures images in High Efficiency Image File (HEIF) format. While great for saving space, Windows PCs often struggle to open these files without extra codecs.
So, to get the HEIF photos always be fully compatible with Windows and make the transfer easier, you should adjust one setting on ensure your PC can actually read your photos.
This tells the iPhone to automatically convert your HEIF images into a PC-friendly JPEGs during the transfer, which saves you the nightmare of "can't open file" compatibility issue on Windows after all your photos are transferred.
Also: How to transfer MP3 music to iPhone
Transferring photos from your iPhone 14 to a Windows PC is something almost every iOS user needs to do—whether it's to free up storage, back up precious memories, or edit images on a larger screen.
Depending on how many photos you have, you can use either wired or wireless method to handle large library transfers or small batches transfers.
How to get photos from iPhone 14 to PC with USB cable transfer
How to copy iPhone 14 photos onto PC wirelessly
Using a USB cable for moving photos from an iPhone to a PC sounds simple: connect your iPhone charger cable to your device and your computer's USB port, then drag files over.
There are 3 popular tools you can take to complete the transfer of photos across from your iPhone 14 to your Windows PC.
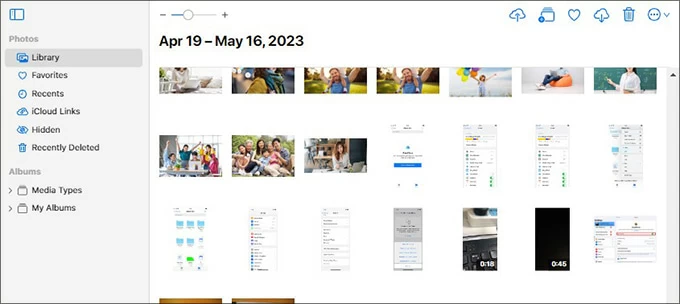
The Windows Photos app is the built-in solution for most users. It is designed to recognize digital cameras and iPhones as soon as they are plugged in through the lightning cable, offering you an easy interface with preview and a guided process of transferring your photos without manually browsing through photo albums.
However, it occasionally fails to detect device and can be slow to load large libraries on your iPhone. If you stick to this native Photos import tool on your PC to migrate your pictures from your iPhone 14, here's how.
1. Connect your iPhone 14 to your Windows computer using a Lightning cable.
2. Unlock your iPhone. If a pop-up asks "Trust this Computer?", tap Trust and enter your passcode.
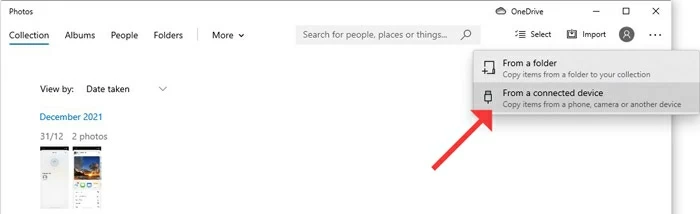
3. On your PC, open Photos app. You can often search for Photos in the Start menu.
4. In the Photos app, click Import in the top-right corner, then choose From a connected device.
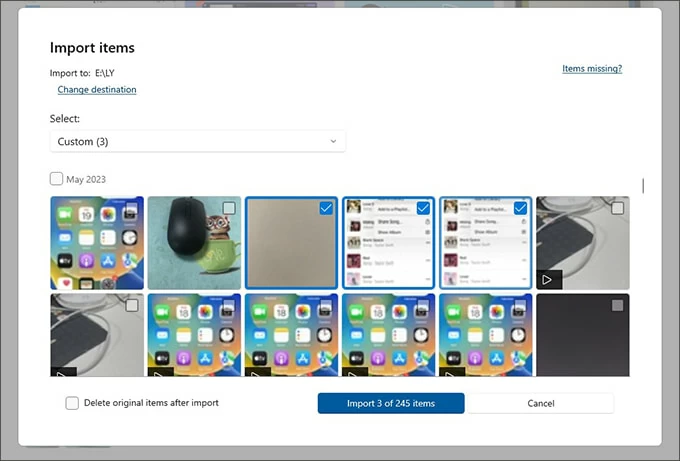
The app will search for photos and videos on the connected iPhone 14. This may take a moment, especially if you have a large library.
5. Choose the photos you wish to transfer to the PC. You can usually import everything or only selected items.
6. If necessary, change the default Pictures folder to your desired folder where you want the images saved on your computer.
7. Click Import [X] items button at the bottom and wait for Windows app to put your iPhone photos onto your PC.
If you prefer manual control, Windows File Explorer gives you direct access to your iPhone 14's camera roll folder — DCIM folder, letting you drag and drop the photos onto the PC without requiring extra software. This USB transfer method is straightforward when you only need a few photos or when you know exactly where they are saved (100APPLE, 101APPLE, etc., or date-based subfolders)
Here's how to transfer photos over from iPhone 14 library to your PC through File Explorer.
1- Plug your iPhone 14 into the PC using a cable, then unlock it and trust the computer if needed.
2- On your computer, open File Explorer (This PC)
3- Under Devices and drives, double-click Apple iPhone.

4- Navigate to Internal Storage > DCIM. Inside, you will see subfolders that contain your photos and videos. They should be named by year-month, or 100APPLE, 101APPLE, etc.
5- Browse through the folders until your find the photos you'd like to copy over.
6- Simply copy and paste (or drag) the folders or individual photos from these folders to a location on your PC's hard drive.

For transferring a large photo library, the process may take some time. Keep the phone connected until the migration is finished.
For users who are looking for a more organized transfer experience at a faster speed, Appgeeker iPhone Data Transfer is a top-tier third-party tool.
Unlike the Windows Photos app or File Explorer, which can be glitchy, this dedicated iPhone photo transfer software provides a stable solution that bypasses any restrictions and allows you to preview & transfer a large amount of photos and videos between iPhone and PC without compromising the original quality. It can also convert HEIC to JPEG on the fly, saving you the hassle of setting the TRANSFER To MAC OR PC in iPhone Photos settings to Automatic.
In addition to importing photos from iOS device, the program is also able to transfer videos, music, text messages, iMessages, contacts and more info all in one place, making it possible to view iPhone files on the computer.
Whether you need to copy all photos from an iPhone 14 to a PC for backup, device's space cleanup, project editing on a big screen or for other purposes, or simply move multiple pictures over, follow these steps to complete the transfer via USB connection using Appgeeker iPhone Data Transfer utility.
Step 1: Launch the tool, and attach iPhone 14 with the computer through the lightning cable.
Step 2: To export your photos that are on iPhone, click on Photos tab on the left sidebar.

Step 3: Preview your photos in your iPhone 14's Camera Roll. The software maintains your photo album structures (Live Photos, Videos, Screenshots, etc.), making it easier to access iPhone photos on a PC and locate the preferred ones to transfer.

Step 4: Check the boxes for the photos or albums you want to move. This step is helpful if you only want certain albums, recent shots, or selected images instead of everything on the phone.

Step 5: Hit Export to PC icon from the toolbar at the top, choose your destination folder and let the software handle the rest. If your photos are HEIFs, there's a built-in HEIF converter to handle the conversion to JEPGs during the transferring procedure.
Wait for the program to finish copying the selected photos from your iPhone 14 to your computer.
Related: How to retrieve old Messages on iPhone
Chances are that some users prefer a wireless transfer of photos from iPhone 14 to Windows computer. The good news is that Apple has native photos sync related to iCloud account to get photos off iPhone and onto PC without a cable.
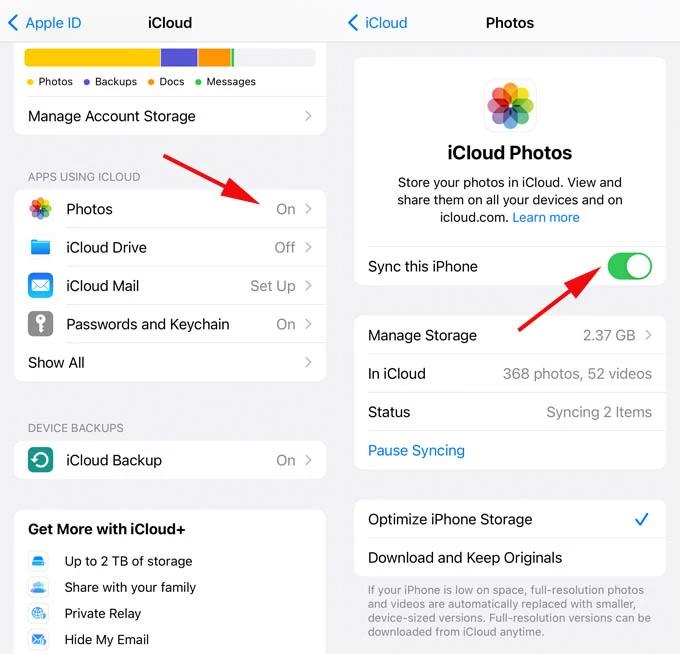
The first method is to download iPhone photos directly from icloud.com through your browser - if you don't want to install any software. Before attempt this web-based solution of downloading photos from iPhone 14 to Windows PC, you have to set iCloud Photos to ON so your photos are uploaded to iCloud: Settings > [your name] > iCloud > Photos > Sync This iPhone.
Once iCloud Photos is turned on, it's time to download photos from icloud.com to your PC's local drive.
The selected photos will save to Download folder on the computer. From there, you can copy the photos to anywhere you want.
Tip: If you hold down the Download icon, you can choose between "Unmodified Original" (highest quality) or "Most Compatible" (JPEG).
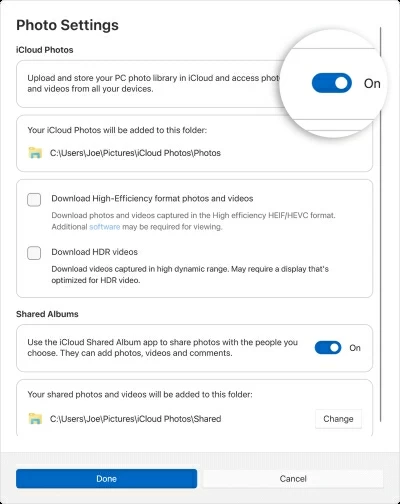
By enabling iCloud Photos on iPhone 14 and in iCloud for Windows app, your entire library of photos and videos will automatically sync across devices through your Apple ID and Wi-Fi connection.
The only catch is that, iCloud gives you only 5 GB of storage for free. If you have a lot of photos to sync with iCloud for downloading to the PC, make sure to upgrade the plan. To get started how to transfer pictures from the iPhone 14 to your PC, do the following.
1. Enable iCloud Photos on your iPhone 14.
On your device, go to Settings > Photos, then turn on iCloud Photos. Your iPhone will upload photos to your iCloud account as long as it's connected to Wi-Fi network.
2. Install iCloud for Windows if it is not already installed.
3. Open iCloud for Windows and sign in with your Apple ID.
4. To the right of iCloud Photos, click ">" icon, then turn on iCloud Photos to trigger the automatic wireless sync. Your iPhone 14 photos will begin appearing on your PC.
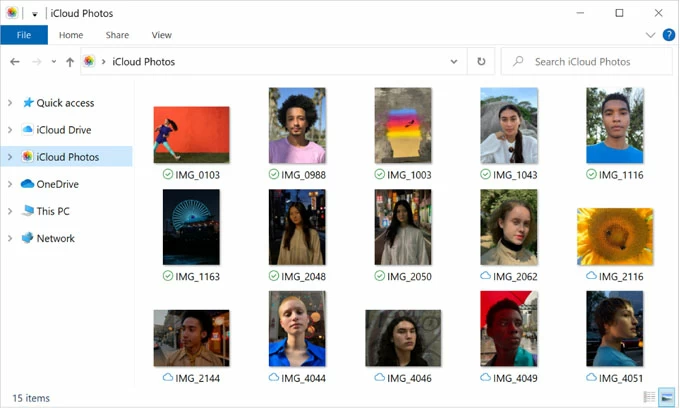
After syncing, access your iCloud photos in File Explorer. They are usually available in the iCloud Photos folder on your Windows computer, where you can click on each image to have it fully downloaded for local access, move or edit.
Depending on your specific needs like speed, simplicity, or stability, there is no single easiest way to transfer photos from iPhone 14 to PC for everyone. Below are key features of each tool so you can pick the best one to make your iPhone photo import to Windows smoother.
Windows Photos app: Simple and beginner-friendly. It is a good choice for quick imports when you want Windows to handle the process for you.
Windows Explorer: Direct and manual. It gives you folder-level control and works well for users who prefer drag-and-drop transfers.
Appgeeker iPhone Data Transfer: Flexible and organized. It is ideal when you want to preview, select, and export JEPG, PNG, HEIF photos at original quality more efficiently than with Microsoft's built-in tools.
iCloud Photos: Wireless and automatic. Once set up, it keeps your photos synced across devices without repeated manual transfers.
iCloud.com: Convenient and software-free. It is best for downloading photos from a browser when you are away from your usual PC or do not want to install extra apps.


