
How to transfer WhatsApp from Android to iPhone

Looking for a reliable way to transfer files from your iPhone to your Windows 10 desktop? Apple comes with a few ways to handle the tasks, and there are third-party solutions, too.

If you're looking for a reliable and efficient way to deal with your media files, including photos, videos, music, go with Appgeeker iPhone Data Transfer. It acts as a versatile, "sync-free" alternative to iTunes, allowing for seamless two-way, drag-and-drop media transfers without the constant fear of accidentally wiping your library. It also includes options to export your personal information, such as contacts, text messages, notes, voice memos, etc.

Click Unlock button to begin the process.
The situation is simple: your iPhone is full. Between 4K video recordings of your kids and essential work PDFs, your storage is screaming for help. You need to move these files from your iPhone to Windows 10 computer.
Here is where the complication arises, though. You can't just drag everything from the iPhone onto your desktop. Instead, there is no single solution that perfectly addresses every transfer scenario. The method you can take depends entirely on what you are transferring, how much of it there is, and your tolerance for cables versus cloud dependence.
In this article, we will walk you through the ways of transferring photos, videos, and non-media files from an iPhone to a Windows 10 PC. To bridge the divide between iOS and Windows 10 effectively, we must categorize the solutions based on the data type: Photos/Videos (the storage hogs) and Non-Photo Data (documents, files, etc.). Here's how.
See also: How to Get Into a Locked iPad
Photos and videos usually constitute the bulk of data intended for transfer. Transfer those files from an iPhone to Windows 10 primarily using a USB cable for direct access, or wireless methods like iCloud, OneDrive, or third-party apps like Appgeeker iPhone Data Transfer.
This is the classic method. It doesn't require extra software and is often the fastest way to move a massive amount of photos and videos at once because it relies on the speed of the USB connection rather than Wi-Fi. You simply plug the iPhone into the PC, select "Trust" on the phone, and use Windows File Explorer to copy from Internal Storage > DCIM.
Here's how to transfer media files (photos, videos) from iPhone to Windows 10:
1. Plug your iPhone into your Windows 10 PC using a cable.
2. If a prompt appears asking if you trust this computer. Tap Trust and enter your device passcode. If you don't do this, Windows will not see any files.
3. On your PC, open File Explorer (Windows Key + E). Under This PC, you should see your iPhone listed as a portable device.
4. Double-click the iPhone icon, then Internal Storage. You will see a folder named DCIM (Digital Camera Images).

5. Inside DCIM, you will see several folders with confusing names like "100APPLE," "101APPLE," or "CloudAssets." Your photos and videos reside in these folders.
6. Select the photos/videos you want, right-click and select Copy, and then paste them into a desired folder on your Windows PC.
Important! Do not cut and paste. If the connection drops mid-transfer, you might lose the file on both ends. Copy first, verify, then delete from the phone later.
Another way to transfer your media files from iPhone to Windows 10 is use third-party tool, something like Appgeeker iPhone Data Transfer. It's a dedicated data management suite that's used for transfer media files to and from iPhone, and includes a set of tools to handle other tasks, including the ability to create custom ringtones, edit music tags, back up messages, export contacts, manage iCloud drive, convert HEIC images to JPG format, and more.
Benefit of using it:
Steps to import media files from iPhone to Windows 10 PC:
1. Launch the tool and connect your iPhone

2. Click Videos, Music, or Photos from the left sidebar. This will open the corresponding media library and show you all items inside it.
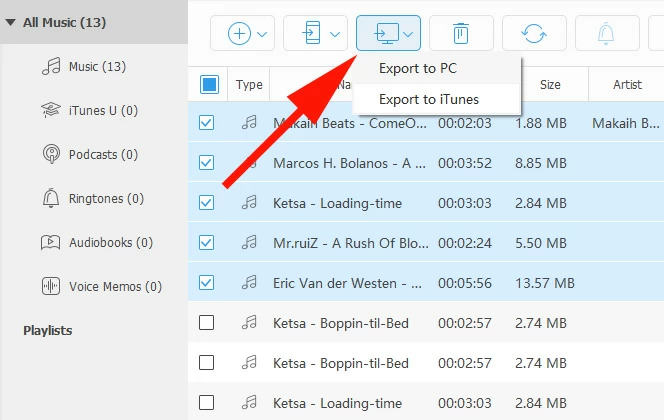
3. To transfer your files, select what you need from the list, then click the Export to PC icon on the top menu bar (see image below). In the opening dialog, select a local folder on your PC to store them.
Export photos:

Export videos:

Export songs:
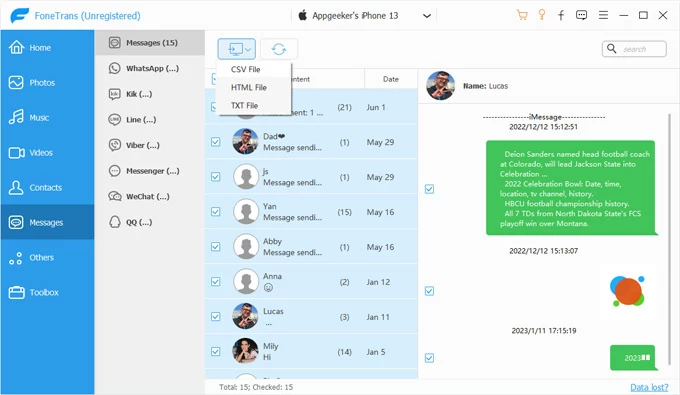
Tip: You can also export SMS, iMessages, WhatsApp chats, call logs, contacts notes, and other files — even print them or save them as PDFs. It's ideal if you sometimes just want to back up a few important conversations without doing a full iPhone backup.
See also: How to Add Ringtones to iPhone
Windows 10 includes a native Photos app designed to streamline imports from cameras and phones. It offers a slightly cleaner interface than sifting through raw DCIM folders.
1. Connect your iPhone to Windows 10 PC, and open Photos app.
2. In the top right corner of the Photos app window, click the Import button.
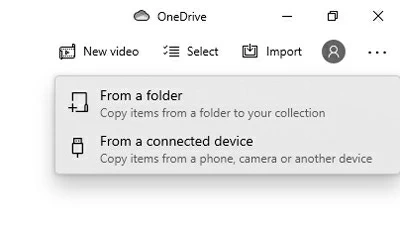
3. Select From a connected device. The app will scan your iPhone for photos and videos.
4. Once populated, you can select Import all items, or pick individual photos or videos.
5. Click import and choose where on your PC you want them saved.
If you dislike cables and have sufficient iCloud storage space, iCloud for Windows is the most seamless long-term solution. It automatically syncs photos taken on your iPhone to a dedicated folder on your PC.
1. Download and install iCloud for Windows from the Microsoft Store.
2. Launch it and sign in with your Apple ID.
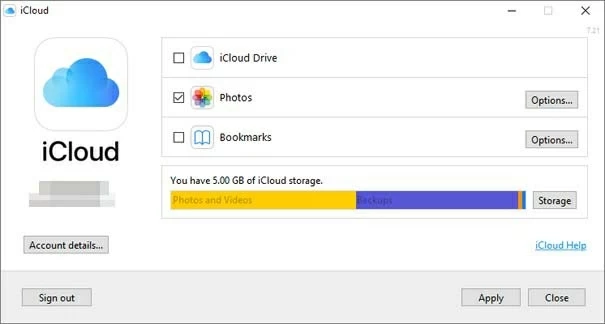
3. Check the box next to Photos. Click the Options button next to it.
4. Ensure iCloud Photos is selected. You can choose to "Download new photos and videos to my PC" and specify the path.
5. Click Done and then Apply.
Once set up, any photo you take on your iPhone will eventually appear in the specified folder on your PC whenever both devices have internet access. It is not instant, but it is automatic.
See also: iMessages Missing on iPhone
For documents, PDFs, or media within specific apps, you will need to use other approaches to transfer them to your Windows 10 from iPhone.
This method is older and clunkier, but it remains essential for transferring files directly into specific apps that support it (e.g., loading video files into the VLC Player app, or loading PDFs into a specific reader app).
1. Install the latest version of iTunes on your Windows 10 PC.
2. Connect your iPhone via USB.
3. Click the small iPhone icon near the top left of the iTunes interface.
4. In the left sidebar menu, click on File Sharing.
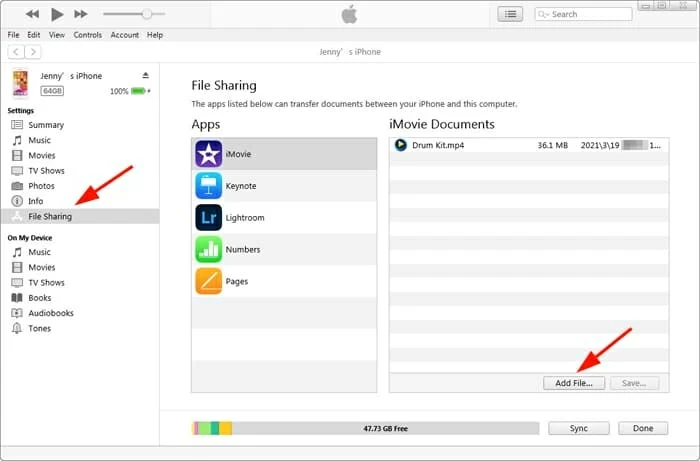
5. You will see a list of apps on your iPhone that are capable of receiving files this way.
6. Click on an app (e.g., Microsoft Word, Adobe Acrobat, VLC). Before you click, you will see a list of documents currently in that app's sandbox.
7. To transfer from iPhone to PC: Select the file in the right-hand pane and click Save to... then choose a location on your PC.
See also: How to Remove Apple ID from iPhone without Password
Another way to move non-media files is to utilize a middleman cloud service that both the iPhone and Windows 10 support natively. Since this is a Windows guide, Microsoft OneDrive is often the smoothest option, as it's built into Windows 10, though iCloud Drive works well too.
1. Install the OneDrive app on your iPhone from the App Store and sign in with your Microsoft account.
2. On iPhone, open the Files app. Tap Browse at the bottom. You should see OneDrive listed as a location.
3. Move the documents you want to transfer into the OneDrive folder within the Files app.
4. On Windows 10, open File Explorer and click on the OneDrive icon in the left sidebar.
Your files will synchronize there automatically.
If you installed iCloud for Windows, you can also check the box for "iCloud Drive." This creates an iCloud Drive folder in your Windows File Explorer that acts just like any other folder.
1. On iPhone, open the Files app. Save your documents (PDFs, Word docs, etc.) into the "iCloud Drive" location.
2. On PC, open the iCloud Drive folder. The files will appear there, synchronized over the internet.


