How to transfer music to iPhone 13

Your iPhone 11 has accumulated more and more photos and videos. It's time you transfer them to your PC or Mac to free up storage spaces. These tips will get you there.

Don't like the way Photos app or File Explorer does when it comes to transferring pictures from your iPhone 11 to the computer? It's worth going with Appgeeker iPhone Data Transfer, which has a clean and effortless transfer of photos from an iPhone, and comes with a set of tools to manage and transfer music, photos, ringtones, podcasts, and videos to and from your iPhone and iPad.
You can make a wired or wireless transfer of your photos on iPhone 11 to a Windows computer or Mac.
When you have a large library of photos and videos taken with camera on your iPhone 11, you may be at the edge of running out of space. What if you don't want to buy more iCloud storage? The good news is you can directly transfer photos and video from iPhone 11 to PC or Mac so that you can save them to a separate hard drive, or get a physical copies of your photos on an external HDD that you can move around.
Having your favorite videos and photos saved locally means you can free up a lot of space on your iPhone 11. This article will show you which apps you'll need and guide you through the steps to ensure a smooth photo transfer from iPhone 11 to computer. Let's get started!
Table of Contents
Transferring iPhone 11 photos to PC or Mac can be useful for optimizing storage space on the device. Here's what you need to know to start transferring photos and videos from iPhone 11.
You can download photos from iPhone 11 to computer using a USB cable or wirelessly. Which method you should take depends on your needs and preferences.
If you have a large number of pictures to move onto your PC or Mac without interruption, you will want to use a physical USB cable, which gives you ability to directly import photos from iPhone 11 to computer desktop, and it's generally the fastest. For this purpose, you can try the import feature in Windows/ Mac Photos app and File Explorer import feature.
iCloud.com website is convenient for automatic syncing and quick download of photos from iPhone 11 to PC, while you will need to install iCloud for Windows app and enable Photos option for a sync. The third-party cloud services work the similar procedure to help transfer photos to computer from iPhone 11.
The AirDrop is known for its speed and efficiency in transferring a small group of photos from iPhone 11 to Mac.
If you want to get more control about your media library on iPhone 11 rather than just directly transfer photos to computer, stick with iPhone Data Transfer, which is cross-platform.
See also: How to transfer music to iPhone without iTunes
Windows 10 and Windows 11 comes with a Photos app and File Explorer that allows photos transfer for iPhone with a direct connect instead of a cloud service or wireless connection. Follow these simple steps to connect your iPhone 11 to your PC with a USB cable and begin importing photos from iPhone 11 directly to Windows PC.
First of all, make sure Apple iTunes or Apple Devices apps installed on your Windows 10 or Windows 11 PC. You can get either of them from Microsoft Store.
If you have iCloud Photos enabled on your phone, you must download the original versions of your photos to your device before you import to your PC: Settings > [your name] > iCloud > Photos. Then select Download and Keep Originals.
1. Connect your iPhone 11 to your PC using a working USB cable.
2. If prompted, tap Trust or Allow on your phone, and then enter your passcode to unlock it.
3. Select Start button on your PC and open the Photos app. It comes already installed.
4. Click the Import button in the top right of the application window.

Get photos from iPhone 11 to computer
5. Locate Apple iPhone. Allow a few moments for loading your photo library. All your photos and videos will display in the window.
6. Check the boxes next to the photos you want to import into computer, or choose Select all.
7. Select the folder on your PC to which you want to transfer the photos.
8. Click the Import button. It saves your photos onto the target folder immediately.
9. When done, eject your iPhone 11 and unplug it from your Windows PC.
To get the best compatibility when transferring photos from your iPhone 11 to PC Windows 10 or Windows 11, on your phone, go to Settings > Camera > Formats and tap Most Compatible instead of High Efficiency. This way, your camera will capture photos and videos in JPEG and H.264 formats in the future.
See also: Photos disappeared from iPhone
Another simple way to transfer photos from an iPhone 11 to Windows computer is to copy them directly from your device's internal storage. Here's how.
1. First, connect your phone to your computer using a cable.
2. Unlock your iPhone 11 using your passcode.
3. If it asks you to trust your computer or allow access, tap Trust or Allow to continue.
4. Open the File Explorer on your PC.
5. Locate your phone under This PC in the left side column. Double-click on Apple iPhone.

Move photos from iPhone 11 to computer
6. Double-click Internal Storage that appears to open your photos library. You should see all of the folders here. They should be named things like 202501_, 202502_, 202503_, etc.
7. To transfer your photos, you can copy and paste the photos from a specific folder to your preferred location on the PC. Alternatively, open another window in File Explorer to a local folder, drag and drop your photos from iPhone 11 to your computer.
8. Unplug the device.
If you can't just copy/paste photos using Windows File Explorer, you should go to Settings > Photos on your iPhone 11, scroll down until you find the Transfer to Mac or PC section at the very bottom and then select Automatic option. (don't check Keep Originals)
You don't have to limit yourself to Windows Photos or File Explorer when you're moving photos from iPhone 11 to PC.
Appgeeker iPhone Data Transfer is a highly rated third-party solution that has always been known for its simplicity and flexibility. It simplifies the photo transfer process, allows you to access the phone's media library whenever you need and quickly transfer the pictures and videos to your computer hard drive.
The winning feature of it is the ability to transfer your media files (photos, videos, music, podcasts, etc.) to and from the iPhone and iPad — regardless of the models, as well as manage your phone's media library. When you need to add, move, delete, preview, de-duplicate, or export a file, iPhone Data Transfer makes it incredibly easy.
Here's how to get photos off iPhone 11 onto PC Windows 11 quickly. The instructions work for any other Windows operating system and macOS.
1. Plug your phone into the computer with a cable, and launch Appgeeker iPhone Data Transfer.

2. When connected, Click the Photos in the left sidebar. Allow the software to generate all the photos from iPhone 11, sorted by date. This will help download only photos newer than the last time you downloaded in future.

3. To transfer photos from iPhone to your computer, check the boxes next to the thumbnails, check the box next to the date, or check the Check All(numbers).
4. Then click the Computer icon (when you hover it, it says Export to PC). In the opening dialog, designate a folder where you'd like the file to be saved on the PC.

Alternatively, right-click on the selected photo(s), then select Export to PC. You can also choose to transfer over to your iPad or iPhone, or move to another album you want.
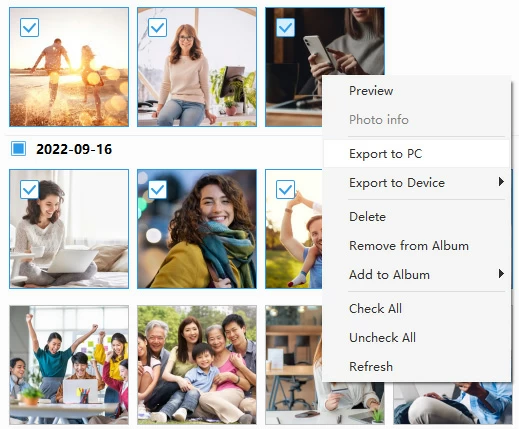
Also, the software comes with a direct transfer of entire media library by right-clicking the name of media library, followed by Export to PC.

For music lovers, the beauty of iPhone Data Transfer is that you can use it to make custom ringtones, transfer your music to your iPhone and vice versa, and even create your favorite playlists within the app.
Downloading pictures from iPhone 11 to Mac with Photos app is very similar to downloading them to PC Windows 11/ 10. For Mac users, the preinstalled Photos app will be your primary app.
Here's how to import photos to a Mac.
1. Connect your iPhone 11 via a USB cable.
2. Unlock your phone and tap Trust if prompted.
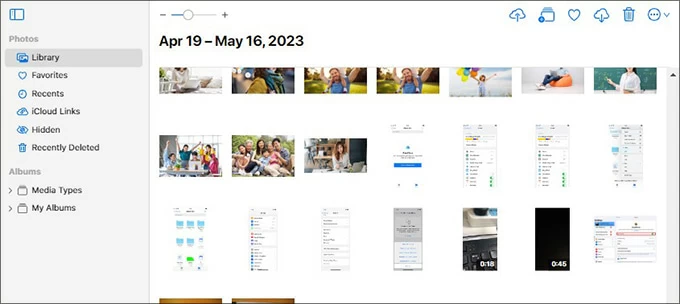
3. Open the Photos app.
4. Click the phone name in the sidebar of the app. It shows all the photos and videos from iPhone 11 in the screen.
5. In Add To field at the top of the screen, browse to the folder you'd like the photos copied to. You can choose an existing album or create a new one on Mac.
6. Select the photos you want to import the list and click Import Selected; to transfer all your photos to Mac, click Import All New Photos instead.

Import photos from iPhone 11 to mac
If you want to delete the photos from your phone after the import to free space, tick the Delete items after import checkbox in the upper-right corner.
7. After your iPhone 11 photos are transferred to Mac, disconnect the device.
See also: iPhone says unavailable
If you don't want to go through a wired transfer, the easiest way of copying photos from iPhone 11 to PC is first sync the photos and videos to iCloud and then use iCloud for Windows to access your photos on computer, or login into iCloud.com from your PC and download them from there.
The only caveat with this route is that Apple only offers 5GB of free storage for iCloud. You will have to pay for more storage if you have more than 5GB of photos that needs to be synced.
1. On iPhone 11, go to Settings > [your name] > iCloud.
2. Tap Photos, then turn the Sync this iPhone switch on. Wait for your photos to sync with iCloud. Make sure you have enough space in your iCloud to accommodate all your photos.
3. On your Windows 10 or Windows 11, browse and sign in to the icloud.com website with the same Apple Account used on your iPhone 11.
4. Select Photos in iCloud menu. You should see the photos synced from your phone.
Import photos from iPhone 11 to Mac
5. If you want to download all your photos from iPhone 11 to PC, click any one of the photos, then press Ctrl + A to select all.
6. Click the Download icon (a cloud with down arrow) in the upper right of the page.
7. In the opening dialog, specify a folder on your computer, then click Save. Your photos are saved to your selected place as a ZIP file.
See also: What to do when you forget iPad passcode
Install the iCloud for Windows app on your PC if you have not already done so.
1. Enable iCloud photos on your iPhone 11. Check the steps above.
2. Open iCloud for Windows app, sign in with the same Apple Account.
3. Click the arrow next to iCloud Photos and then turn on the iCloud Photos switch from the settings screen that opens.
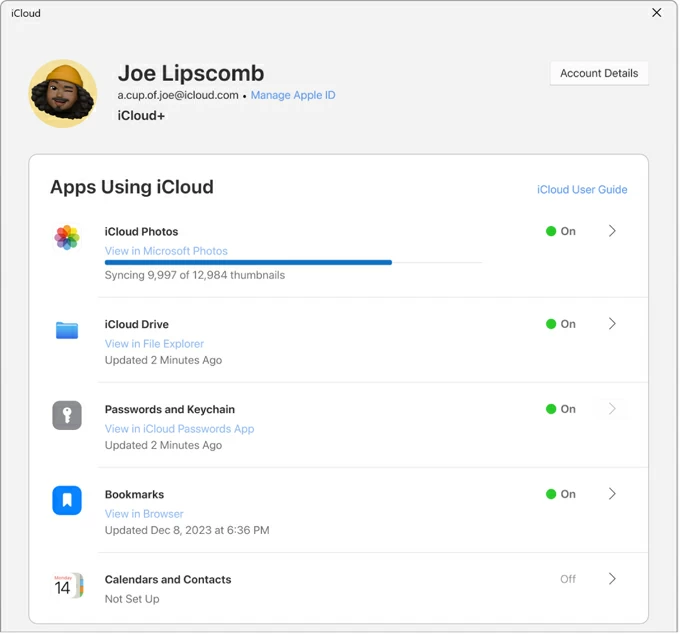
Transfer photos to computer from iPhone 11
4. Click Done. All your photos that are stored on your iPhone 11 will now automatically download to your PC when Wi-Fi is available.
5. After the download, navigate to C:\User\[your user name]\Pictures\iCloud Photos\Photos, and you should see all downloaded photos and videos via iCloud on your computer.
See also: Apple ID locked for security reasons
Your another option is use AirDrop, which lets you transfer pictures from your iPhone 11 to Mac wirelessly. The tool is more useful for transferring just a few photos at a time. Your first step is to ensure both Apple devices are within Bluetooth and Wi-Fi range, and have AirDrop enabled on both.
1. On your iPhone 11, open the Photos app.
2. Select the photos you want to transfer to Mac, and click the Share icon (the square with an up arrow).
3. In the sharing menu, select AirDrop.
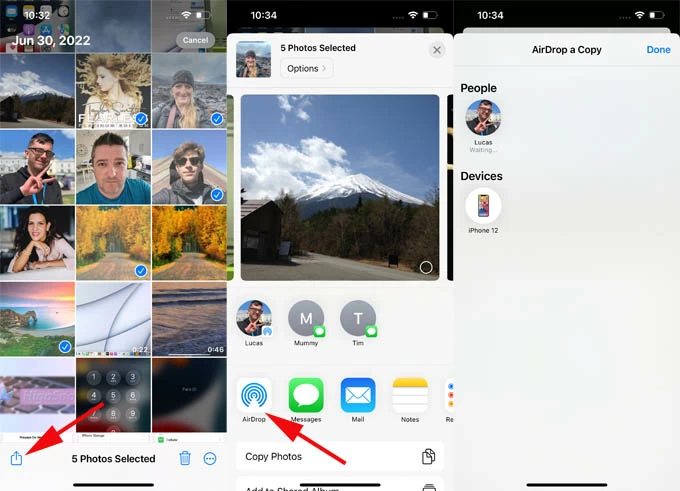
Send photos from iPhone 11 to Mac computer
4. When your Mac's name appears in the list of nearby devices, choose it.
5. On your Mac, a notification pops up on the screen asking you to accept or decline the photos you send. Click Accept to receive the photos.
6. The photos will be saved in the Downloads folder on your Mac by default. If both devices are signed in with the same Apple ID, the transferred photos might automatically save to Mac's Photos app.
See also: How to spoof location on iPhone
There are several other cloud storage services available for you to choose from as a bridge to transfer photos from an iPhone 11 to a PC or Mac, such as Google Photos, OneDrive, Dropbox. And most of them have a similar procedure to complete the job.
1. Install the app on both your phone and computer
2. Upload your pictures from iPhone 11 to its cloud server when signed in.
3. Download everything you need manually on your computer. You can also visit the cloud service website via your desktop browser to download photos.
One thing to be noted that, while each Google account offers 15 GB of free storage shared across Gmail, Google Drive, and Google Photos, Microsoft only includes 5 GB of free space in OneDrive for all users. For those who have a huge number of photos and videos on their iPhone 11, you might need to purchase additional storage plans or subscribe if it's inefficient to transfer that amount of data.