
How to Fix Security Lockout on iPhone

Do you want to transfer your photos and videos from iPhone to Windows 11 PC & laptop? Read on and here's the ultimate guide on how to get iPhone photos onto Windows 11.


Seamlessly transfer the high-resolution pictures from your iPhone to a Windows 11 PC.
iPhone space is always limited, especially with high-resolution photo library that can easily take up a lot of memory. Therefore, many people like to transfer photos and videos from iPhone to Windows 11 PC to clear up device space as well as store, manage or edit photos conveniently. And this post will walk away four simple and fast methods for you on how to transfer photos from iPhone to Windows 11 PC.
Table of Contents
Microsoft Photos app, as the software that comes with Windows 11 to manage and organize photos, can help you import photos and videos from external connected devices to Windows PC. There is no need to download third-party software, just need to prepare a data cable adapted for linking PC and iPhone to transfer photos from an iPhone to Windows 11 PC.
1. Connect your iPhone to Windows 11 with a lightening or USB-C cable.
2. Unlock your iPhone and trust the computer to access your iPhone.
3. Open Microsoft Photos app from the Start menu.
4. Select your iPhone device from External Devices tab on the left sidebar. The videos and photos from your iPhone will start loading in the right panel.
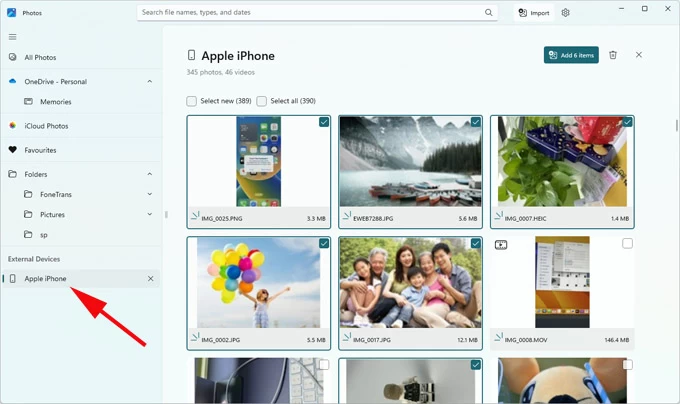
5. Check the photos and videos you want to import and then click the "Import [Number] items" button.
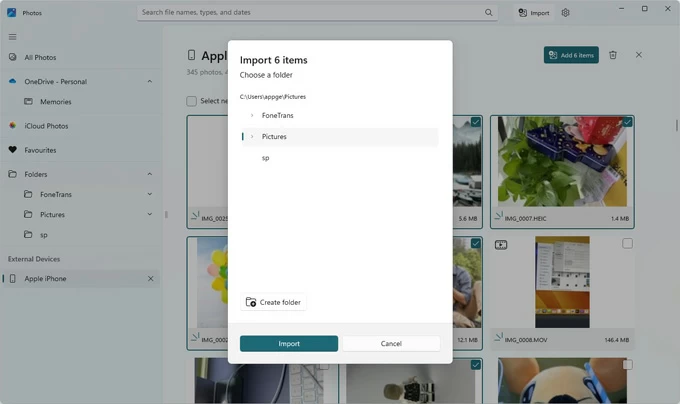
6. In the pop-up window, choose a destination to save the transferred photos from iPhone to Windows 11.
Note:
However, transferring photos with Windows Photos app requires you to install additional HEIF Image Extensions to view HEIC images. Looking for a more compatible method, you can take the help of Appgeeker iPhone Data Transfer to quickly and seamlessly transfer tons of photos from iPhone to Windows 11 PC without iTunes, and vice versa.
The software organizes iPhone photo collection decently into different albums within Camera Roll, and Photo Library. Besides, it's capable of dealing with different formats of photos, screenshots, and videos taken with iPhone's Camera, including JPG, JPEG, PNG, HEIF, MP4, MOV, etc. For HEIF photos, you can convert them to JPG/ JEPG format during the transfer process, making them more compatible with Windows 11 systems.
Here's how to use iOS Data Transfer to copy photos from iPhone to Windows 11 PC without quality loss:
1. Download and launch the software on your PC and then plug your iPhone into the Windows 11 with a data cable.

2. Navigate to the "Photos" tab and select the photos you want to import. All the images on your iPhone will be sorted into different categories. You can preview these photos in the right panel and then check the photos you need.

3. Get iPhone photos off Windows 11 PC. When you're done selecting photos, click the "computer icon" (Export to PC) on the taskbar above, and then select a folder to save the imported iPhone photos locally.

Alternative to importing iPhone photos to computer for saving, you can also learn how to transfer photos from iPhone to external hard drive.
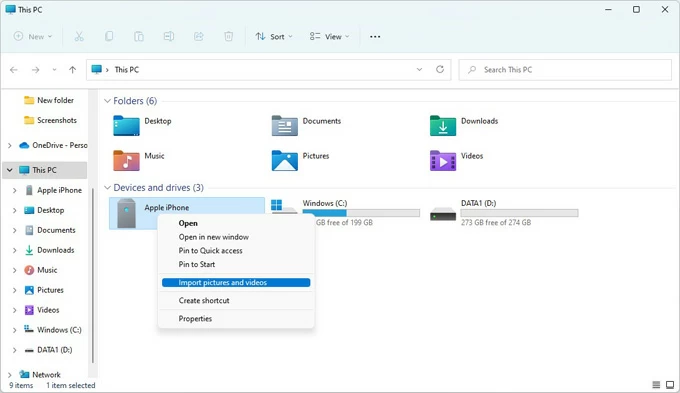
In addition to the Microsoft photos app, Windows 11's built-in File Explorer can also help you move photos and videos from iPhone to Windows 11 PC. File explorer allocates your photos and videos to the DCIM folder by reading the media files of your iPhone's memory. You can follow the steps below to copy your iPhone photos to Windows 11 through File Explorer.
1. Connect your unlocked iPhone to Windows PC with a USB cable.
2. Press "Windows logo key + E" on your keyboard to open File Explorer.
3. Locate "Apple iPhone" in the Devices and drives section.
4. Right-click on the Apple iPhone, and choose "Import pictures and videos" from the menu that appears.
5. Windows 11 will start scanning your device for photos and videos and tell you how many new items you have that were not previously transferred.
6. Select "Import all new items now" > "Import" to move iPhone photos and videos to the PC's Pictures folder by default.
Tip: During the import process, you can check "Erase After Importing" in the Import Pictures and Videos window to delete the photos transferred to Windows 11 PC from iPhone.
Also read: How to transfer videos from PC to iPhone
To transfer iPhone photos and videos to Windows 11 PC without USB, you can use a cloud storage service, such as iCloud. iCloud is a cloud server for file and data management and backup that is built-in to Apple devices. If you turn on iCloud Photos, your photos will be synced between iPhone and Windows PC wirelessly.
The benefit is that you can use iCloud to download your photos from iPhone to a Windows 11 PC without the loss of quality. However, you should pay attention to if your iCloud has enough space for your entire photo library, as iCloud only offers 5GB of free storage space.
1. Make sure your iPhone has uploaded the photos to iCloud. Go to Settings > [your name] > iCloud > Photos and enable "Sync this iPhone."
2. Visit icloud.com on your Windows 11 PC and sign in with your Apple account.
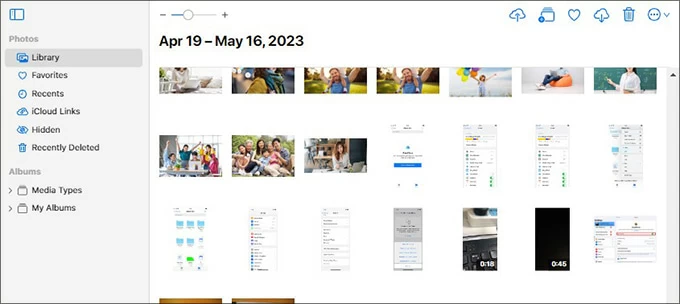
3. Navigate to the "Photos" option to view your iPhone pictures.
4. Pick the pictures you want to download to your PC.
5. Click the "Download icon" at the upper right of the page. Then you will get iPhone photos on your PC.
Actually, iCloud Photos is directly integrated with the Photos app in Windows 11. You're able to access iCloud Photos in the Microsoft Photos app and then download photos from your iPhone to your Windows 11 PC.
1. Can I transfer my photos from iPhone to Windows PC without cable connection?
Using cloud-based services can wirelessly transfer iPhone photos to PC, such as iCloud, OneDrive, Google Drive, Dropbox. You should first upload photos from iPhone to the cloud, then download them from the cloud to save locally on Windows computer. Or, you can send photos as attachments to your PC via email.
2. Why doesn't my Windows 11 recognize my iPhone photos?
If your photos are in HEIC format, Windows 11 PC might not recognize them unless you download the HEIF Image Extensions. But in order to make your iPhone device more compatible with your Windows 11, you can change the settings directly on the iPhone:
3. How to transfer photos from iPhone to Windows 10/11?
To import photos and videos from an iPhone to PC, after you have established a connection between iPhone and Windows 10/11 using a data cable, click the "Start" button and select the "Photos" app. Click Import > From a USB device, then select photos and videos from your iPhone and import them to computer for storage.


