Get Back Deleted Messages on iPhone without Backup

Can't transfer your photos from Mac to iPad? No need to worry, if you've chosen a right method in this post.

The act of capturing moments with a DSLR camera is one of our habits. Every time we use the camera to capture the beauty, we let our Macs read the pictures from the camera and manually transfer these pictures to our Macs.
You may want to edit and upload the pictures on your social media accounts. However, it is difficult for you to do so. Since the editing software on the Mac is far too advanced for a novice to operate. There's still hope if you have an iPad. iPad is a convenient device for beginners to use for photo editing. You can always transfer these pics from Mac to your iPad to edit them.
![]()
You can always transfer photos from Mac to your iPad without effort.
You don't need to spend long hours sitting in front of your Mac searching for various ways to transfer photos from Mac to iPad to get the job done. Most of the methods you need are already in this post. At most, you might need to make a choice between these methods.
Import photos from Mac to iPad with a USB cable
How to Transfer Photos from Mac to iPad Wirelessly
Apple has an app called iTunes that can help you move photos between Apple devices, including from Mac to iPad. In macOS Mojave and earlier, you can use iTunes to transfer photos from Mac to iPad. If you have a Mac with macOS Catalina and later, iTunes has been replaced by Finder.
In this post, we will take Finder as an example. For iTunes users, you can still use these steps to transfer photos from Mac to iPad because the procedure is not significantly different.
Here's how to import photos from Mac to iPad with Finder:
1. Let iTunes or Finder run on your Mac. Plug your iPad into your Mac's USB port using a USB cord. Then unlock your iPad and trust the Mac. To proceed, you will be prompted to enter your iPad passcode.
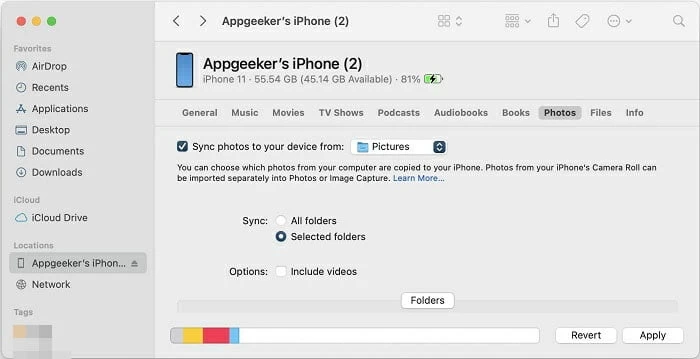
2. In Finder, click on "your iPad's name" from the left sidebar.
3. Hit on the category you want to share, which in this case is "Photos."
Note:
4. Check the checkbox next to "Sync photos to your device". From the drop-down menu, select the Photos app or any other folder you want. To start transferring, click on the "Apply" option.
Once you have finished, you can open the Photos app on iPad to view the added items.
Be aware that using iTunes/Finder to sync photos may result in data loss on the destination device—iPad. These new pics may take their place in your iPad's current pics. If you are afraid to risk losing your data, consider the following third-party solution—iPhone Data Transfer.
Many individuals are fans of iOS, but they are not fans of iTunes because of the risk of data loss. Alternatively, iPhone Data Transfer is worth considering. It is a one-stop source for all your data management needs. Aside from the fact that it can handle all of the essential functions of iTunes, iPhone Data Transfer also includes many valuable extras. It takes care of all of the compatibility concerns for you and also lets you preview the items as you transfer them.
iPhone Data Transfer is a great way to move photos from Mac to iPad with no obstacles. Read on to see how it works.
Step 1: Launch iPhone Data Transfer on Mac
Firstly, download Appgeeker iPhone Data Transfer by clicking on the green "Download Now!" button below, and then set up the software on your Mac
Step 2: Connect you iPad to Mac
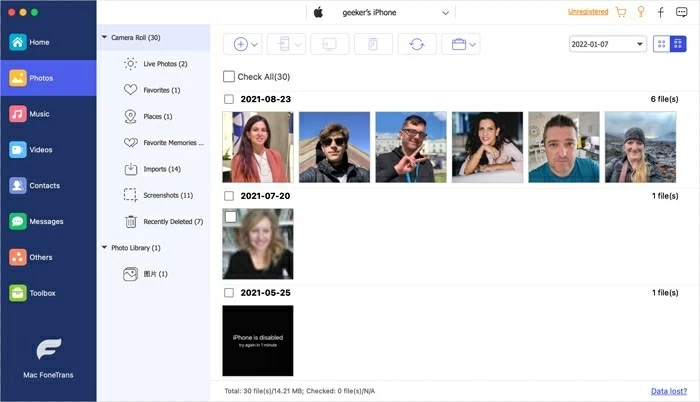
When you open iPhone Data Transfer, you can see a tip on the screen asking you to connect your device to manage your data. Just plug your iPad into your Mac. Enter the passcode to unlock you iPad to let it trust your Mac. Then iPhone Data Transfer will show you the detailed information about your iPad.
![]()
Step 3: Add pictures from Mac to iPad
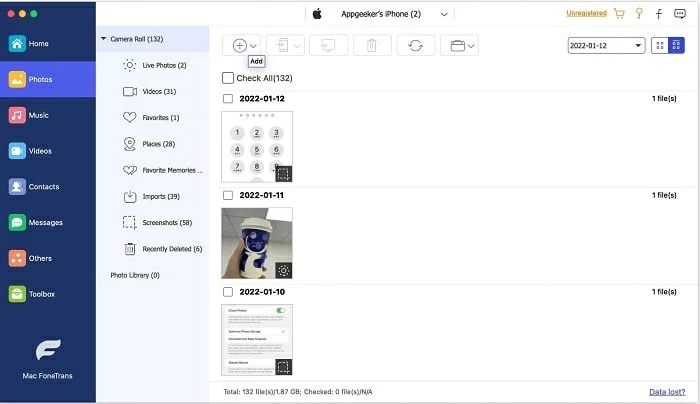
In the left-hand directory, select "Photos." In this window, you should see all the photos from your iPad.
At the top of the software, click on the "+" button. Then choose the pictures that you want to transfer from the picture folder on your Mac. You can also drag and drop the items into the software window to begin the transfer process.
Usually, it takes a few seconds to transfer photos from Mac to iPad. Once transferred, you can check them on your iPad.
The last two methods describe how to use a USB cable to transfer images from your Mac to your iPad. But there are many people looking for solutions to transfer photos from Mac to iPad wirelessly. It is possible to accomplish that. Let's find out how.
If you wish to transfer images from Mac to iPad wirelessly, iCloud may be one of the options available to you. Your images will always be synced to all your Apple devices as long as you have iCloud Photos enabled. Irrespective of the device you use to access your pictures, full-resolution versions are kept in the cloud.
For iCloud to transfer photos from Mac to iPad, make sure to use the same Apple account on both Mac and iPad. Adequate storage space in iCloud is also required to accommodate the items you'd like to transfer.
To transfer images from your Mac to your iPad using iCloud, first, enable iCloud Photos on your iPad by navigating to "Settings"> "Your account" > "iCloud" > "Photos" and turn on "iCloud Photos."
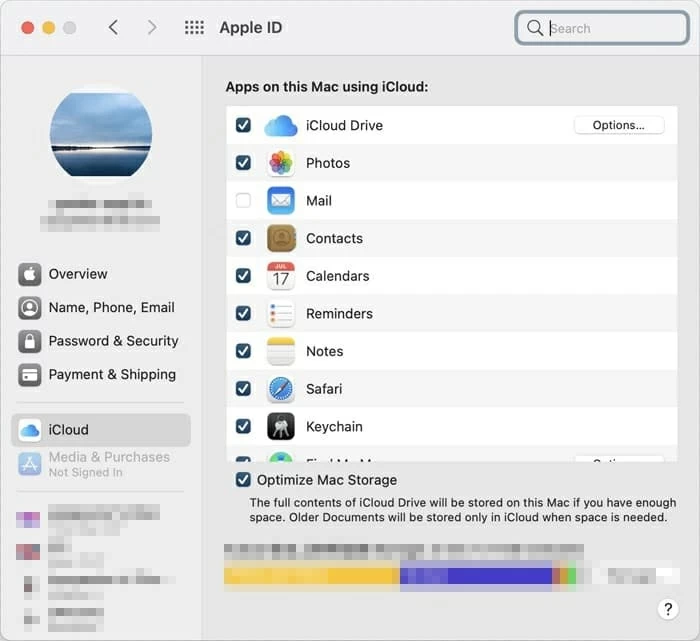
On your Mac, click on the Apple icon on the top-left corner of your screen and choose "System Preferences" from the drop-down menu. Afterward, sign in to your iCloud account by going to "iCloud." Tick the box beside "Photos."
Your Mac's Photos app will upload all of its photos to iCloud. After the synchronization, you may now access these added items on your iPad.
Apple's iCloud is an excellent option to sync photos from Mac to iPad for those who are willing to pay a monthly fee. Of course, it's fine if you aren't because you get 5GB of free storage.
Using Airdrop to transfer pictures is a method unique to Apple devices. If you are the people who neither want to use a USB cable nor a cloud storage service. This may be a good option for you to send photos from Mac to iPad over Wi-Fi and Bluetooth.
You can use Airdrop to transfer photos between Mac and iPad as long as they are in close proximity:
The first step is to enable Airdrop on your Mac: go to "Finder" > "Airdrop" and select "Everyone" as the option for "Allow me to be discovered by." Then, from the iPad's Control Center, enable Airdrop.
Go to the item you wish to share and select the "Share" option, then "Airdrop," select the name of your iPad, and click "Done." Move to your iPad, tap "Accept." Of course, you can multi-select to transfer.

After tapping on "Accept" on your iPad, you will be led to the newly added photos on your iPad.