
5 Options to Record Audio from Computer in High Quality

You may find that you can only record you computer screen with microphone audio only. Then how to record audio playing on computer? Here're the answers.


There may be some limitations on computer system audio recording due to the safety privacy and policy.
Recording audio playing on a computer is a great way to achieve high-quality recorded content for streaming. Audio recording can do wonders whether you are a podcaster or like to capture epic moments when playing games, online classes, or meetings. This article will review various audio recording apps for Windows and Mac.
Table of Contents
Many people ask, can I capture sound playing on a computer? Some users may want to record an audio track playing on the computer without recording the corresponding video. Here, we will show you how to record sound playing on a computer only without video.
Stereo Mix, also called What U Here, is the built-in feature on Windows 10 and Windows 11 PC that users can use to capture and output audio from the computer. It is disabled by default, but you can go to settings and enable it to force any software or application on your computer to record the same audio from speakers or headphones.
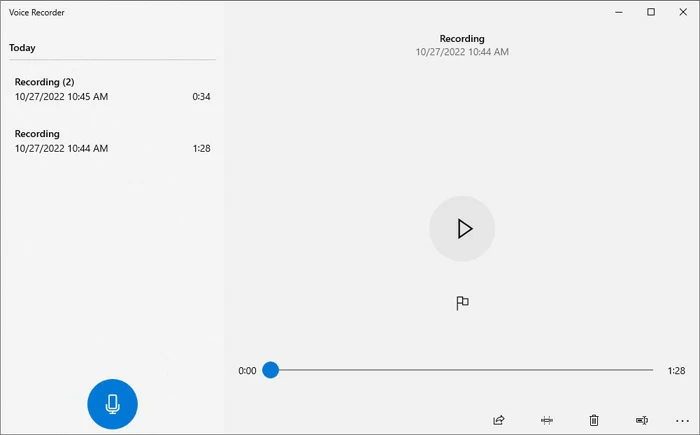
Microsoft has launched Sound Recorder for Windows which can be traced back to Windows 3.0. It is sometimes called Voice Recorder depending on the Windows operating system you use. It can record audio from microphones. On Windows 10 and Windows 11, it is supported to pick up and output internal voice through the loopback channel Stereo Mix. After enabling Stereo Mix, you can choose it as the audio resource in the Sound Recorder to catch the voice from the computer.
To enable Stereo Mix:
Note:
After enabling Stereo Mix, let's go to record playing audio on Windows PC using Windows Sound Recorder:
Note:
Audacity is a free desktop program to record system and microphone audio on Windows, macOS, and Linux computers. It can record your voice and a wide range of microphone sounds. But Audacity is not user-friendly, especially for novices. Therefore, we'll guide you step-by-step to learn the use of this recorder.
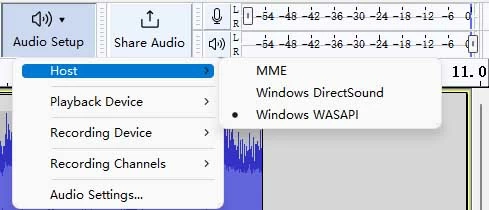
Some Windows computers don't have the Stereo Mix option. But worries not. For Windows computers, Microsoft released WASAPI and added it in Windows Vista to enable applications to manage the audio between the application and output devices like headphones and speakers on Windows 7 and later versions. If there's no Stereo Mix option on your computer, you can still record the computer audio using WASAPI on Audacity.
As for Mac users, it would be more complex to use audacity to record internal audio. Keep reading to learn the specific steps to record computer audio.
Note:
1. Launch the Audacity
Download and install the software on your computer from the Audacity website.
2. Select the appropriate settings
After opening the app, pick the recording parameters. Click on the Audio Setup button and choose Windows WASAPI in the Host panel. If there are no speakers on your computer, use headphones to pick up the audio by choosing Headphones in the Recording Device panel.
3. Record the audio and save it
After settings, click the Record button to start the sound recording.

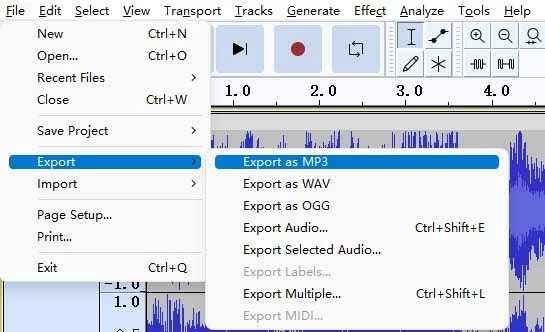
4. Export recorded audio file
After you're done, go to File > Export > Export as MP3. Then you can choose the output file and save the recorded audio.
As for Mac users, if you use the M1 and later chip-based models, you can't record computer audio using Audacity. If not, go to download a plug-in called Soundflower.
Before recording, go to Transport > Transport Options to turn off the checkmark next to Software playthrough (on/off). Then click on the Record button directly.
Note:
OBS is a free, open-source screen recorder compatible with Mac and Windows. You will find it captures an MP4 or MKV format file in your device instead of a pure audio file. Even if you record audio only, you'll be presented with a blank video with audio. The recording process using OBS is kind of difficult. On the one hand, the un-user-friendly interface will discourage many newbies, on the other hand, the professional features OBS offers make it more suitable for advanced users.
Since the operation on Mac and Windows are similar, Let's take Windows PC for example, and learn how to record an audio play in Open Broadcast Software.
1. Run the Software
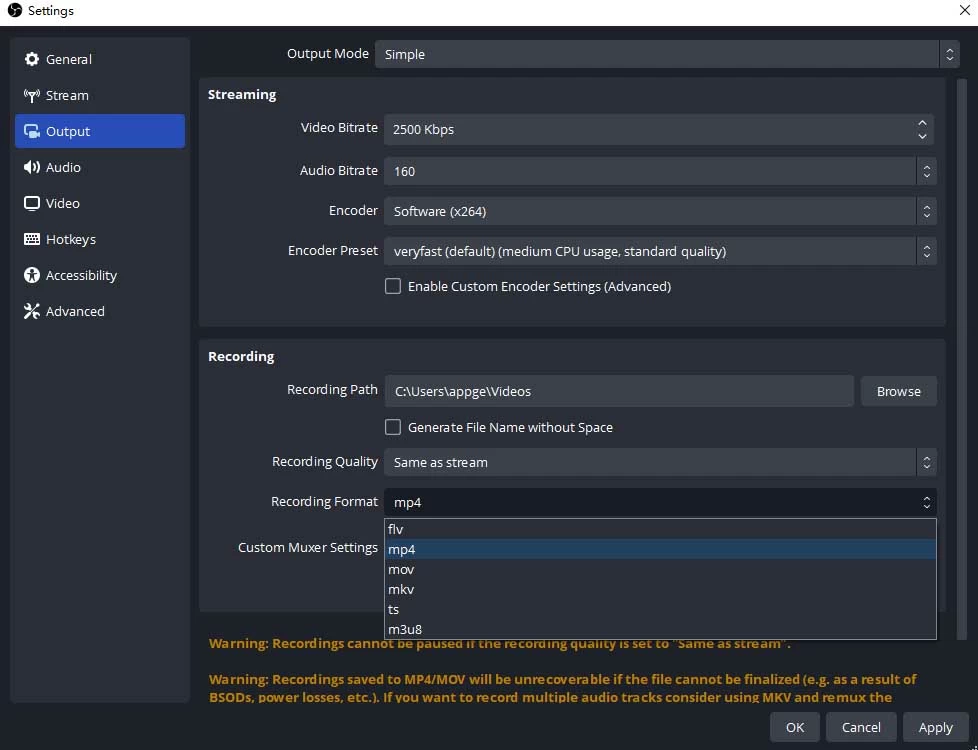
When you run the OBS for the first time, go to the auto-configuration wizard. Here, you will find a guide about handling the software on your device. Also, it will provide different Settings, such as recording, resolution, encoder, etc., for further use.
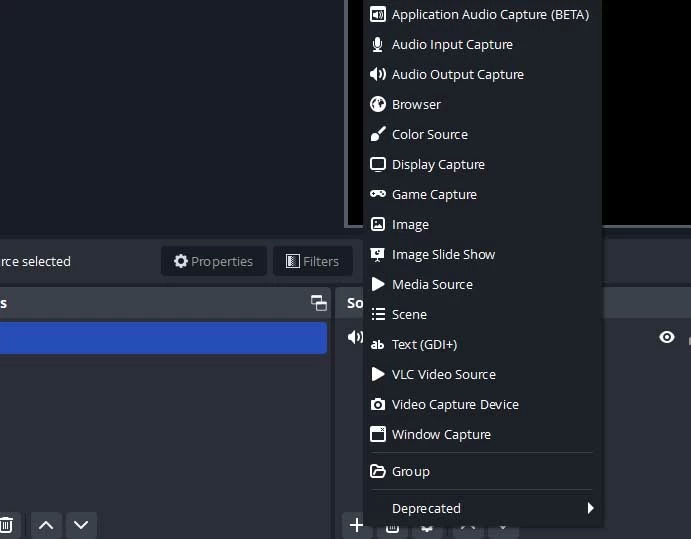
2. Add recording source
Automatically, this software is designed to capture desktop and microphone audio. Click the Add button in the Source module, and choose Display Capture.
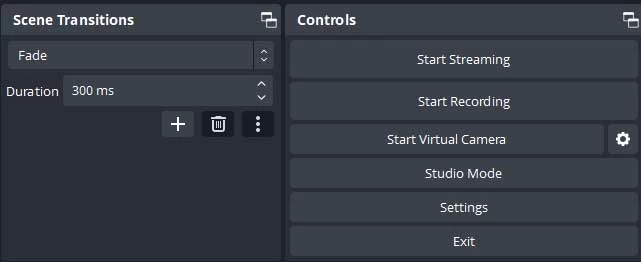
3. Start Recording
After completing all the settings, you can click on the Start Recording option. When the recording is complete, tap the similar button to Stop recording.
Appgeeker Screen Recorder is an excellent tool to record all the happenings on your screen. Users can seamlessly use it to record audio from the system and the microphone. You will enjoy the latest output settings like audio format, quality, and many more.
Compared to OBS Studio and Audacity, Desktop Screen Recorder is more user-friendly – no extra settings and the straightforward recording process makes it selected by more newbies. Once installed, you can use it for a wide range of recording and conversion functions.
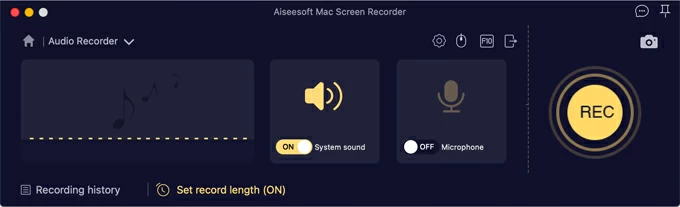
Step 1: Run the software on your computer and select Audio Recorder from the available options. If you want to record a video as well, click on Video Recorder.

Step 2: Select the audio source from the system sound and external microphone.
Step 3: After you've set the recording parameters, hit the red REC button to start recording sound playing on the computer.
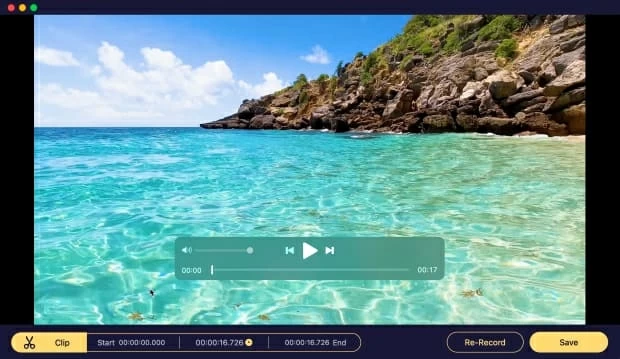
Step 4: Finally, preview and save your recording at the desired destination on your device. You can press Re-Record if you are not satisfied with your current recording.
AppGeeker Screen Recorder is a reliable and comprehensive screen recorder for your wide audio and video recording needs. It is easy to use for beginners and delivers outstanding output results. But for advanced users, it offers advanced algorithms to check and enhance the audio quality.
Xbox Game Bar is Microsoft's default recording tool for recording games on Windows. Capable of working on Windows 10 and 11, it can not only capture game clips but seamlessly record other applications with both the internal and microphone sound. The downside is that it only records one application on the screen, and it can't capture the whole screen.
You must navigate your device's Settings and enable the Game Mode in the Gaming Bar.
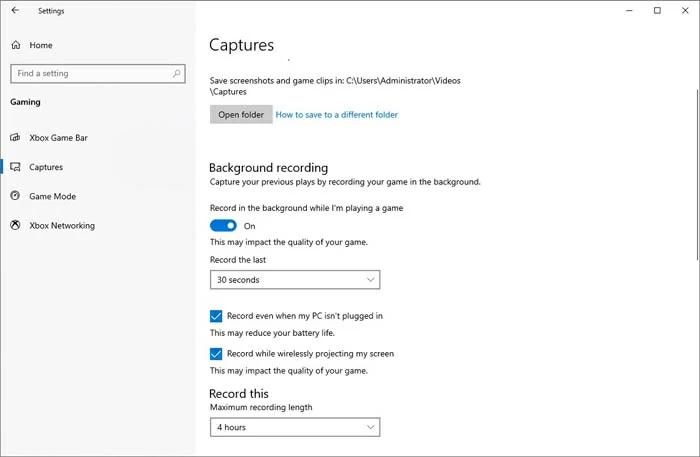
After that, close all the unwanted windows except the one you like to record. To open the Xbox Game Bar in that window, press Windows + G on your keyboard simultaneously. The Game Bar widget will display all the required options you need for recording.

You will click on the Capture icon to record the screen. But before that, you must enable the audio recording and adjust the volume of the system and microphone sound. Both internal and external voices will be recorded by default.
Once done, click on the Recording button to start recording.
At last, click the Stop button in the bar or directly press the keyboard shortcut Windows + Alt + R to stop the recording.
Similar to Xbox Game Bar, Mac models also have their screen recorder QuickTime Player. It is generally considered a video player as the name implies, but it also features video recording. However, it can only capture the sound from the microphone. System sound recording is unavailable. Also see: How to record screen in Windows 10
Newbies usually find it challenging to use Audacity due to its complex interface. However, they can use video-to-audio converters as an alternative. AppGeeker Video Converter allows you to extract audio from the recorded video clip.
Video Converter is a fantastic tool to convert all media formats from one to another. You can use this software to extract sound from a video. Moreover, you can convert audio to popular formats like M4A, MP3, and others. Its vast compatibility and advanced editing features make it a perfect tool for extracting audio. The tool is enough to please beginners and experts.
You just need to import the video, choose the output format in the profile, set the output folder, and convert.
Wrapping up
To conclude, this article is a comprehensive guide to recording audio playing on the computer. Each recording tool we have reviewed features its perks and drawbacks. However, sometimes you might like to record a computer screen with system sound without any hassle. For this purpose, you will need to install Appgeeker Screen Recorder to cope with it. Come and free download to have a try!


