
How to Use QuickTime to Record Screen and Audio

You can record computer audio in a better way by running a proper sound recorder. Here's how to use the native audio recorder or some extra tools to capture sounds from computer.

What can you do to create new audio recordings on computer:

Record audio from a computer using the pre-installed recorder or other sound capturing apps.
When you're listening to music or a podcast, or having an important meeting, you may want to save the audio file and keep it for later use. On smartphones, you can tap the screen record option and get everything recorded easily. But recording audio on a computer is entirely different. Depending on what audio you wish to record from your computer, there are multiple ways you can go about it. We can also help you if you're interested in the quick ways to record screen with audio on your computer.
Suppose you want to record your computer's internal audio, here you will find the best solutions with step-by-step guides. We'll also guide you on recording external audio on your computer with simplest tools. Just go through all the listed methods and pick a proper one to use. Now, let's dive into the most essential part on how to record audio from your computer in easiest ways.
Tip: Before everything else, note that there are two types of audio files that you can record from your computer: the internal audio coming out from your computer system, including the media and application sounds; and the external audio inputs through your microphone, such as your voice and sounds from your surroundings.
To capture audio from your computer's microphone, simply open up the built-in tool Voice Recorder on your computer and create new recordings.
For Windows users, you can easily open the Voice Recorder app (Sound Recorder on previous Windows 8) and record external audio through your microphone. It comes pre-installed on your computer, so you don't have to download any extra app. It is an efficient tool that is easy to access. You can also add markers to record key moments and do quick trims after recording. We also have another guide to help you in audio recording on a Windows PC.
STEP 1: Start by checking your microphone.
Make sure that your mic is turned on and ready for recording. Head to System Settings > Sound and select the Input option. Pick your microphone from the drop-down input list. Set the volume to the max for a better recording.
STEP 2: Open the Voice Recorder program from Start menu. You can also use the search bar to find and access it.
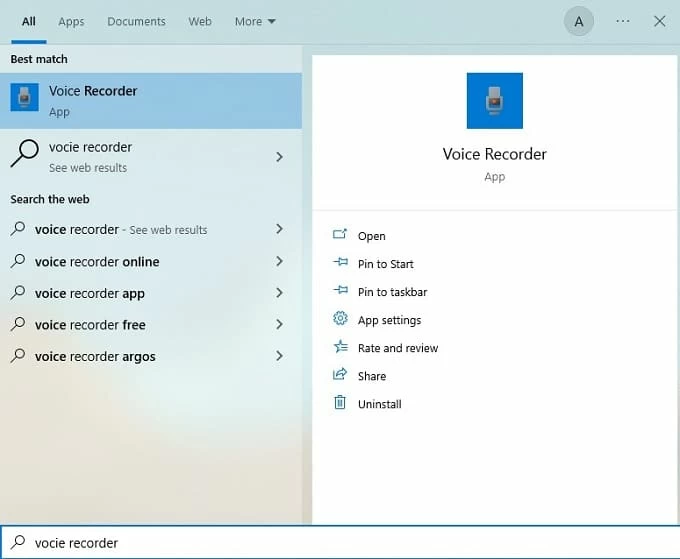
Open the Voice Recorder on your computer from the Start menu or search bar.
STEP 3: Click on the Microphone icon to create a new recording.
You can pause the recording while you record. Also, the flag icon is for adding markers to help you remember the important moments of your recording.
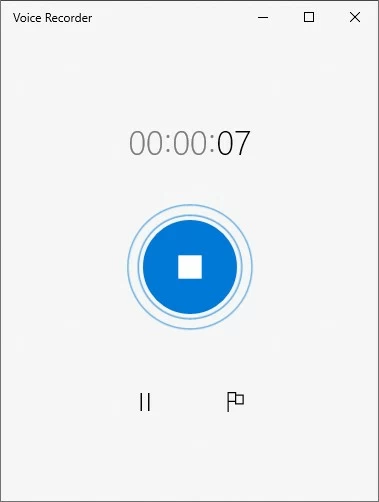
Recording microphone audio using Voice Recorder.
STEP 4: After the recording is complete, click the Stop button and your computer will save the file in M4A format automatically. You can now listen to recording by hitting the Play button.
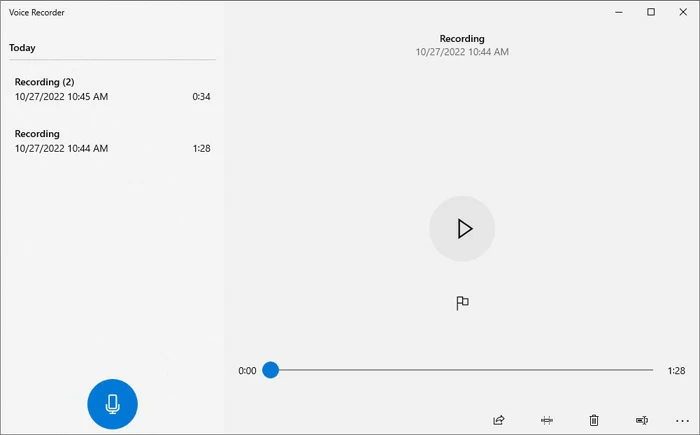
There are a few options available at the bottom of the window, allowing you to share, rename, locate or delete the recording you just created. Moreover, you can use the Trim option to edit the file, and select Save as a copy or Update original to save it.
Tip: Although the Voice Recorder only offers basic recording features, it's still an excellent tool for quick and easy audio record on computer. Remember that you cannot use it without a microphone and it's unable to capture the system audio of your computer. For more recording solutions, try the following audio recorder.
The built-in Voice Recorder is a helpful tool in its own right, but if you want a better tool with more recording options and editing features, the AppGeeker Screen Recorder is your pick. It is a efficient and easy-to-use tool that lets users record both system and external audio from their computer with simple clicks.
It also gives you multiple recording options to ensure that you have full control over any recording on your computer. You can choose to record the audio only, or record with your computer screen at the same time. The best part is that after you record audio from your computer, you can quickly edit it without using another tool.
Step 1: Open Screen Recorder on computer and select Audio Recorder from home screen.

You get options to record audio, computer screen, gameplay, and webcam videos on computer.
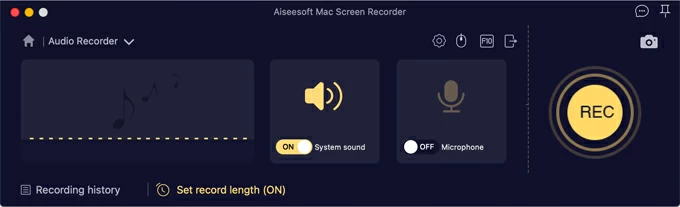
Step 2: Enable System Sound and set the volume. Turn on Microphone option if you also want to record external audio or add your own voice.
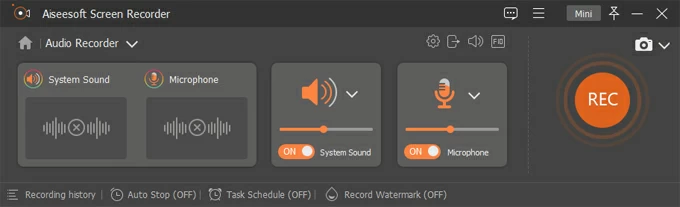
Both system sound and microphone audio can be recorded on computer.
Step 3: Adjust the audio quality and format by checking the Output settings.
There are various formats you can choose, including the popular MP3 and M4A, and many other formats. You can also decide audio quality from Low, Middle, to High or Lossless.

Adjust output format and audio settings before pressing the REC button to start.
Step 4: Click REC button to record the audio playing on computer. By default, it shows countdown before the recording starts, so you have enough time to open and play the audio you wish to record.

Pause or stop the recording when you need. Or set up the recording length to make it stop automatically.
The recording ends when you press the Stop button. After that, you can play, trim, edit and save the recording result on computer in your desired format.
Available on both Windows and Mac, Screen Recorder can be used to record any audio or videos playing on your computer. Whether you want to record music or videos, screen or webcam, it is an all-in-one solution to help you record everything happening on your computer with ease.
The next option Audacity is an audio-only recorder that you can use on your computer for sound recording and editing. It's compatible with different operating systems like Windows, macOS and Linux. This open-source software enables you to record sound from your computer system in a few steps. You're also allowed to record and edit multiple soundtracks on your computer, and export them in various formats.
If you're using the Audacity for the first time, you may get a little confused by its complex interface and various recording settings. But luckily, here we've attached the quick steps you can follow to create audio recordings on your computer:
STEP 1: Visit the Audacity website; download and install it on your computer.
STEP 2: Next, open the Audacity and select the ideal settings for your recording. You need to consider the loopback device and the audio host parameters.
For Windows users:
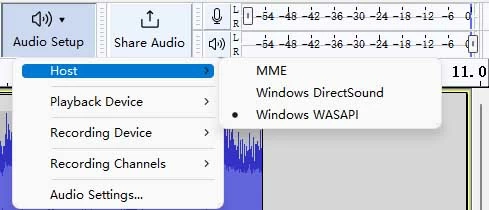
Select Windows WASAPI for internal audio recording on computer.
For Mac users:
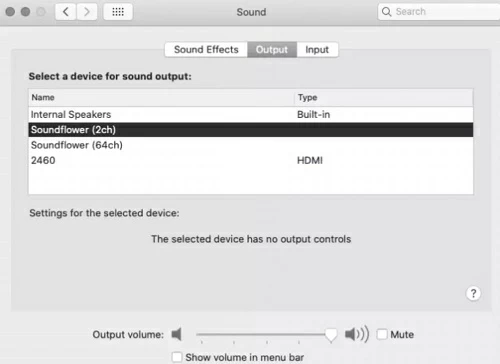
Set up the Soundflower before using Audacity to record the internal audio.
STEP 3: Once done, click on the red Record button to start recording.

Use the recording toolbar to begin, pause, stop, and play.
STEP 4: After you finish recording, hit the Stop button and save the file on computer by navigating to File > Export. The sound recording can be saved in MP3, WAV and other different formats.
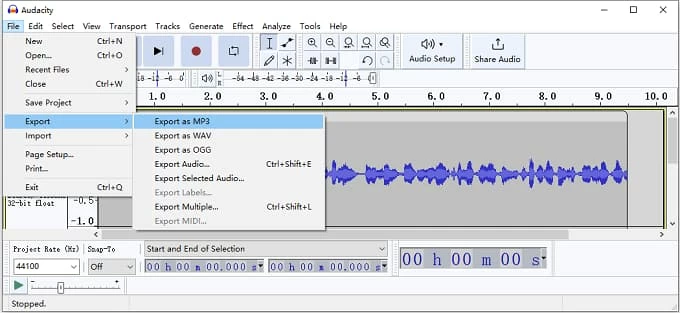
Export recorded audio in different formats and save it on computer.
After you save it, you can add effects or continue with audio editing.
Audacity is a pretty useful computer audio recorder. While setting up it can be a little difficult at first, you'll find it very powerful for editing the recorded or imported audio files.
If you have a Mac computer, you can use the QuickTime Player to record audio without using an additional tool. It is similar to the Voice Recorder in Windows, only with much more recording options and additional features. As a native recorder on macOS, QuickTime Player can handle audio, screen and video recordings. You can create a new audio recording using your computer's microphone or an external one.
1. Open QuickTime Player on your Mac computer; select File > New Audio Recording.
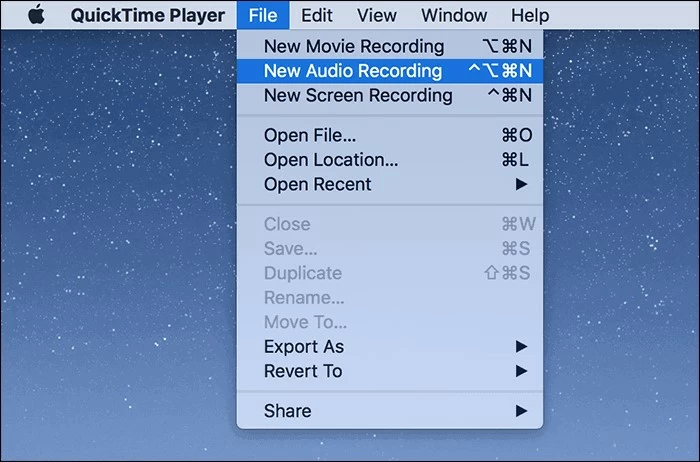
Create new audio recordings by opening QuickTime Player and navigating to File.
2. When the Audio Recording prompt appears, click on the down arrow next to the red button to open the Options menu. Now, set the recording quality and select a microphone you want to use if you have multiple connected devices. Adjust the volume settings to make sure you can clearly hear the audio you are recording.
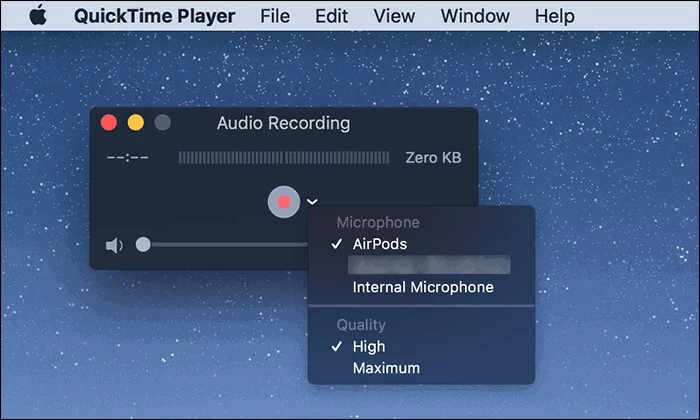
Record microphone audio in high or maximum quality on Mac computer.
3. Next, click on the Record button to start recording; and when the audio ends, click on the same button to stop recording.
4. Navigate to File > Save at the top and save the recording result on your computer as an M4A file. After that, you can continue editing the audio file with QuickTime Player, or copy and paste it to anywhere you want.

Play and save the audio recording in M4A format on macOS computer.
The QuickTime Player is great and free to use, but if you want to record the internal sound coming from a macOS computer, use the Screen Recorder instead.
You can easily record either internal or external audio from Windows or Mac if you have the right tool. And the AppGeeker Screen Recorder is one of the best tools that will allow you to record everything from your computer in just a few clicks. It is a one-stop solution for all your recording need, enabling you to record your computer audio, computer screen, applications, media players, webcam videos and even the gameplays without limitation.
1. Install and launch Screen Recorder on your computer; select Audio Recorder.
2. Configure the audio settings by clicking Record settings. You can adjust the audio format and audio quality, or set the volume and the output location as you want.
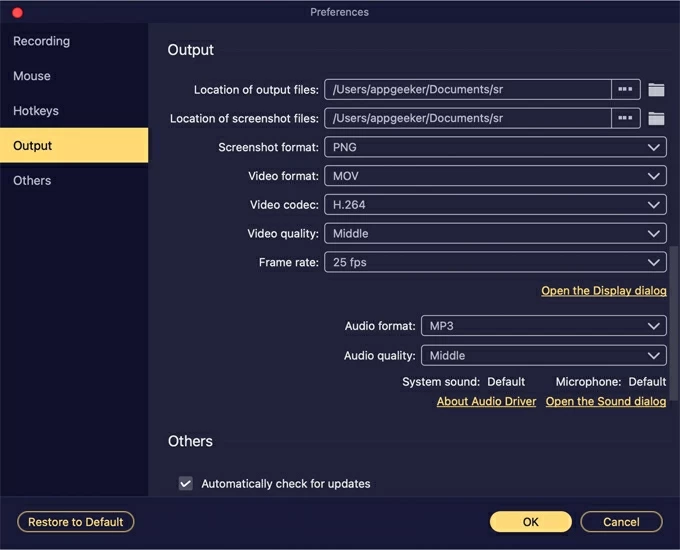
Set the audio format as MP3, M4A or others. Adjust the audio quality to Middle, High, Highest or Lossless.
3. If you only want to record your computer's internal sound, enable the System sound option and disable the Microphone option.
4. Play the target audio file on computer and click on REC button to start recording.
When you finish recording, exit recording mode by hitting the Stop button. Then play the audio and click Export button. This way, the recording file will be saved on your computer in the format and location you just set. You can also access recording results in Recording history when you open up the Screen Recorder.
Q1: How to record audio on Windows?
If you're using a Windows PC, simply press the Windows button on your keyboard. Then select Voice Recorder (Sound Recorder) from the Start menu. Check your microphone input and click on the microphone icon to start. Once you finish recording, press the Stop button to end, and save the recording file on your Windows in M4A format.
Q2: How can I record the audio coming from my PC?
To record the sounds coming from a PC, you can install the AppGeeker Screen Recorder on your computer and open it up to start:
Q3: How do I record my computer audio for free?
To create audio recordings on computer for free, you can visit Audacity's website and install it. Launch the software on your computer. Set up the source audio before recording. To do that, click the Audio Setup option from its home page, and then select Host. From its drop-down list, select Windows WASAPI. Once set up, head to the recording toolbar at the top, and click the Record button to start capturing the sounds from your computer. When it's done, hit the Stop button to stop recording, and select File > Export; choose a file format to save the audio.
Q4: What to do to record computer audio from a Mac?
When you want to record computer audio from macOS, you'll need some extra tools to help you since Apple doesn't allow users to record the internal sounds coming from its system. To capture your Mac's audio, you can get AppGeeker Screen Recorder, Audacity, or the Easy Audio Recorder Lite on your computer, and follow its basic steps to create new audio recordings.


