How to Record a Live Stream on PC

Wondering how to record a live stream on macOS? The process is incredibly simple! Read on to discover some of the easiest ways to record streaming video on your Mac.

What to do to record your live streams on Mac:
Try using Screenshot Toolbar and QuickTime Player to quickly record a live stream on your Mac!
Reusing live content's is an important reason why more people are recording live streams on Mac, especially those who want to record live streams on YouTube. Whether you're a viewer or a streamer, you can record a livestream on your Mac for further study, or turn recorded streaming video into other content to attract new followers.
To record streaming video on Mac, there are many available ways to do it. This post compiles several ways on how to record a live stream on Mac, including with the help of Mac's built-in recording tool or third-party streaming video capture software. Without further ado, let's start now!
Table of Contents
With macOS Mojave or newer, you can use Screenshot Toolbar, which combines screenshot and screen recording functions, to record your live stream on Mac without downloading any software. If you are familiar with Mac keyboard, then using hotkeys to record live streaming on macOS will be a breeze.
Here is how to record live streaming video on Mac using Screenshot toolbar:
Step 1. Launch Screenshot Toolbar
Press "Shift + Command + 5" on your keyboard to open Screenshot Toolbar. A toolbar will appear on your Mac screen with various recording settings, including recording the screen and taking a screenshot of part of the screen, the entire screen, or a window.

Use Shift + Command + 5 to open the Screenshot taskbar.
Step 2. Select recorded area and start recording
To capture the entire live stream window, pick "Record the entire screen" in the toolbar. If you only want to select a part of screen to record the streaming video, choose "Record a portion of the screen" and drag your mouse to select the screen area. Then click "Record" on the toolbar to start recording the live streaming content.

Select the Record Entire Screen option or custom recording range and then click on Record to start.
Step 3. Stop recording and save it
Click the "Stop" icon in the menu bar on the top of the screen to end the recording. By default, the recorded live streams will be saved as a thumbnail file in .mov format on your desktop for you to preview or edit.
If the hotkeys don't work or you're running an older version of macOS, you may be wondering how to record a streaming video on Mac for free. Luckily, there is also a screen recording software coming with Mac called QuickTime Player that can record the live stream on your Mac!
1. Run QuickTime player on your Mac. Then click on the "File" option in the top left corner and select "New Screen Recording" option.
2. Select the recording parameters. A screen recording box will be displayed on the desktop. To use QuickTime Player to record screen and audio, click the downward-hanging white arrow to access more features, such as capturing sound from an external or internal microphone while recording live streams.
3. When ready, click the Record button. If you want to record a portion of the screen, drag the cursor to the region you want to focus on.
4. Once you're done, hit the "Stop" button in the top menu bar. The streaming video recording will be saved to a selected location on your Mac.
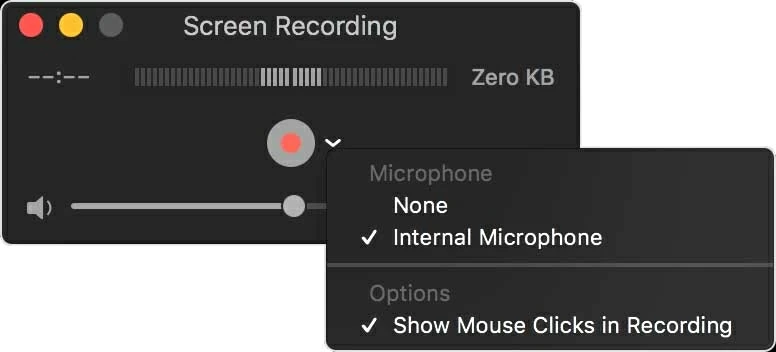
Click the arrow next to the red button to select whether to record the microphone's sound.
Note:
To record live streams with audio on Mac, including internal and external audio, you can try an all-in-one live stream recorder for Mac - AppGeeker Screen Recorder, which allows users to record all desktop activities with audio.
Whether you want to capture live stream video or online meetings on your Mac, or use a webcam to record your own live content, it offers all the modern features you need, including capturing screen, system sound, microphone, webcam and more. In addition, this live streaming recording software also lets you add real-time drawings and annotations during the recording of your stream, making the recordings more personalized and outstanding.
If you have already downloaded this live streaming recorder on your Mac, then follow these steps to record your streaming video.
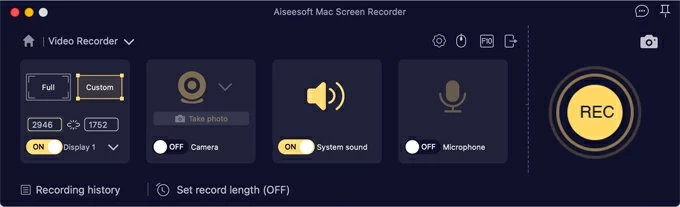
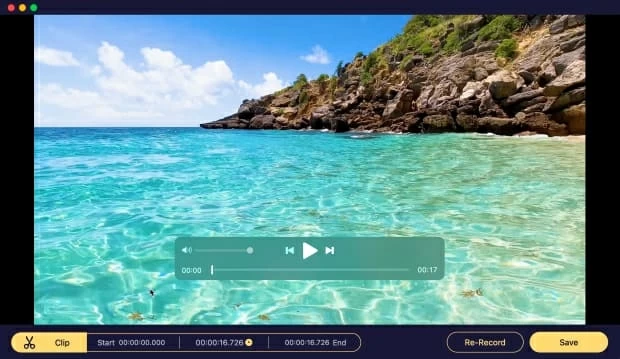
1. Run the program and select "Video Recorder" to take the live stream recording task on Mac.

2. Select recording settings. Select "Full" or "Custom" to record a full-screen live stream or customize the length and height for recording. Then, depending on your needs, switch on or off the Microphone and System sound option.
3. Open the streaming video you want to record on Mac and click the "REC" button. To enhance the visual experience, you can add patterns, words, and illustrations as the recording is being done using the tool's built-in features.
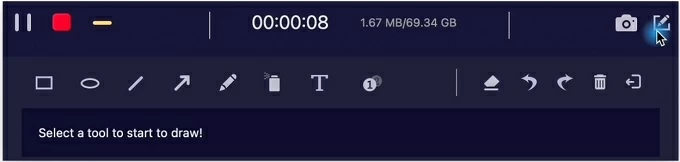
4. When you're finished, click the "Stop" button to end the recording. While previewing the recorded streaming video, if you are not satisfied, you can use the Clip button or Re-Record to start over. Or, click Save to export the recording to your Mac.
If you want to record live videos on Mac without any stress or record YouTube videos, using AppGeeker Screen Recorder will meet your various recording needs, including HD video, clear audio, webcam and more, in case you miss any critical information.
In fact, there are many live video recording software on the market, and even some streaming services have their own recording function. Here will recommend some software worth trying to record streaming video on Mac.
Apart from playing your streaming videos, VLC Media Player also has the ability to record your screen. But make sure you have activated the VLC Record option before using it to record live streaming videos on your Mac!
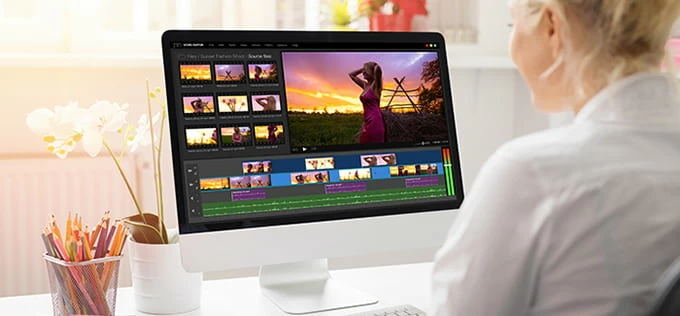
If you need to broadcast live on YouTube, Facebook, Twitter and other platforms, Restream Studio can help you record your live stream video while sharing live content to these platforms. Besides, it also provides Record-only mode, allowing audiences to record live streaming video.
However, it is important to note that to get the full functionality of this live streaming software, you may need to spend a higher price than the recording software.
Conclusion
We looked at some of the quickest ways to record a live stream on Mac in this post. For typical recording tasks on Mac, standard tools such as QuickTime Player and Screenshot Toolbar are enough.
However, for more complex recording needs, users must switch to third-party screen recording software like AppGeeker Screen Recorder to record live streaming with audio on Mac.