
How to Record Video on Windows 11

Take a video recording on a Mac or MacBook while you're playing games with these approved solid screen recorders: gameplay, game audio, webcam.


Here's what you need to know when capturing gameplay on Mac, along with some screen recorders worth considering.
Why not share your gaming moments with your friends by capturing gameplay? Recording gameplay on Mac is relatively common for any gamer or game streamer who likes to make gameplay videos and eventually stream the games online. If you want to record game on Mac, which game recorder for Mac is the best?
There are many available Mac gameplay recording software. You can use the built-in QuickTime or Screenshot Toolbar to record gameplay on your Mac in HD quality, or try third-party screen recorders to record gameplay with sound on Mac. Here are the detailed solutions.
Table of Contents
Tip: If you're a Windows user and want to record video gameplay to get the exciting moments captured, then be sure to check out AppGeeker's guide to record gameplay on PC.
Mac or MacBook comes with a simple free screen recorder called QuickTime Player that lets you capture anything playing on the screen without downloading any other apps.
It is capable of recording your gameplay on your Mac desktop in MOV format. In addition, you can also turn on the built-in microphone to record your narration or voice-overs while recording your gameplay! Here's how to record game videos on Mac with QuickTime Player.
Step 1. Run QuickTime Player from your Mac's application folder, then select File > New Screen Recording in the menu bar.
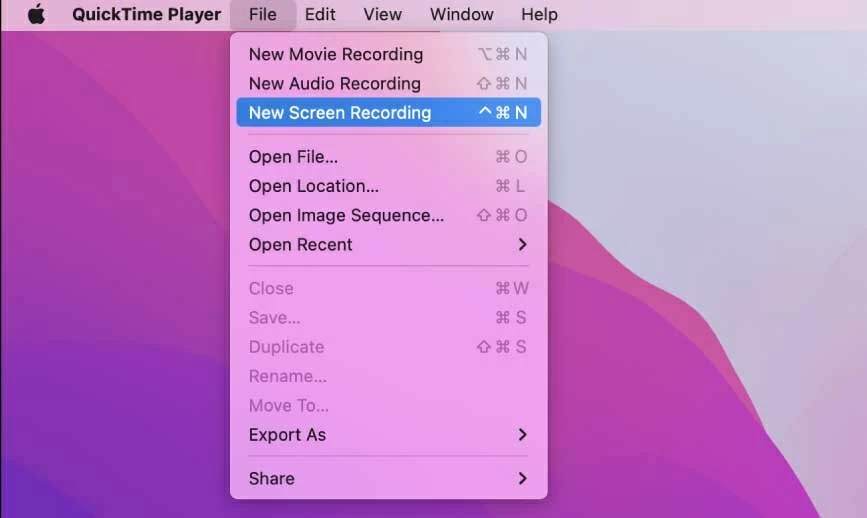
QuickTime Player gives you obvious options that you can take to record gameplay on Mac with sound.
Step 2. To record your own in-game speech while recording the game, click the triangle next to the red Record button and then select "Internal Microphone" in the Microphone section.
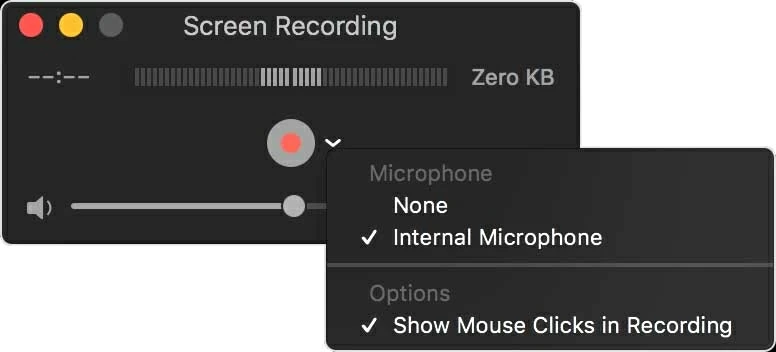
Drag the volume slider to adjust how loud your gameplay recording is from the screen recording window.
Step 3. Open the game you want to record on your Mac.
Step 4. Click "Record" button. Then choose the screen area to be captured and the recording begins automatically:
Tip: Talk yourself closer into the connected microphone to get your clear voice and gameplay recorded on Mac.
Step 4. When you finish recording, hit the "Stop" button in the menu bar, or press "Command + Control + Esc." After that, QuickTime opens your new game recording for instant viewing.
Don't Miss: How to Record Screen And Audio with QuickTime
Screenshot Toolbar is available on macOS Mojave 10.14 or later. If you're running the newer macOS on your computer, you can utilize the shortcut to wake up the Screenshot Toolbar to record gameplay videos.
For Mac gameplay recording affair, press "Shift + Command + 5" to enable Screenshot toolbar. From the menu, you will get two screen recording icons marked with a dot: Record Entire Screen, Record Selected Portion.

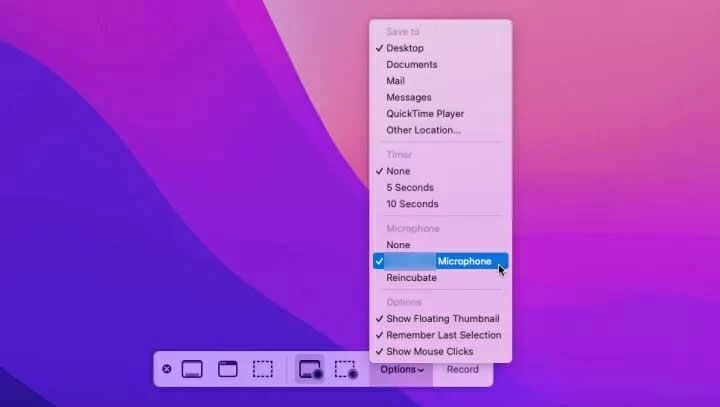
In newer Mac, you will be guided to Screenshot toolbar menu if you use File > New Screen Recording within QuickTime Player.
After selecting what to capture, click "Options", then select Microphone for Mac to capture your voice as you play games on your Mac.
Screenshot toolbar starts capturing your gameplay video screen as soon as you hit the Record button.
When you're ready, click the "Record" button in the Screenshot toolbar menu. Footage displaying on the gameplay and your microphone voice should be recorded as expected.
No audio in gameplay captured by QuickTime Player
Although QuickTime and Screenshot are easy to use and completely free, due to Apple's copyright protection, neither of them can capture internal audio coming from your Mac computer, only your voice.
If you need to record a game on your Mac screen while capturing audio from the game, such as game sound effects or music, these two built-in Mac game recording programs may disappoint you. But they're good for adding gameplay footage and your own narration to your gameplay recording videos.
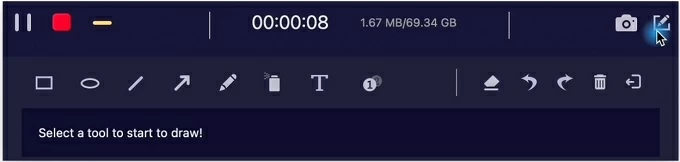
To capture gaming on Mac without lagging and FPS drop, Appgeeker Screen Recorder is worth a try. This lightweight but powerful game recording software for Mac not only records gameplay with audio on Mac, including microphone and in-game sounds, but also desktop gameplay footage and face to create vivid gameplay recordings or game commentary videos.
During recording the game you're playing, you can add text annotations, draw highlights to show off your gaming skills, and show your audience the game activity in real time. Besides, the software can smoothly record games up to 60fps in 1920*1080 full HD format without any lag on less powerful machines.
Key features:
How to record gameplay with sound on Mac using Appgeeker Screen Recorder:
1. Launch Screen Recorder on your Mac or MacBook and choose "Video Recorder" from the main screen.

2. To capture the whole screen of the game window, click "Full" and the entire screen will be highlighted. If you want to record partial screen, choose "Custom" instead and then drag to select the specific area.
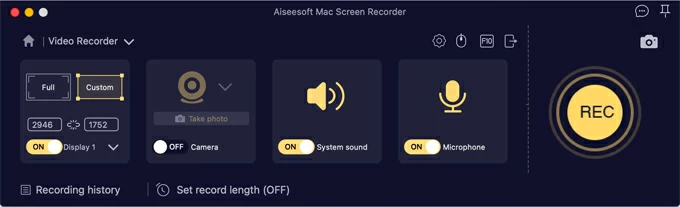
3. Select the audio source for game recording. To record sound effects from the gameplay, such as background music, battle sounds, ambient sounds, etc., enable the "System Sound" option. If you want to play the game and narrate at the same time, turn on the "Microphone" option.
Tip: For more game recording configurations like output path, output format, video quality, frame rate, etc., you can make changes or tweaks in the Preferences window after you click the "gear" icon located right above the "Microphone."
4. Click the big "REC" button to comfortably start recording what's happening in the game on Mac with no lagging issues.
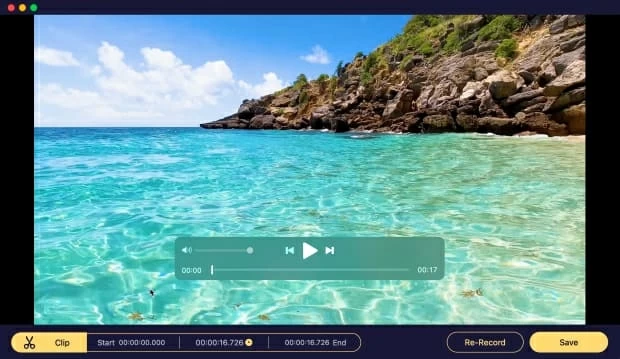
5. Hit "Stop" button to end the game recording. You'll get a preview window to play the recorded gameplay video, and trim the recording without grabbing another third-party application. Click "Save" button at the bottom and your recorded gameplay video will be immediately accessible at your desired video format on Mac's system.
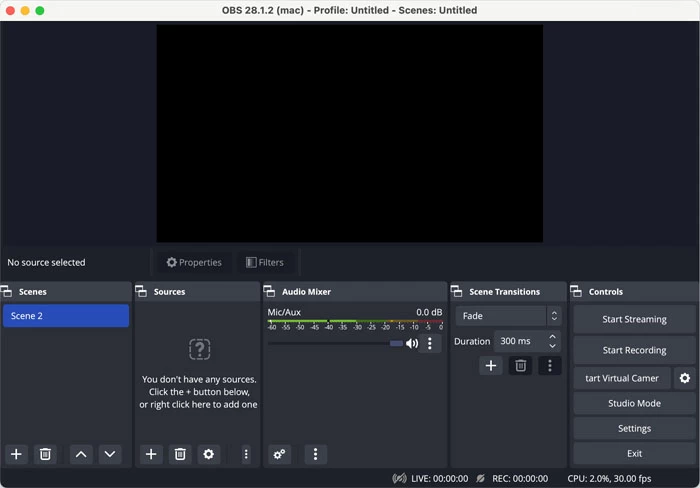
OBS Studio is an open-source and free video recording software that allows you to quickly record gameplay with audio on your Mac screen and share the recorded game videos on social media platforms. What's more, the program is also able to broadcast the game screen to YouTube, which is very suitable for game live streamers!
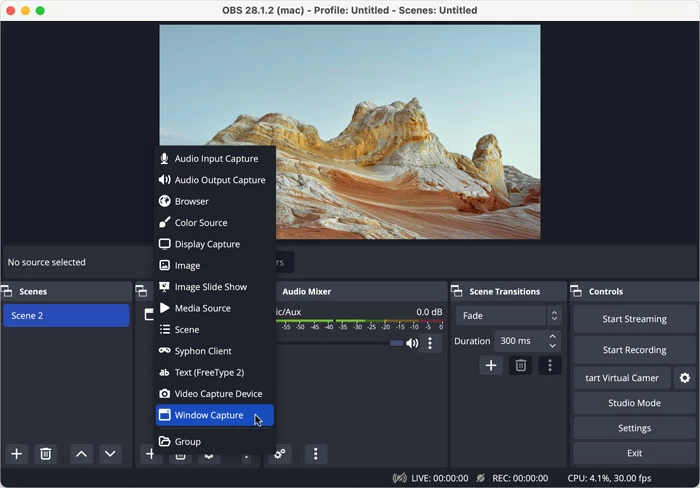
It features with Game Capture feature which relied on SyphonInject to work, making it really simple for you to record your gameplays on the Mac to create stunning game videos, along with customizable video and mic settings — though it's a little complicated for beginners.
Note:
How to record the gameplay on your Mac using OBS Studio:
1. Is there a gameplay recorder for Mac?
Yes, Mac comes with two screen recording software for recording gameplay: QuickTime Player and Screenshot toolbar.
You can open QuickTime Player, navigate to File > New Screen Recording, click the "triangle" icon to set the recording parameters (including the microphone), and then hit "Record" to start capturing the game on your Mac screen.
Alternatively, press "Shift + Command + 5" on your keyboard to enable the Screenshot toolbar, and choose to record the entire game window or a portion of it.
2. Can I record gameplay with sound on Mac?
QuickTime and Screenshot enable you to record gameplay footage and your own voice on Mac. But to record sound from the game, you'll need to resort to other gameplay recording software for Mac, such as Appgeeker Screen Recorder and OBS.
3. How to record gameplay videos on Mac as a YouTuber?
If you want to record videos on Mac and share them on YouTube, you can do so with the help of some great gameplay recording software for macOS.


