How to Screen Record on Windows 11 Quickly

What does it take to record screen and audio on your computer? We have shortlisted some of the most reliable ways to record your screen with audio on both Windows and Mac.

What can you do to record your computer screen with audio:
Here's everything you should know about how to screen record your computer with audio.
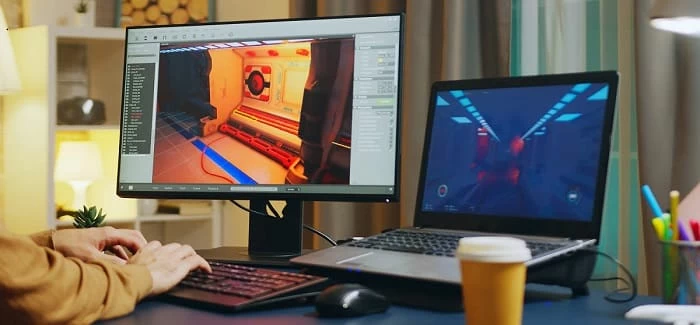
We often find ourselves in situations where we have to record our computer screen along with audio and send the file to someone. Maybe you want to record an interesting video that you'd want to watch again later. Maybe you are a gamer who wants to record the gameplay and share it on your social media channels. Whatever your need may be, it's crucial that you know how to record your computer screen and audio.
In fact, the process is quite simple as you will always find either the built-in apps or third-party solutions to record your computer screen with audio. Therefore, we have created this guide to walk you through the quick steps to create screen recordings with audio on your computer. So, let's cut to the chase and dive right in!
It's time we discuss the various methods you can use to record your computer screen with sound. First, you should understand the methods vary depending on the operating system of your computer. Given that, you can always rely on screen recorder tools that are compatible with Windows, macOS, or both.
Pre-installed on both Windows 10 and Windows 11, Game Bar is designed to record the clips of the video games that you play on your computer. But, it's also helpful to record the computer screen and audio on your PC. You can use it to record your screen to capture the stunning gameplay and also other non-game apps on your computer, with or without audio as you want.
To set up Xbox Game Bar on your computer, tap the Windows button on your keyboard or click on the Windows icon on your desktop, then select Settings > Gaming, and enable the Xbox Game Bar option.
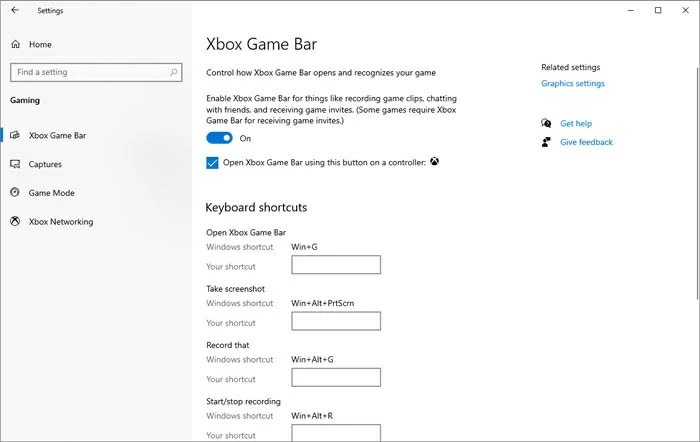
Enable the Xbox Game Bar to record the screen and audio on a computer.
From here, you can also use the opportunity to change the keyboard shortcuts related to using the Xbox Game Bar for screen recording with audio. The shortcuts can be changed for opening the Xbox Game Bar, taking screenshots, starting or stopping the screen recording. If you don't like to change anything, the default Windows shortcuts let you screen record your computer with audio easily and quickly.
Once enabled, you can now record your screen activities with audio in a variety of applications, however, with the exception of the Windows Desktop, File Explorer, and several other apps. Also, keep in mind that the Game Bar recorder is only available to record one application at a time on your Windows PC. That is, if you switch between multiple active screen displays while recording, Xbox Game Bar will only record the one you started with.
If it doesn't bother you, check out the recording steps below. Otherwise, scroll down to get the AppGeeker Screen Recorder which simultaneously records all the active apps with audio on your computer screen.
1. On your computer, press Win + G to open the Xbox Game Bar. The Xbox widgets will show up on your screen. The speaker and camera icons enable you to take screenshots, record screen videos and gameplay, and also capture the audio if required.

Use Windows + G shortcut to open the Xbox Game Bar on Windows computer.
2. Now run whatever games or apps you want to capture. And use the Windows + Alt + R shortcut to record your screen activities and computer audio. You can also start the recording by clicking on the Capture icon > Start Recording button.
Make sure you've turned on the Mic option if you're going to capture the external audio from your microphone or add narration to what you're recording.
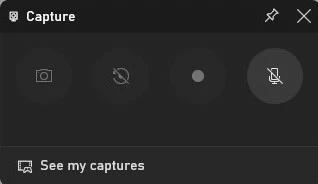
To capture screen and audio on computer.
When you start, the Game Bar control panel disappears, replaced by a tiny toolbar with a timer floating on your screen, which allows you to take full control of the screen and audio recordings.
3. To end the screen recording, hit the Stop button on the floating bar or use the shortcut Windows + Alt + R. A message box will pop up automatically, telling you that Game clip was recorded. Click on it to view the recording you just created. The video you saved should be accessible as an MP4 file.
You can also click on the Folder icon to access all the recordings you've captured in Xbox Game Bar. By default, they will be saved in the ...\Videos\Captures on your computer.
If you are looking for an all-in-one tool for audio and screen recording on both Windows and Mac, you just need AppGeeker Screen Recorder – one of the most popular recording apps on the market that can capture your computer screen and audio in a couple of clicks!
It owns the ability to record all screen activities on Windows and Mac along with system sound or external audio, or both. It is well-equipped with a variety of features that you can use to capture your screen activity, gameplay, computer desktop as well as the apps and programs while making sure the audio is included too. And if you're willing to use a webcam, you can also record your face and voice along with your computer screen at the same time.
And that's not all. Screen Recorder can help you annotate the captured video, highlight your mouse pointer, record the mouse movement and clicks, and even schedule the recordings to start and stop. Do you want to save your screen and audio recordings in different formats? You got this! It can export your recording files in multiple different formats after you trim, merge, compress or convert the file you want.
Here are the steps to record your computer screen and audio together:
Step 1: Download and run AppGeeker Screen Recorder software. Launch it and choose Video Recorder from the main interface.
Step 2: Select recording area and choose source audio.
Select the full screen or adjust the recording region you wish to record. Make sure you choose the correct audio source. It can be your computer sound, your mic audio, or both.
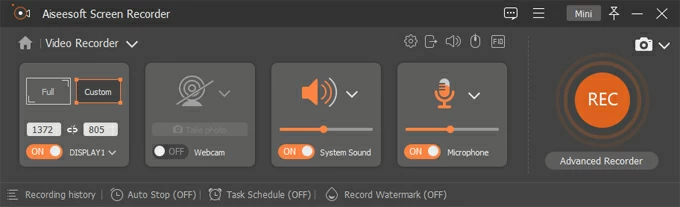
The control panel for recording computer screen along with webcam, system sound and microphone.
Click on the gear icon, and check the Sound and other basic settings to ensure everything is right. You can adjust the audio from your computer system and mic. Enable the Microphone noise cancellation and Microphone enhancement to ensure a high-quality audio record.
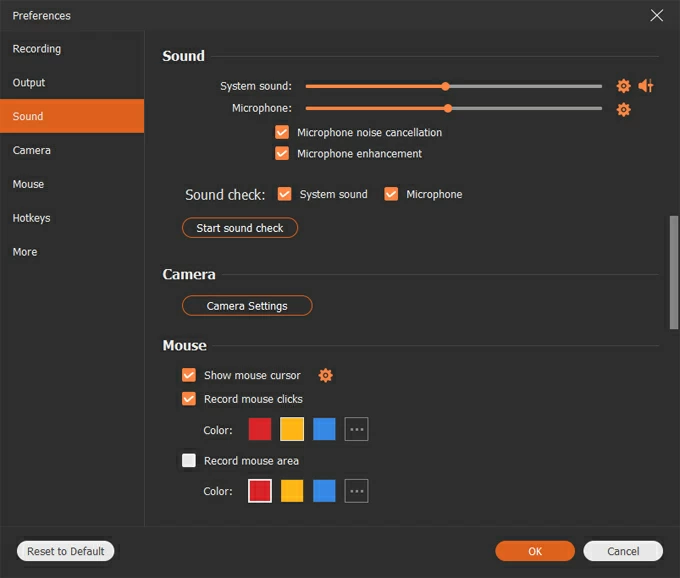
Adjust the settings of Recording and Sound to make the process more flexible.
Step 3: Click on REC button to start recording. It will then start capturing your screen while recording the audio through system and your microphone. Also, the control panel turns into a small recording bar. You can also hide the floating bar by click Hide button.
While recording, clicking on the Edit button to add drawings, circles, arrows and texts to the captured video if you need. If you'd like to take a break during the recording, use the Stop or Pause to end or pause the video recording whenever you want.
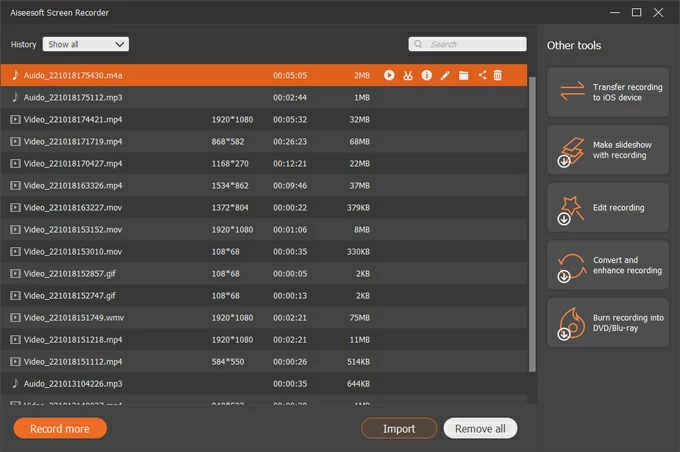
View and edit the recordings and captures in the History.
Once done, you can preview and trim the recording file before you decide to export it and save it on your Windows or Mac computer. Multiple popular formats are supported for the exported files.
And the best part of using this Screen Recorder is that you have the option to configure recording settings before you start, and to preview and edit the recording file when you finish, which ensures that you have your screen and audio recordings in the exact format, size, and quality as you need.
When you're recording your computer (Windows or Mac) with Screen Recorder, the keyboard shortcuts are always available to make your screen and audio recording much quicker and easier. The default hotkeys vary depending on your computer OS:
To start or end the screen recording:
To take a screen capture:
To show or hide the floating panel while recording:
To pause or resume the capturing:
These are the default hotkeys you can enter on your keyboard to perform the recording. You can change them by your preferences any time you want.
It's extremely straightforward to screen record your computer with audio using AppGeeker Screen Recorder, especially when you want to record your desktop activity along with your computer audio and microphone sound at the same time.
Screen Recorder is probably one of the simplest screen recording software out there. You can easily create screen recording with audio whether you're using a Windows PC or a macOS computer. But, is there any built-in tool that can help with the screen and audio recording on computer? Well, we do have another solution for you – use the Screenshot Toolbar on macOS Mojave or later!
That's right. Mac comes with its own screen-recording feature that you can open and use through simple keyboard combination. If you want to record your screen, or record a game or app, you can go for the Screenshot Toolbar by performing the Shift + Command + 5 shortcut.
How can you access the Screenshot toolbar on macOS? The simplest way to do it is by using the keyboard combination Shift + Command + 5. This will open the screen-capture floating toolbar. Below are the steps you'd want to follow for recording your screen and audio.
However, before you start, be aware that this macOS recorder doesn't allow users to record the internal audio coming from its own system. That is, you can only record your computer screen and add your audio using a built-in or an external microphone.
Step 1: Open the apps, game videos, or windows you want to record.
Step 2: Simply press Shift + Command + 5 to open the Screenshot Toolbar.

Use the Shift + Command + 5 to enable the Screenshot Toolbar on macOS Mojave and later.
Step 3: Use the toolbar at the bottom to select the screen capture area. You can opt to capture the entire screen, an open window, or a small portion of the screen.
Step 4: Now click on the Options button to set the location where you will save the recordings. Also, you can set the countdown timer to start the recording. Most importantly, you should check the option for audio source. You can choose to record with Mac's microphone or an external one.
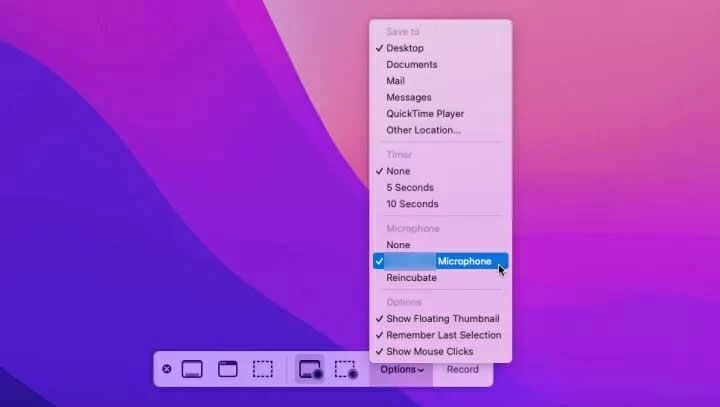
Select full screen or a certain recording area, and choose the source audio you want to capture.
Step 5: Once all the settings are set, you can click Record Entire Screen or Record Selected Portion. This will trigger the tool to start recording. Now you can see the recording button appearing at the top of the screen, on the menu bar.
Step 6: Once you are done recording, click on the Recording button. This will also add a thumbnail of the recording to your computer. Preview by double-clicking the recorded file. The recordings are saved in .mov format with the filenames containing the time and date you created them.
Remember, this method only works on macOS Mojave or above, and you cannot record the internal sound on your computer. If you have a computer running on other versions of macOS, or you wish to record the internal audio with your screen video, don't hesitate to try the AppGeeker Screen Recorder application we discussed earlier.
Did you know that the Mac's built-in media player QuickTime can also be used to record your screen and audio? Developed by Apple, QuickTime Player, pre-installed on every Mac, is capable of editing a movie as well as recording your Mac screen and the audio. But just like the Screenshot recorder, it has no ability to get the internal audio recorded. If you want to accomplish that, try the Appgeeker Screen Recorder so your screen video can be recorded with audio and also the background sound.
Step 1: Use the Launchpad to find and open QuickTime Player. Once opened, you should click on File, then New Screen Recording from the top menu bar. If you'd like to record only the audio without the screen, select the New Audio Recording instead.
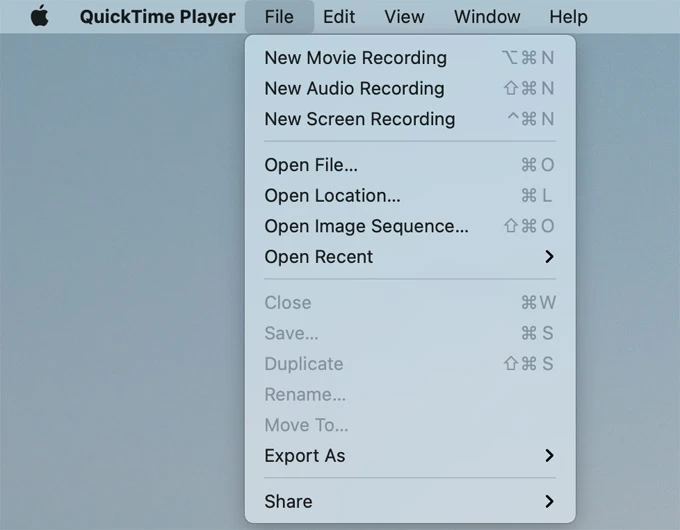
Select New Screen Recording from the QuickTime Player on a Mac computer.
Step 2: You will now see the recording control center appear on the screen, which offers the same options as the Screenshot Toolbar.
The recording toolbar shows up for making screenshots and capturing screen activities.
Step 3: Use the arrow next to the Options to make changes to the recording settings. Here you can select the audio source and determine whether or not you want to add mouse clicks to your screen recordings. To record your audio, make sure to check the Microphone option.
Step 4: You are all set to start recording. Just click on Record Entire Screen, then hit the Record or click anywhere on the screen outside the tool box to record the entire screen. You can even select Record Selected Portion and drag to choose the area of the screen you wish to record.
Step 5: Once you finish recording, make a single click on the Stop button in the floating bar. If that's not available, you can always use the combination Command + Control + Esc to quit.
Step 6: QuickTime Player will automatically play the recorded video so that you can preview it before saving it for later use. The screen recordings you created will be stored as .mov files on your Mac, named according to the date and time.
Hope this guide has shared everything you need to know to record your computer screen with audio. You can use the preset Xbox Game Bar on Windows, or the Screenshot Toolbar (QuickTime Player) on macOS. They both have their pros and cons. To make the task of recording screen and audio simpler, we'll recommend you start with the AppGeeker Screen Recorder, which delivers exactly what you want to record from your computer screen along with the audio from your system and mic.
1. How do I record my screen on Windows with sound?
To capture the screen and sound from your Windows PC, press the Windows + G to enable the Xbox Game Bar on your computer. Click on the Speaker and Camera buttons to record your screen and audio at the same time.
2. How to screen record my computer screen with audio?
For Windows PC:
For macOS:
For both Windows and macOS:
3. Can I record the video on my computer screen with audio?
The Screen Recorder is compatible with both Windows and macOS. Get it to explore more!