How to Record Music on Mac

With our step-by-step guide, you can easily discover how to start and stop screen recording using built-in recorder QuickTime on different versions of Mac.

Recording a screen on a Mac through QuickTime Player is a simple process. However, if you are capturing your screen via QuickTime for the first time, you may be wondering where to find the "Stop Recording" button to end the screen recording on Mac.

With the built-in recorder QuickTime, you can easily screen capture video on your macOS laptop and desktop.
To stop a screen recording in QuickTime, you can use keyboard shortcuts (in newer versions of macOS computers), or just click on the "Stop Recording" button in the menu bar. Alternatively, you can bring up the Force Quit Applications window or take advantage of Activity Monitor to stop screen recording on QuickTime.
Remember: The Mac recorder QuickTime doesn't have the ability to record both your screen and system audio. Fortunately, there's a reliable third-party tool AppGeeker Screen Recorder that helps capture screen along with system audio and microphone audio seperately, or both.
Table of Contents
QuickTime Player is an easy-to-use recorder for Mac users looking to capture their screens. However, when you want to finish recording, it may not be immediately clear on how to do. No need to worry. By applying the approaches below, you'll know how to stop a QuickTime screen recording on your Mac.
If your computer is running macOS Mojave or later, using the built-in recorder Screenshot toolbar to capture your screen as a video is a quick and convenient option.
1. Press the keyboard shortcuts Command + Shift + 5 to activate the Screenshot toolbar.
2. Click on the Record Entire Screen button to start recording your entire screen. Alternatively, you can choose to record only a selected portion of the screen by clicking on the Record Selected Portion button, then drag and select the area of the screen you want to record.

3. You can also click Options to enable or disable the microphone, set a timer, and choose a different location to save your recording file.
4. Hit the Record button to start the screen recording.
5. To stop the recording, click the Stop button (a circle with a square inside) in the upper right corner of the computer, or press Command + Control + Esc on your keyboard. Then, your screen recording will automatically be saved as a .MOV file on your Mac.
![]()
6. Once finished, a preview window of the recorded video will appear in the lower right corner of your screen. From this preview window, you can choose to either save the video to your desired location or delete it.
Read more: How to use QuickTime to record screen and audio
If you're using QuickTime on earlier macOS versions, the answer to how to start and stop a screen recording is slightly different from the one on newer versions. Here're the detailed steps:
1. Launch QuickTime Player from the Applications folder or use Spotlight search.
2. From the menu bar at the top left of your screen, click on File and select New Screen Recording or use the keyboard shortcuts Command + Control + N.
3. You can select whether to record audio or not by clicking on the dropdown arrow next to the red Record button.
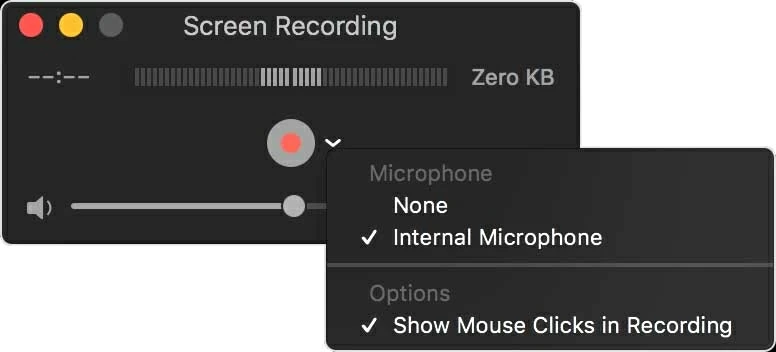
4. Click on the red Record button in the QuickTime Player window to start the screen recording. If you would like to record the entire screen, just click anywhere on the screen; or you can drag the cursor and hit Start Recording to record a specific portion of the screen.
5. To stop the recording, click on the Stop button in the menu bar or press the keyboard shortcuts Command + Control + Esc.
6. The screen recording will stop and a new QuickTime Player window will appear with the recorded video.
7. Save the recorded video file by clicking on File in the menu bar and selecting Save or using the keyboard shortcuts Command + S.

By following the steps above, you now know how to record screen on Mac. However, in some cases, you may encounter issues where the recording won't stop or the QuickTime Player application becomes unresponsive. These issues can be frustrating, but don't worry, there are several troubleshooting steps you can take to resolve them and stop the recording safely.
Note:
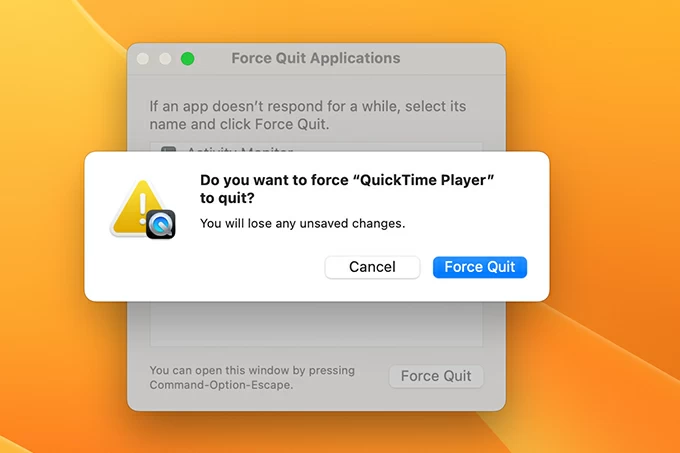
Step 1: Press the Command + Option + Esc keys on your keyboard, or click the Apple logo and select Force Quite to bring up the Force Quit Application window.
Step 2: Find and select the QuickTime Player application from the list of opened applications.
Step 3: Click the Force Quit button in the bottom right corner of the window.
Step 4: A warning message will appear asking if you are sure you want to force quit QuickTime Player, then click Force Quit to confirm.
Don't miss: How to record a webcam video on Mac
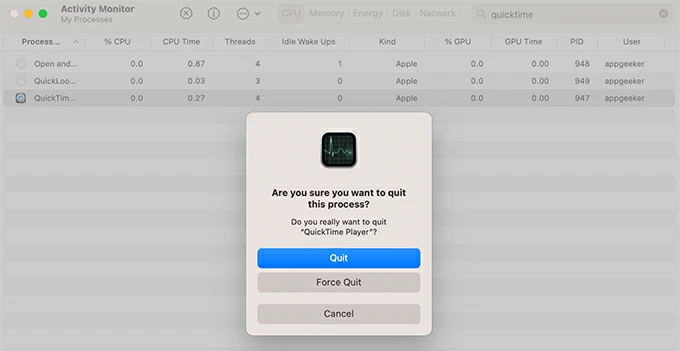
1. Open Activity Monitor: Go to Finder > Applications > Utilities > Activity Monitor, or by searching for it using Spotlight (Cmd + Space).
2. Locate QuickTime Player: Search for QuickTime in the search bar or manually scroll through the list of processes.
3. Select the QuickTime Player process: Click on the QuickTime Player from the process list to select it.
4. Force quit the process: Click on the Stop button in the top-left corner of the Activity Monitor window, or select Force Quit from the View menu at the top of the screen.
5. Confirm the force quit: To finally confirm to end the screen recording, click Force Quit in the dialog box that appears.
Although using QuickTime to capture screen is a quick and easy process, it has some limitations. For example, QuickTime can't record certain app windows or capture screen with system audio at the same time.
If you're looking for a reliable and easy-to-use screen capturing tool as a substitute for QuickTime Player, a third-party tool AppGeeker Screen Recorder would be an optimal choice.
Different from QuickTime, you can use a conspicuous red stop button or a stop hotkey when using this tool to record your Mac screen. It also provides advanced features to end your screen recordings from setting a stop time, record length, and file size.
Unlike QuickTime which can only record screen with external audio, AppGeeker Screen Recorder enables you to effortlessly capture the Mac screen with any audio, no matter if it's from microphone or system sound.
After screen recording on Mac, you can edit the recording and save it in the format like MP4, MOV, WMV, etc. In addition, the lightweight design of this tool saves computer storage space, so you don't have to worry about your Mac getting stuck or running slow.
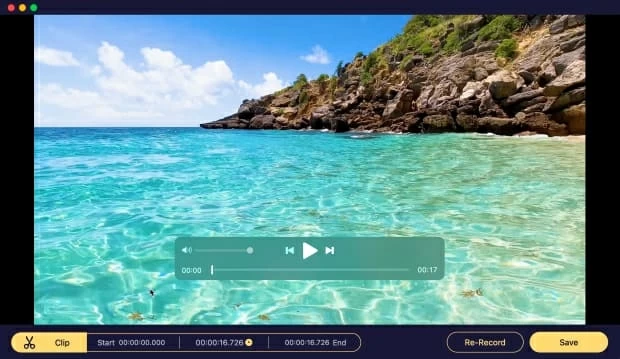
Below are the steps on how to capture Mac screen via Screen Recorder.
1. Launch the program and click on the "Video Recorder" option.

2. Select Full to record the entire screen, or hit Custom and drag the cursor over the portion of the screen you want to capture.
3. Toggle on the System Sound or Microphone option to enable the corresponding audio recording from your Mac.
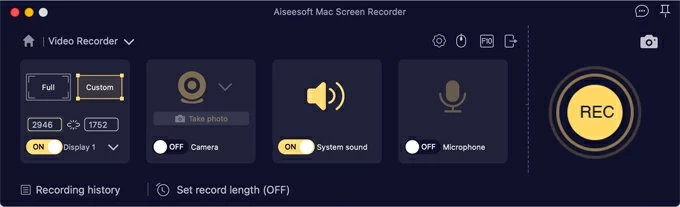
4. Click on the REC button to start the screen recording.
5. When you are finished, click on the Stop button on the toolbar to end the recording.
6. Once finished, hit Save. Then the video will be automatically saved to your designated location.
If none of the above solutions work, you may want to consider using an alternative screen recording software like AppGeeker Screen Recorder. It offers more advanced features and may be better suited for your needs.
First, click on the Launchpad icon in the Dock at the bottom of the screen. Then you can find QuickTime Player in the list of applications. You can also use the search bar at the top of the screen to find QuickTime Player by typing its name.
QuickTime has the ability to record audio, but it can only record audio from an external microphone, not the system audio. If you want to record screen with audio on Mac, you will need to use a plugin or a third-party software to help.