How to Record Computer Sound on Computer

If you want to use OBS to capture audio coming out of Windows, here's how you can do it. You'll also get an OBS alternative to take audio-only recordings and save the audio tracks.

Things you need to know if getting desktop sound in OBS on Windows system:
It's not hard to use OBS to record desktop audio that you can hear from a Windows PC & laptop.
OBS (Open Broadcaster Software) is a powerful and popular open-source solution for gameplay recording, video recording, and live streaming, packing with a lot of features like Desktop Audio Capture that you can record desktop audio or just the audio coming from a single application. This guide is to show you how to use OBS to capture desktop audio on Windows PC & laptop.
Until recently, recording desktop audio without adding a video source through OBS wasn't possible. This is odd, considering that the third-party services like Audio Recorder allow you to record audio-only content from the Windows desktop and save it as a sound file that you can later use as background music or whatever.
Don't Miss: How to Record Audio on Windows 10
Luckily, with a little patience to learn, you're able to set up Windows desktop audio capture in OBS to record sound on the computer. You can also employ the OBS alternative to get any desktop audio playing on Windows system recorded.
Table of Contents:
Using OBS recorder for Windows to capture all desktop audio isn't as simple as you think. Don't worry, we'll guide you through the process of configuring audio interface in OBS to enable Desktop Audio Capture feature and make it easy to create audio recording on the desktop of a Windows computer.
Make sure OBS for Windows has been installed on your computer. If not, navigate to OBS website and get the software.
Once installed, launch OBS application.
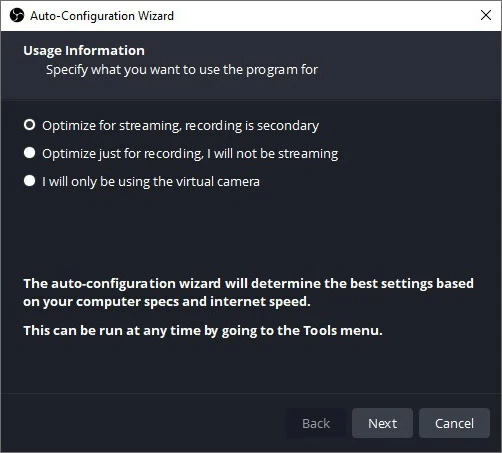
When Auto-configuration wizard opens, follow the steps to finish the setup that best matches for Windows. For desktop audio recording on Windows, choose "Optimize just for recording, I will not be streaming."
Configure OBS to record your audio from Windows desktop for free.
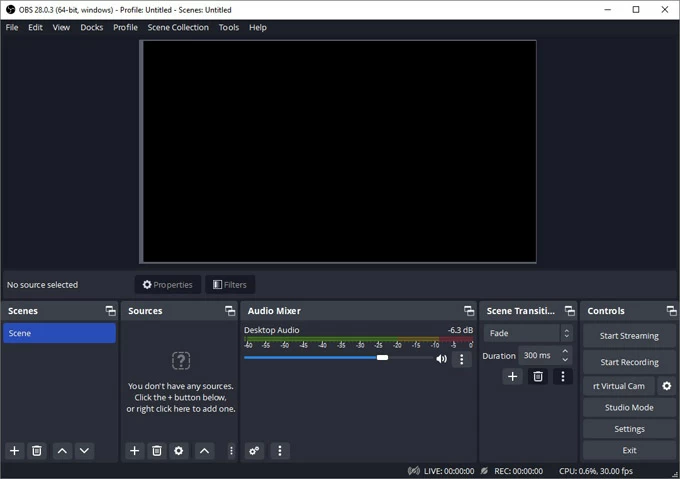
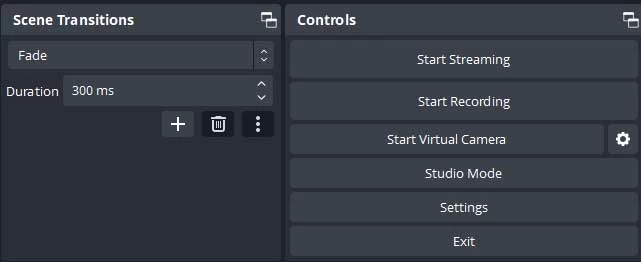
When you're in OBS's main interface, you should see several recording panes at the bottom: Scenes, Sources, Audio Mixer, Scene Transition, Controls.
By default, desktop audio, audio from an app and microphone (if there's an internal or external mic connected) will automatically be added to the Audio Mixer. To make sure you can capture desktop audio in the recording, monitor the volume meter of Desktop Audio moves just fine or not and measure how loud the sound is.
Click three dots > Properties under Desktop Audio and select Default audio device to capture the sound.
If it's not moving, or you want to change the audio device as the input to be captured, go to the upper-left of the window, click File > Settings. Then choose Audio, followed by selecting your audio device input manually in the Desktop Audio field.
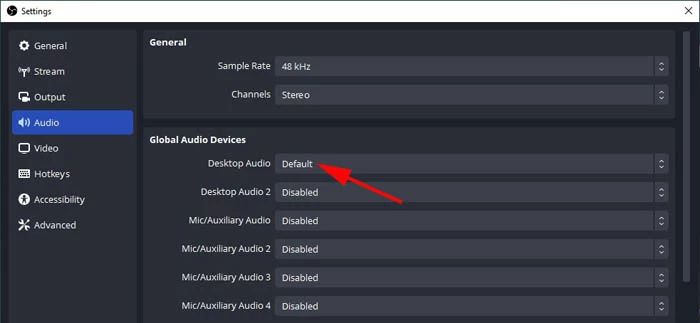
Set Desktop Audio to Default under Global Audio Device should OBS record the computer sound.
Bonus tip: If your computer has a built-in microphone or you've connected an external microphone to the PC, you should see Mic/Aux in the Audio Mixer pane. You're able to add your voice for narration or commentary while doing desktop audio recording with Windows.
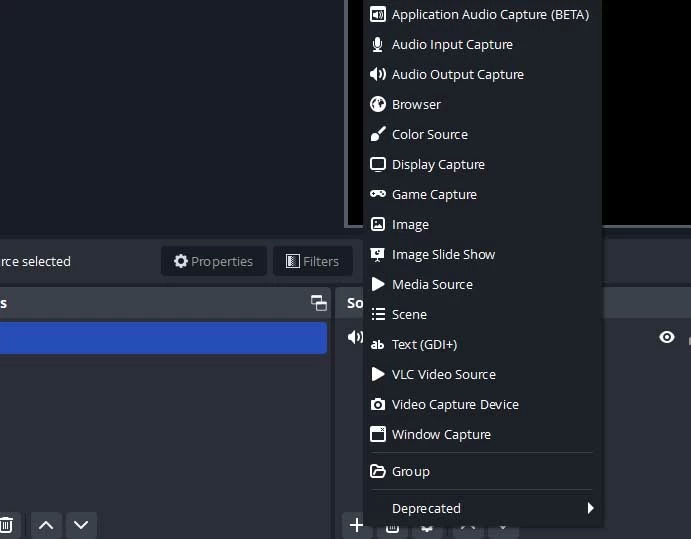
Click "+" symbol in the Sources pane at the bottom, then choose a source to record entire desktop audio or record from certain application:
Display Capture: All desktop audio including audio files playing in web browser, application, game, etc., will be captured.
Window Capture: Record the audio only from your selected window or application.
By default, OBS Studio will record the visible screen together with desktop audio. In case you do not want to display the footage, but just the sound, you'll need to disable the visual capture by checking the eye icon to the right of the added source. This will give you a video file with all-black display but with normal audio. Then you can extract the raw audio into an audio file.
You can either make a recording of audio from entire desktop or Windows system, or from a specific app.
Once you're ready, click Start Recording button under Controls pane at the lower right of the window.
While recording, you start playing the media with the audio you want to capture.
After adding desktop audio to OBS, press Start Recording to begin capture the sound out of computer.
When you've captured all desktop sounds in the recording, you can end the process.
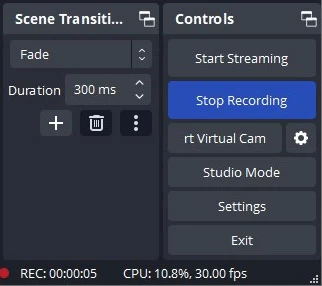
To get OBS to stop the recording, return to its main window and hit Stop Recording button in the Controls pane.
The finished recording with desktop audio will be saved to the default MKV output in the Videos folder. Play desktop audio recording through a media player and test the sound by recording.
You will get a video recording with PC's desktop audio included.
It's not possible to only record audio using OBS and get a resulting audio file like MP3 or whatever format.
OBS is designed primarily for recording video content with desktop audio and microphone captured, rather than for audio-only recordings. When screen recording desktop in OBS, you will end up with a video file which output as a MKV file by default - though you can change the output to MOV or MP4 file. And to export the audio file, you will need an extra step for post-recording conversion to convert the recorded screen video to the soundtrack with the format as you want.
Hence, OBS is a powerful free screen recorder program, but it's probably overkill for anyone who just want a quick and easy audio capture solution.
Read More: How to Convert MP4 Video to MP3 on Mac or PC
While you can't record only audio on a desktop using OBS software in one step, it's still a terrific way to take a recording of sound file in MP3, AAC or M4A for capturing audio from YouTube video, creating music collection, or any other purpose.
Audio Recorder is where you will get the best control over recording system & desktop audio on Windows. The software features an intuitive interface that makes it simple and straightforward to record any sound from video or sound track playing on computer, application like streaming services, music players, games, etc., record from multiple sources simultaneously and can record directly to MP3 (or a couple of other formats). You don't have to add the footage. This is not the case in OBS audio recorder of capturing video and audio at the same time.
Now that all the basics are out of the way, let's get into why you're here: how to record desktop audio on Windows using the alternative to OBS desktop audio capture.
To get started:
1. Launch the utility after it's installed.
2. Select Audio Recorder tab on the main screen.

3. To get your desktop or system audio recorded, make sure "System Sound" toggle is turned on. If you'd like to record your own voice, switch on the "Microphone" as well.
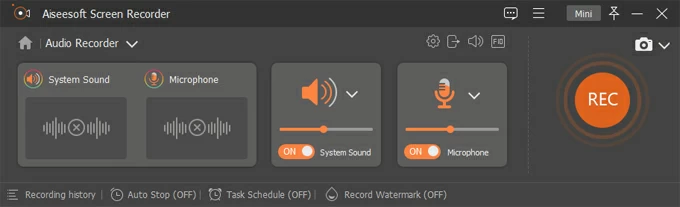
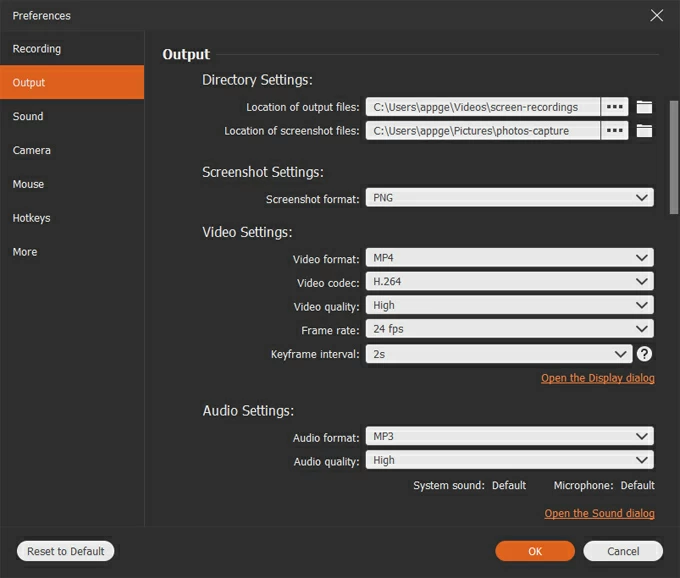
Before you start recording the audio from Windows, tweak the output settings if necessary. Find the Gear icon right above the "Microphone" tab and click on it to open Preferences window, go to Output section, change the audio format to MP3, M4A, WAV, WMA, FLAC, etc. depending on where you need to play back the audio file later.
Scroll down to Sound settings, you can switch your desktop audio output source, adjust volume, and test the audio stream.
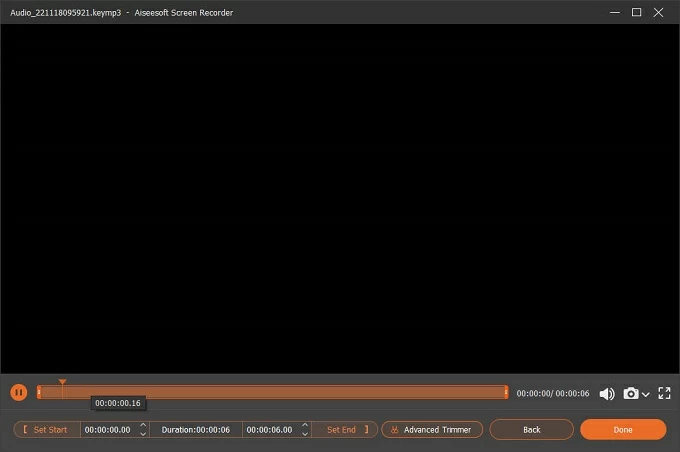
4. When you're pleased with your settings, hit the REC button to let the software record audio with your desktop on Windows. A recording floating bar should appear.

5. When done, click the Stop Recording icon on the floating bar. You can then play your audio recording to see if any sound is captured correctly, edit it if needed, and finally click Done button to save to your computer.
That's it! Windows desktop audio has been recorded on your own.
How to fix the issue with OBS not recording desktop audio?
OBS is able to record desktop audio in a screen recording. This means that it outputs a video file that contains video and audio at the same time.
OBS basically sets itself to record desktop audio using the default output source. If Desktop Audio isn't presented in the Audio Mixer of OBS, try to close the program and restart it.
OBS desktop audio is disabled. How to enable it?
If your OBS Desktop Audio is not working and you are having trouble hearing any sound from your computer, there may be an issue with the Audio Mixer settings. To fix this in OBS:
How to record desktop audio with OBS on Mac?
It becomes simpler than ever before to take desktop audio recordings using OBS Studio 28+ on macOS 13 Ventura or later. The macOS desktop audio capture has been added to audio mixer. You're no longer need an extra sound output device for macOS to route the desktop audio or system sound to OBS that's ready to be captured.
With the desktop audio capture enabled in OBS, you just need to use Display Capture as a video source to capture all sound that's playing macOS. For recording audio from an application, choose Windows Capture or Application Capture.
If you only want to capture audio and not show any picture in the recording with OBS, you can hide the source in Sources pane at the bottom.