How to Record Screen on Lenovo Laptop

Here are the best audio recorders you can install on your MacBook Pro or MacBook Air so you can record your voice and computer audio in high quality and then share recordings.

Recording audio on your MacBook is easy with the built-in microphone or by connecting an external microphone. All you need is a reliable audio recorder for MacBook, and you'll be able to record podcasts, music, YouTube video background sound, meetings, and more on your MacBook Pro or MacBook Air.
There are many available ways to record audio on a MacBook. Considering the features of each audio recording software, we have listed the best MacBook audio recorders and show you how to record audio on MacBook. If you're looking for an all-in-one tool for recording high-quality, lossless internal audio or microphone sound on your MacBook, try AppGeeker Screen Recorder.

You can make your macOS audio recorder get the sound from the built-in mic or use computer audio recorders for MacBook.
Scroll down to see how to record audio on your MacBook:
As a built-in easy voice recording tool for MacBook, Voice Memos can record your voice on MacBook Air/Pro, including capturing meetings, lectures, interviews, conversations, ideas, and other audio events, and save them as audio clips!
Voice Memos is to capture any human voice or background sound through the microphone on your MacBook. The recording will automatically be saved in the app as an M4A audio file on the MacBook, and you can then do some basic editing work, or sync the recording via iCloud across all Apple devices signed in with the same Apple ID.
Here's step-by-step guide on how to record voice on a MacBook for free with Voice Memos.
1. Run the Voice Memos app on your MacBook.
2. Click the red Record button in the lower left corner. If you're using a newer MacBook Pro, you can use the Touch Bar to start recording the audio.
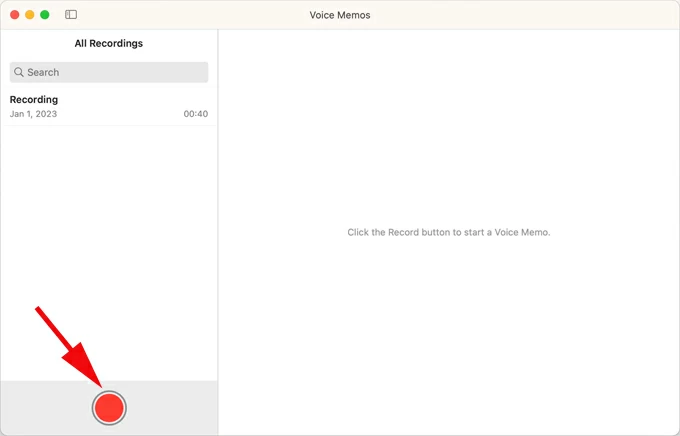
Hit the red circle to initiate the audio-only recording with the best Voice Memos recorder app.
3. To pause the recording, click the Pause button at the bottom left. You can Resume the process whenever you want. The app supports for unlimited recording time which makes it easy to make a long audio recording on your MacBook.
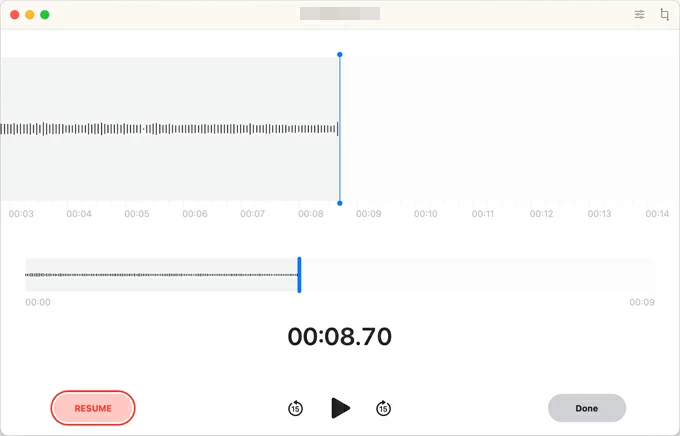
Use your built-in microphone or an external mic to capture your voice and save to MacBook.
4. When finished recording, click Done button.
The sound recording will be immediately accessible with the name "New Recording" (or based on your location) on the left pane of the Voice Memos app. You can rename it.
Click on the recording to playback and use the Edit function in the top-right corner to make some edits like cropping, or re-recording a part of the clip. You can share the recorded file as well by hitting the Share icon next to the Edit button.
As another recording software pre-installed on Mac and MacBook, QuickTime Player is able to record audio on your MacBook and even record screen with audio. To be an excellent audio recording software for MacBook Pro / Air, it provides a simple and user-friendly interface that even beginners can audio record on MacBook without fiddling with too much.
Note:
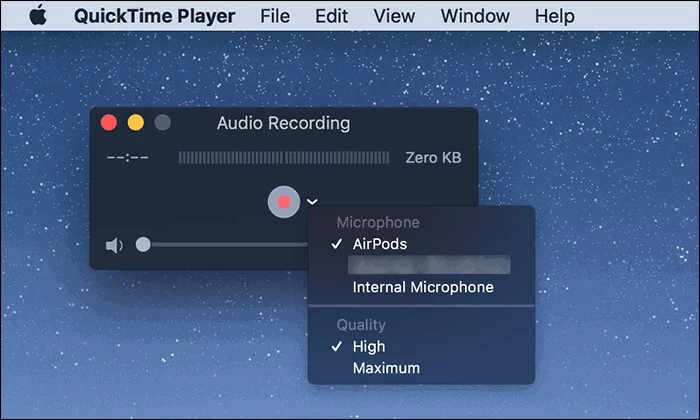
1. Launch QuickTime Player, click File > New Audio Recording. The Audio Recording window should open with red Record button and Options menu for selecting audio output sources and sound quality.
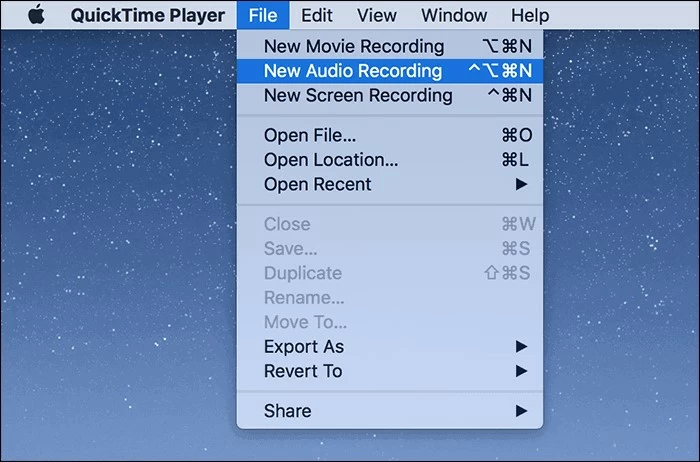
Recording sounds in QuickTime on MacBooks is damn easy after File > New Audio Recording is selected.
2. In the Options drop-down menu, choose Internal Microphone and Maximum. If you want adequate quality sound in your recording, plug in an external microphone to your MacBook and select it here.
3. Drag the volume slider until the sound is in a comfortable level.
4. Hit the red Record button and QT Player starts recording your audio. You can pause and resume recording by using Option-click function.
5. When you are done, click the Stop button in the Audio Recording window.
6. Play the recording within the player and listen to the sound that has been captured.
7. To save your recording, click File > Save. Rename the recording and choose a location for it. You can then share the sound file to wherever you want.
The audio recorders that come with MacBook can only record sound from microphone, If you're looking for a real audio recording software to capture MacBook audio and microphone sound simultaneously or separately, AppGeeker Screen Recorder is worth a try.
As a total recording platform that offers local video and audio recording, Screen Recorder is not only capable of recording videos with audio, but also recording internal audio on your MacBook or Mac with reduced noise, such as livestreaming, podcasts, online meetings, and so on. Besides, it also provides multiple audio output formats and audio editing features.
Step 1- Open the software on your MacBook, and the choose Audio Recorder tab.

Step 2- Enable the audio recording options for System sound or/ and Microphone. This depends on your sound output where the audio comes from to capture.
An extra step. The software allows you to customize the format and quality of the recording. Click on the tiny gear icon right above Microphone and access Preference window to complete this. This is useful if you need to record MP3 audio.
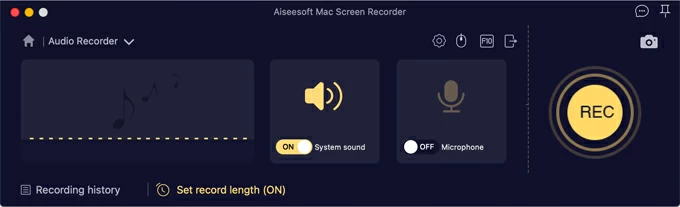
Step 3- Click REC button to begin recording audio or voice. There is no limit on how long you record. To stop recording, press red Stop button on the floating bar.
![]()
After the audio recording is completed, preview the clip, trim it as needed, and save it onto macOS system. That's done.
If you're a music producer, arranger, or music lover, GarageBand fulfills your need to record audio on the MacBook for podcasts, music, voiceovers, and more, allowing you to make professional-quality audio recordings on the MacBooks.
This native free audio recorder works as a Digital Audio Workstation for music production. It comes with a variety of virtual instruments such as guitars, pianos, keyboards, vocals, and genres that let you create music or other audio works with ease. Related: How to Record Music on Mac Computer
1. On MacBook, click System Preferences > Sound. The select Input and choose either internal microphone or external mic.
2. Start GarageBand app. 'Choose a Project window' opens. In the Details section, the Input Device should be your MacBook's Microphone or the external microphone you've configured in Sound settings.
3. Choose to create an Empty Project.
![]()
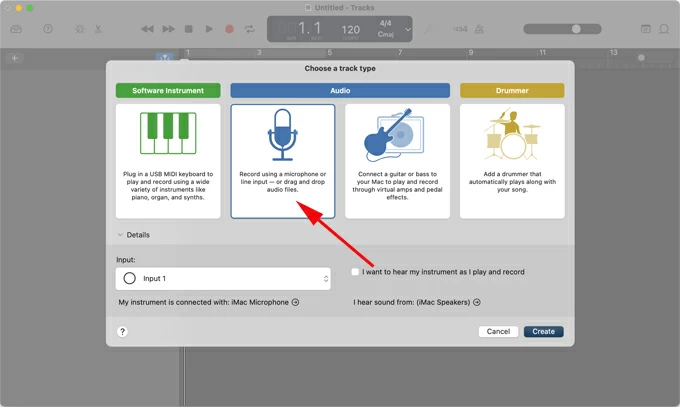
4. On the screen of 'Choose a track type' window, select Audio (Record using a microphone or line input - or drag and drop audio files.), then click Create button at the lower-right corner.
5. When the 'Tacks' window pops up, double-check the Input audio source is your mic. This is under Recording Settings section at the bottom.
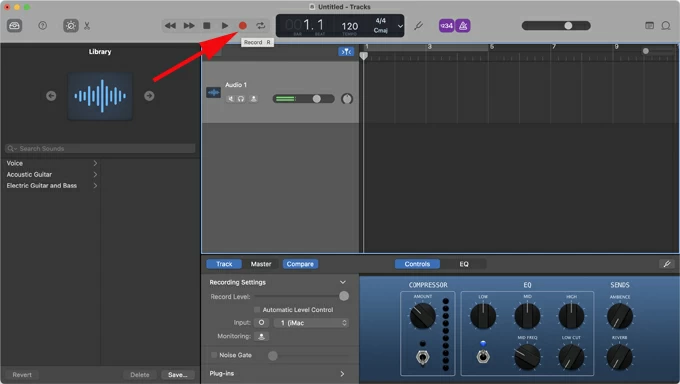
6. When you are ready to record audio file, click the red Record button at the top.
7. To stop the recording with all sounds captured, hit the Play button next to the Record button.
8. Play the sound file and test the recorded audio. You can edit it as well.
9. Save the file to GarageBand by going to File > Save. Or click Share > Send Songs to iTunes in order to export soundtracks to iTunes in a direct manner.
So that's all about how to record sound from computer on a MacBook. Overall, GarageBand is one of the best audio recording software for Mac users to begin to create a studio-quality recording.
Read Also: How to Transfer Music to iPhone without iTunes
By default, it's a tricky affair that Audacity lacks the built-in ability to record system audio on any MacBook. In an effort to get your MacBook to record your voice from computer, Audacity remains the way you could go with. To make a voice recording with Audacity recorder function:
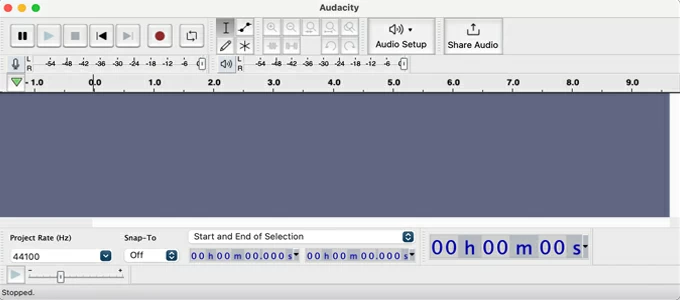
Although the interface seems less intuitive than other audio/ voice recorders for MacBook mentioned above, Audacity does not compromise the powerful recording and editing tools.
The final words - Which audio recorder for MacBooks should you choose?
There is no definitive answer to which recording software is best for MacBook. It depends on what benefits you want from these tools or what recording needs you have.
Does MacBook have a built-in audio recorder?
MacBook serves itself a good audio recording device. The preinstalled microphone, a supported external headset, or an external mic could help you recording audio without any hassle.
You could take advantage of the MacBook free built-in apps - Voice Memos or QuickTime Player, to record meetings, discussions, podcasts, memos, ideas, etc., and save these recorded audio-only events as a sound file for viewing later. They are featuring basic editing functionalities to make your recordings polished.
How to record internal audio on MacBook?
You may be confused that the audio recorded with the native Voice Memos and QuickTime Player is the sound from microphone, not from the laptop itself. In fact, Voice Memos is a voice recorder working with the mic; and QuickTime Player could work with an additional audio drive like Soundflower to record computer audio from MacBook - though you need some setups.
AppGeeker Screen Recorder comes with computer audio recorder MacBook software that lets user to record internal audio on MacBooks with ease. Any audio you could hear from apps or websites on your computer could be captured in the recording.
Step 1: Launch Screen Recorder on MacBook.
Step 2: Click on Audio Recorder.
Step 3: Turn on System Sound toggle to activate internal sound output.
Step 4: Hit REC button to begin recording.
How to record audio on MacBook (Pro, Air) from YouTube?
You will need to consider the legality before recording YouTube audio on your MacBook. Then grab AppGeeker Screen Recorder to record audio from YouTube.
After you start Screen Recorder tool, choose Audio Recorder, and then enable to System Sound. Press Control + Command + S to start recording. As soon as the recording process kicks off, go to YouTube and play the media from which you want to record the audio, and any audio from YouTube should be captured. Then press Control + Command + S again to end the process.


