
How to Record Webcam Video on Windows 11

If you are using a Lenovo laptop and are looking for a way to record your screen activity, this guide will give you the best solution to screen record on your Lenovo laptop.


Make a screen recording on your Lenovo laptop to preserve your important footage.
If you want to screen record on your Lenovo laptop to create instructional videos, game guides or online meeting recordings, whether you are using a ThinkPad, Legion, Yoga & Lenovo Slim or IdeaPad, Lenovo laptop screen recorder is a great helper to create screen recordings on a Lenovo laptop.
For Lenovo computers running Windows, you can use the screen recording software that comes with your Lenovo laptop to record your screen. This article will show you how to screen record on Lenovo laptop and recommend the best laptop screen recorders for you to record Lenovo laptop screen.
Table of Contents
Lenovo laptops running Windows 10 and 11 have their own built-in screen recording tool - Xbox Game Bar. Xbox Game Bar lets you quickly record your screen on your Lenovo laptop without having to download additional software. It also has the ability to take screenshots and record screen with audio on Lenovo computers.
Note:
Its intuitive interface makes it easy to use, here is how to record screen on a Lenovo laptop:
Step 1. Press Windows logo + G to open the Xbox Game Bar on Lenovo laptop.

Press Windows logo + G to open the widget of Xbox Game Bar.
Tip: If you can't open the Game Bar using the shortcut keys, head to Settings > Gaming > Xbox Game Bar to enable it.
Step 2. Locate Capture widget and click the round Start Recording button to begin the recording process. Or use Windows logo key + Alt + R shortcuts to record video on Windows 10 laptop.
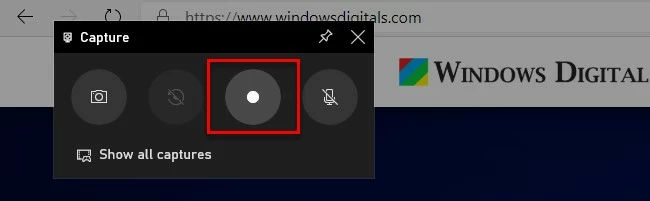
Click on the Start Recording button (or Win + Alt + R) to begin capturing screen.
Step 3. To end the recording, click the Stop Recording button on the recording bar or press the Windows logo key + Alt + R again.

Step 4. Then hit the pop-up "Game clip recorded" to preview the recording. The recorded video will be stored in a subfolder called Captures in your Video Folder.

Click the pop-up window to preview the recorded video.
If you want to record the whole screen of your Lenovo laptop or record HD screen video, try a professional screen recording software for Lenovo laptop - AppGeeker Screen Recorder, which can help you capture not only screen activity, but also computer audio, microphone and webcam to meet your recording needs for different purposes
With this Lenovo laptop screen recorder, you can customize your screen recording range, choose output formats, and even set up scheduled recordings if needed. Moreover, you can add shapes, annotations or icons during the recording. In a word, it is perfect for beginners and professionals to record screen on Lenovo laptops or other computers.
1. Download and launch the AppGeeker Screen Recorder on your Lenovo laptop. Select the Video Recorder from the menu to get started.

2. Choose your preferred recording area, full screen or custom region. Select Full to start full-screen desktop capture, or Custom to customize the recording area. You can also toggle System Sound and Microphone to ON to record screen with audio on Lenovo laptop.

3. Hit the REC button to start the recording. You can perform the task on the screen of your Lenovo laptop and the recorder will capture everything.
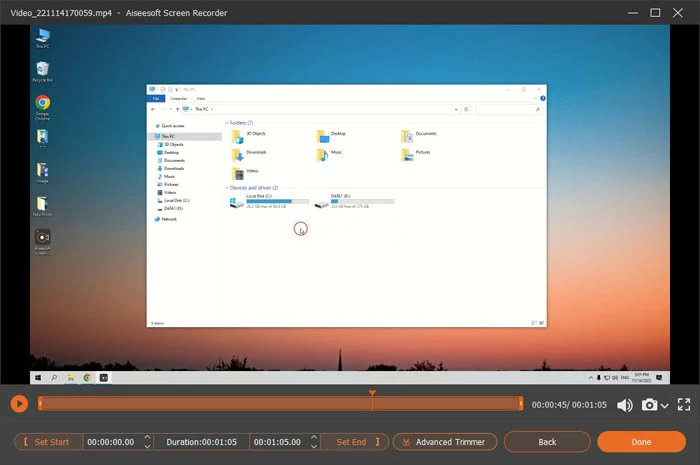
4. When finished, hit the Stop button to advance to preview mode. You can selectively edit your recorded Lenovo laptop video before exporting it in any available format. And then click Done to save the screen recording.
From video recording to webcam capturing, if you want to screen capture on Lenovo laptop, AppGeeker Screen Recorder can do it. Try it out today and see what you can create!
Another screen recorder app for Lenovo laptop is OBS Studio, a free and open-source software with no subscription fees or charges. As a software with live streaming and recording functions, OBS can facilitate the needs of YouTubers or other live streamers who want to record online meetings or capture gameplay on PC and laptop.
Furthermore, OBS's user interface is highly customizable - you can add multiple scenes and sources for screen capture and effortlessly mix multiple audio tracks. However, its interface is so professional that it is not very novice-friendly. And it lacks rich editing features that you cannot rely on it to improve the content you record on the Lenovo laptop screen.
1. Run OBS Studio on the Lenovo desktop and add a scene. Add a scene by clicking on the plus icon in the Scenes tab at the bottom left corner.
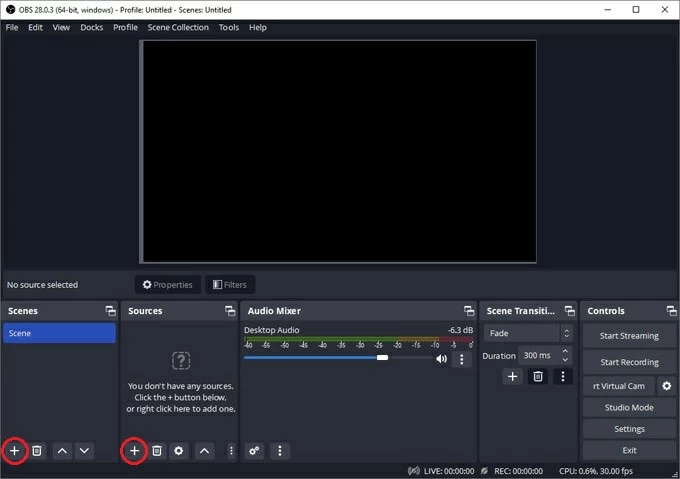
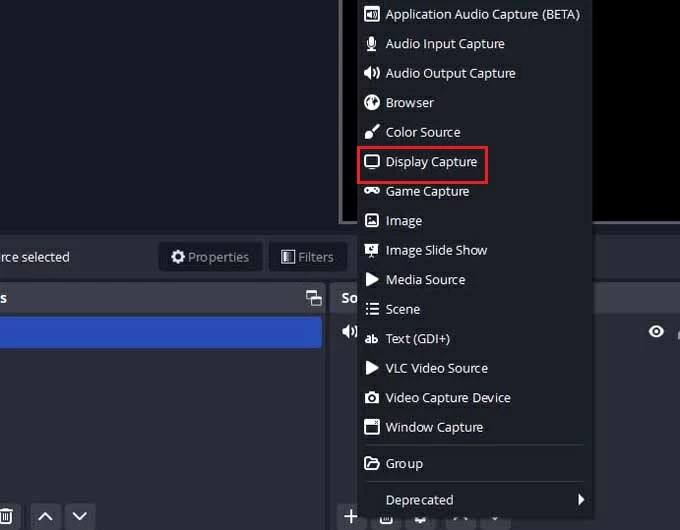
2. Add capture sources. Navigate to the Sources box and click the plus icon that can be seen in the panel. Select the Display Capture option and hit OK to continue.
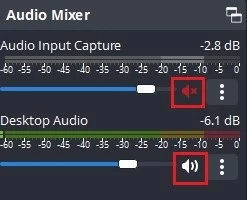
3. Adjust the parameters of Audio Mixer. Go to the Audio Mixer module on the OBS panel and choose to record audio on laptop or mute them as needed.
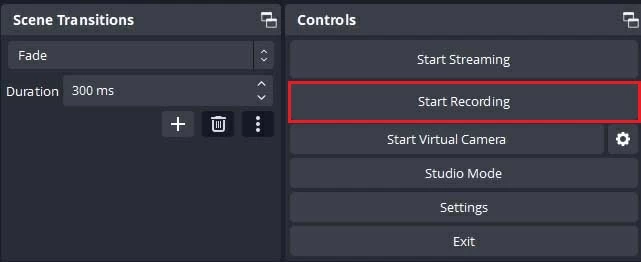
4. Find and click the Start Recording button in the Controls panel.
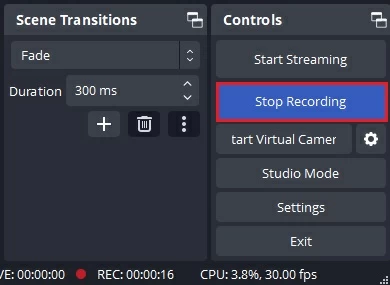
5. Once the screen recording is finished, click Stop Recording to save the recorded video on your Lenovo laptop.
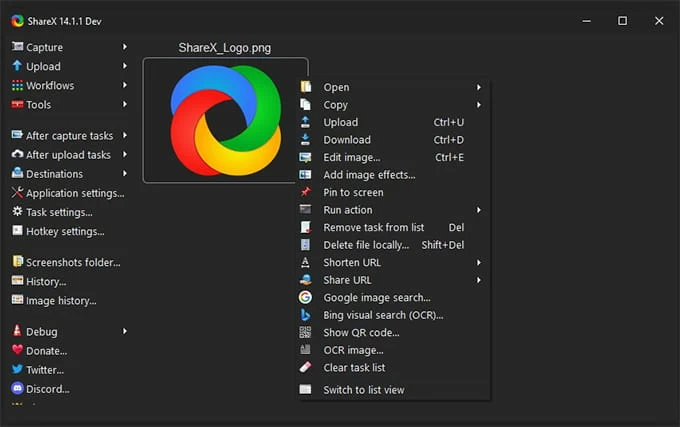
ShareX is a free, lightweight and open-source screen recorder that captures any activity on your Lenovo laptop screen for free. It can not only record your screen but also capture long scrolling images. Besides, you are able to share your Lenovo laptop screen recording to YouTube, Facebook and other platforms. All in all, it is a good alternative to recording screen on Lenovo laptop.
Alternatively, you can also screen record on the Lenovo laptop with the help of an online screen recording software. Screencapture.com. is a good online free Lenovo laptop screen recorder that can meet your needs for recording tabs, windows, full screen, webcam, and sound. But make sure your internet is stable and smooth before you use it.
To do it, open Screencapture.com. in your laptop's browser and select your recording parameters, then click Start Recording button to start screen recording on your Lenovo laptop.
Conclusion
By choosing any of the above screen recording software for Lenovo laptops, you can easily capture any activity happening on the laptop screen and recording screen on a Lenovo laptop will be a breeze.
1. How to screen record on Lenovo laptop windows 10?
With the built-in screen recorder pre-installed on Windows, to record screen on a Lenovo laptop, simply press the Windows key + Alt + R. Once you are done recording, click the Stop button in the recording bar to save the video file.
2. How to screen record on Lenovo laptop with sound?
You can use AppGeeker Screen Recorder to record screen with audio on your Lenovo laptop. In the Video Reorder interface, you can enable System Sound and Microphone options to record internal and external sounds of your laptop and adjust the appropriate volume.
You can even select the noise reduction feature in the Microphone option for clearer laptop audio recording.
3. What are the best screen recorders for Lenovo laptop?
Considering the various recording needs of laptops, the following are recommended laptop screen recorders.


