How to Transfer videos from PC to iPhone

Here're steps to record a game and an app using Xbox Game Bar on Windows laptop, and to record entire screen with alternatives to Game Bar screen recorder.

Important: The content of this article is based on Windows 10 and Windows 11 in any laptop screen recording of a game or any app. (HP, Dell, Lenovo, Acer, Asus, Samsung, etc.)
From making tutorials to instruct viewers on how to use an application or sharing gaming sequences, there are many reasons why being able to screen record on Windows laptop is important. While Xbox Game Bar backed into Windows 10 & 11 laptop ships with screen recording tool for capturing within a single app or a game at a time - if it isn't your case of getting the whole screen recorded on laptop, there are other apps that save the day. Related:

Taking a screen recording in laptop comes in handy when showing off all activities in gameplay and app.
To record your screen on laptop, open one game or app you want to record, press Windows key + Alt + R to let Xbox Game Bar start recording your activities. Once you've recorded whatever you want within your gameplay or application, hit Windows key + Alt + R to stop recording. Upon "Game clip recorded" alert appears, you're able to readily access your screen recording in the laptop within Captures folder as an MP4 file.
Scroll down and learn details on how to screen record on laptop using the native Xbox Game Bar. Utilities that do a lot more than Game Bar of capturing one application at a time, OBS Studio, Screen Recorder and PowerPoint can solve almost all your worries involving recording laptop's entire screen and multiple programs.
Table of Contents: How to Record Screen on Laptop
Click the title link below to go straight to that section of the tutorial.
As the name suggests, Xbox Game Bar lets you record screen while playing games without pausing and leaving your game window - but it does more than just recording the games.
You can use the Xbox Game Bar to record just about any non-gaming apps on the laptop, packing with the ability to record the audio from the app itself, system and microphone, like what it exactly does over the gameplay.
However, there are some things that the Game Bar can't do for recording on laptop. You can only record one application window at a time, not the full screen. When you're operating tasks in multiple programs, everything around that window will not be shown. Secondly, Game Bar doesn't record Windows desktop, File Explorer, and some certain apps like Weather and Maps.
At a glance
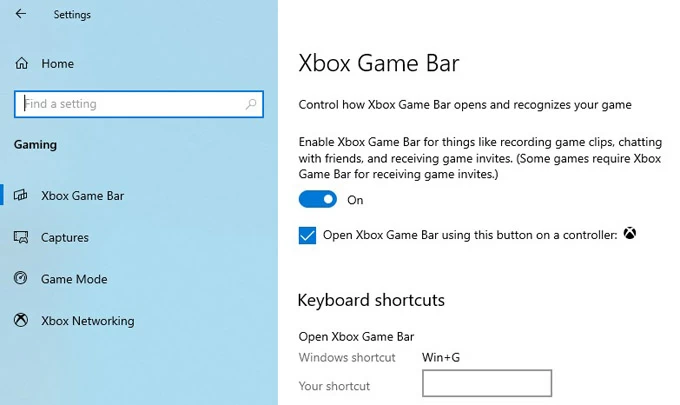
Make sure Xbox Game bar is actually enabled. It could be active by default, but you can find it through Settings > Gaming > Captures.
You can actually use Game Bar recorder with any app from Windows Microsoft Store, even if it's not a game.
If you have more than one window open on your laptop, Xbox Game Box screen recorder will end up capturing the last-clicked-to-access screen.
Alternatively, to get Game Bar to record your screen, press Windows key + G and then click the Start Recording icon on the Capture widget.
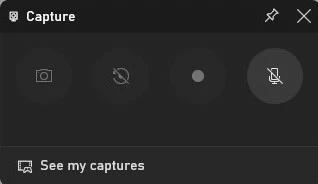
Game Bar has several recording controls.
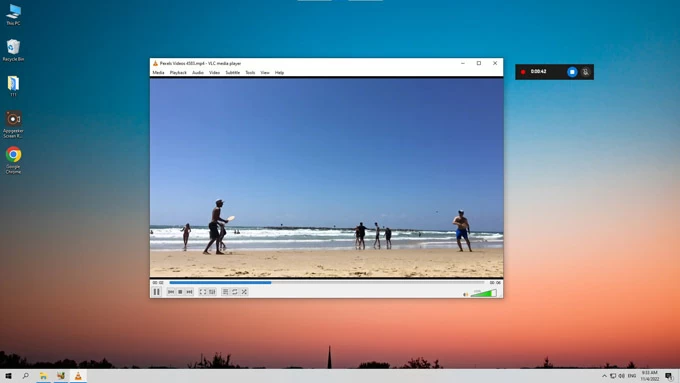
While it's recording on laptop, perform whatever screen actions you wish to capture.
A small recording floatingbar appears mostly at the upper right of the program window. You're able to monitor the counter indicating that your screen recording is processing. The Mic symbol allows you to mute or enable your microphone while capturing (Windows key + Alt + M.)
Xbox Game Bar keeps recording what's happening on your laptop until you stop the process.
Or, click the Stop Recording button on the floating bar to stop the video recording on the laptop.
A notification reading "Game clip recorded" will then show up on the right side of your screen.

Once you finish recording, Game clip recorded alert should pop up.
Clicking the notification should take you to the Gallery window of the Game Bar, where you can watch the video you captured. To access the screen recording on laptop quickly, click "Open file location." You'll find the recorded file saving as MP4 under Videos\Capture folder.
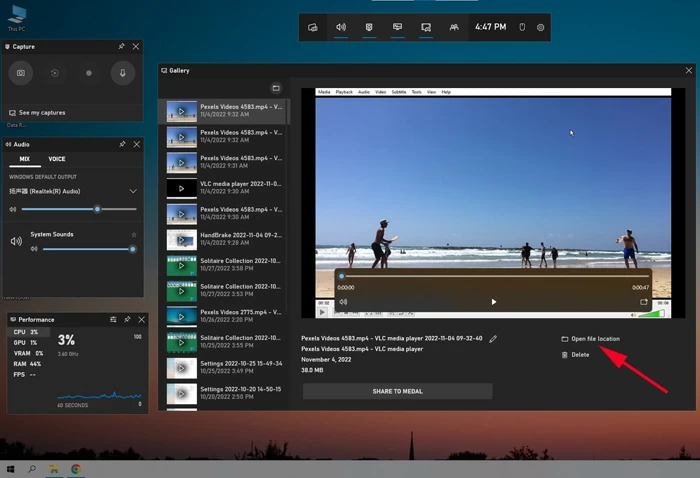
Xbox Game Bar comes with a preview function letting you find the recorded video clip instantly.
On your laptop, click Start menu and choose Settings > Gaming > Captures.
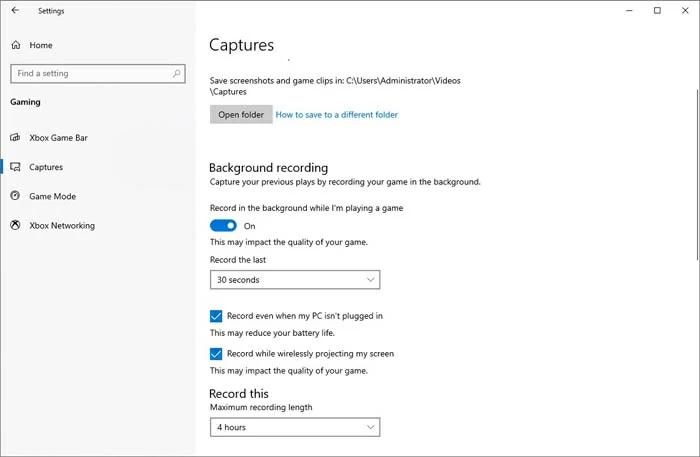
Background recording (Win 10) or Record what happened (Win 11)
Do you often miss great moments while playing into a game because you can't record your laptop screen in time? Fortunately, Xbox Game Bar can record the last 30 seconds (or minutes if you changed the interval) of the screen activities after the fact. As long as it's enabled, a press of Windows key + G to launch Game Bar can save a video on the laptop with the segment passed.
Maximum recording length of videos
Once you select a time frame, for example, 2 hours, Xbox Game bar will automatically stop recording video on laptop once it reaches to the point.
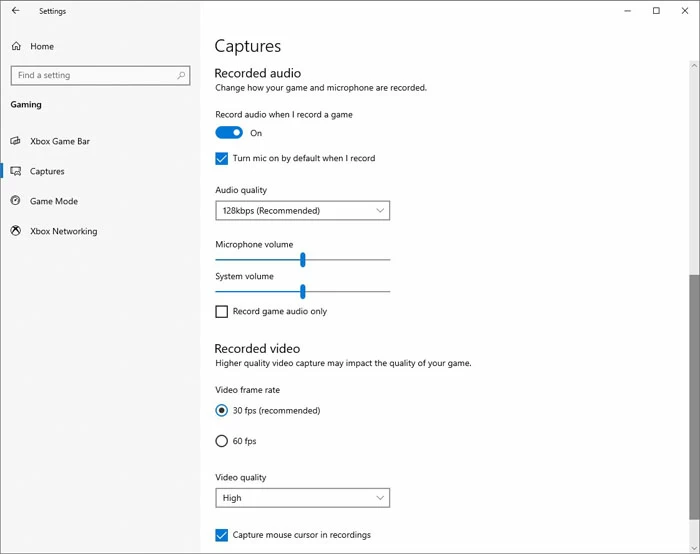
Recorded audio (Win 10) or Capture audio when recording a game (Win 11)
You will get the options to activate audio recording when you screen record laptop. You can opt to record sounds from game, app, system or microphone, modify the audio bitrate and adjust the volume level.
By far, we've known that Xbox Game Bar has the inabilities to record Windows whole desktop & File Explorer, and more than one application at a time. If you're looking for an approach to screen record entire desktop and multiple windows on the laptop, Screen Recorder might be a top pick - and with good reason.
Available on both Windows and macOS, Screen Recorder lets you effortlessly record what's on your screen, including video and audio from system and microphone. It also includes support and access to control over what's recorded so you can trim, split, and convert the recording with ease. All these functions truly set it apart from the native Xbox Game Bar in Windows laptop.
Laptop Supported: HP, Dell, Lenovo, Asus, Acer, Samsung, Toshiba, and so on.

1. Open Screen Recorder software on your laptop.
2. To screen record Windows 10/ 11 laptop, choose Video Recorder.
3. Select "Full" option to record your entire desktop or screen; or click on "Custom" option and drag to select the certain portion of the screen.
4. Turn on "System Sound" to record laptop audio in your screen recording; or enable "Microphone" to capture your own voice from your mic.
Optional. Use tiny gear icon above the "Microphone" option to make some presets for output format and video quality. You're able to set to hide desktop icon and Windows taskbar when recording the whole screen on laptop.
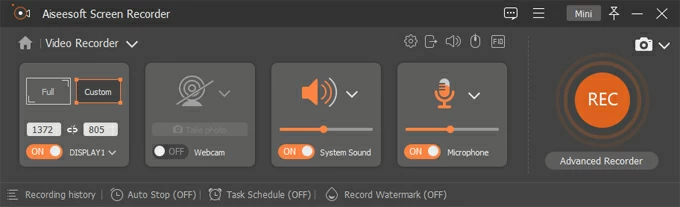
5. When you're ready, hit the REC button to start recording.
6. Make whatever actions on the screen you want to capture.
![]()
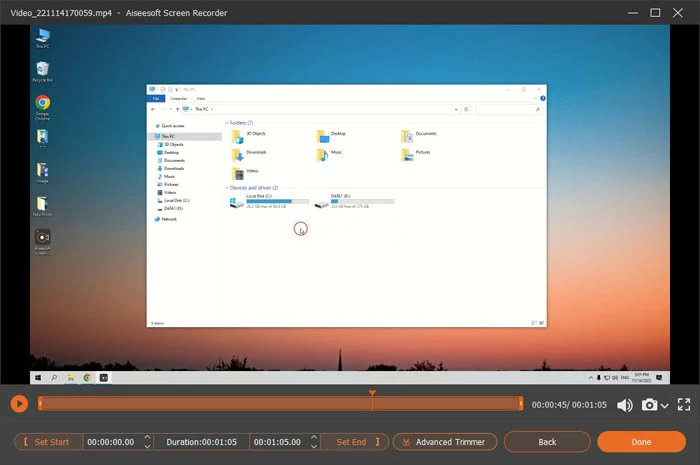
7. Once you complete recording all screen activities, click the Stop Recording icon on the left of the toolbar. You'll get a preview of the video once captured.
8. Hit Done button to quickly export the screen recording in MP4 or whatever format on the laptop.
That's all about how Screen Record works for you to capture entire desktop and all windows on laptop. We've also discussed How to record audio on Windows 10 computer over a lecture, interview, music video, etc.
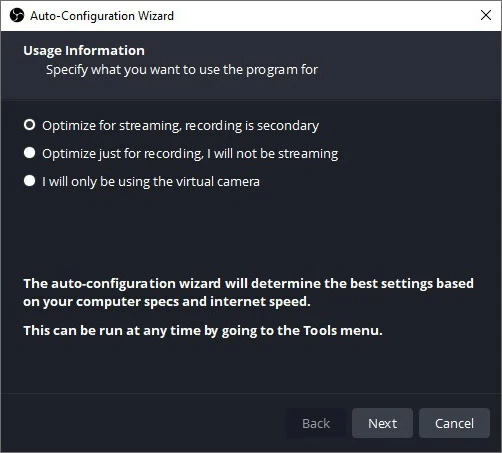
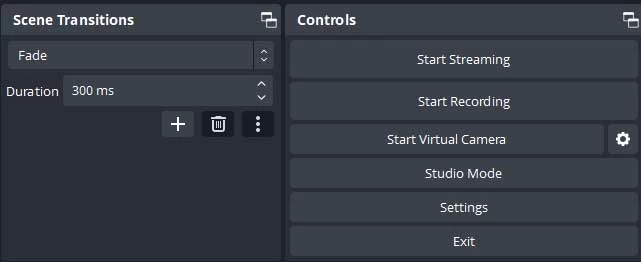
If you're not into Xbox Gamebar's recording method that restricts to work with full screen and multiple windows, there are many free Windows screen recorder for laptop you can choose from over the market. One of the popular tools is OBS Studio. It's purpose-built for gaming and live streaming, but you're able to capture your fullscreen and all windows of apps that's currently working on the laptop.
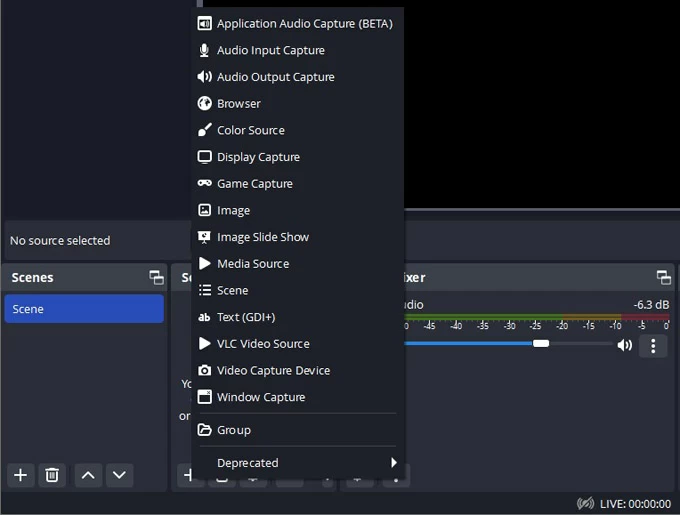
Here's how to use OBS to record the whole screen in laptop and save the screen recording to MP4 video format.
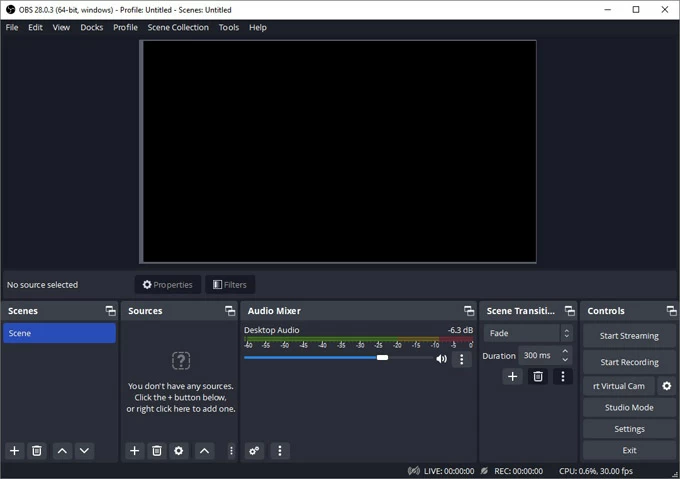
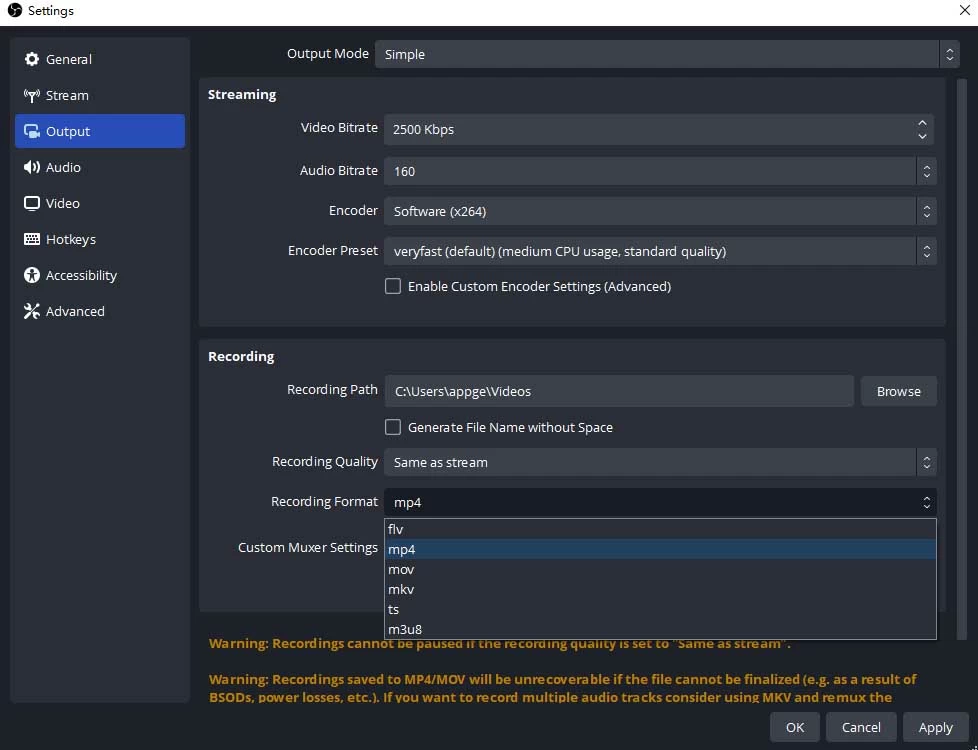
Your new screen recording is outputting to MKV format by default, and can be found in the folder you specified. If you desire to convert a recorded video from MKV to MP4, simply choose File > Remux Recordings.
Read also: How to convert MOV video to MP4 on Mac & Windows
Unlike the Xbox Game Bar, the PowerPoint in-built Screen Recording function is designed for record the whole screen of laptop and multiple windows, though it may not a game. Here's how you can use MS PowerPoint to record screen on your laptop Windows 10/ 11, so that you can embed the video in your PowerPoint slide or save it as a separate file.
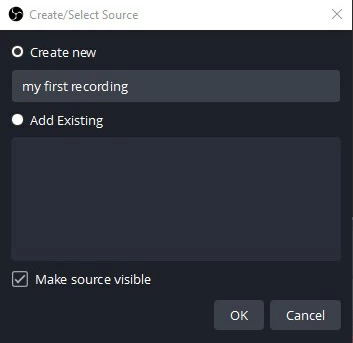
Open PowerPoint and create a blank slide. Head to the Insert tab from the ribbon at the top and then select "Screen Recording." By default, the option is located to the far right of the menu.

On the Control Dock, click on Select Area, and then use your cursor to drag to select the entire screen or the portion of the screen you want to record.
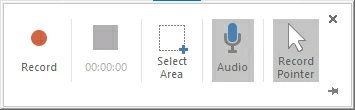
Next, click the Record button. When finished, hit the Stop button. You need to move your cursor back to the top of the screen to get the Control Dock to reappear.
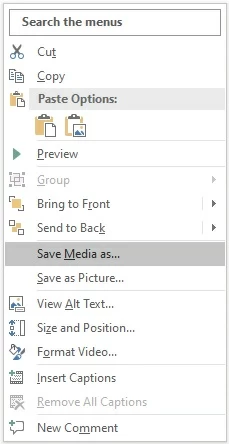
You screen recording will be inserted in the PowerPoint slide. To save it onto your laptop, right click on the video and select Save Media as from the menu. You will need to choose a folder and give the file a name when prompted.
FAQ: How to screen record on Windows 11 (laptop & PC)?
If you need to record your screen on Windows 11 computer, you can use the built-in Xbox Game Bar to do so.
In addition to recording your screen during gaming sessions, Windows Game Bar records non-gaming apps and activities as well.
1. Access the game or app you prefer to record.
2. Press Windows key + Alt + R to start recording anything on the window you're in.
3. When you've done with all actions in the program you want to capture, hit Windows key + Alt + R to end the recording.
Note that Windows desktop and File Explorer will not show up in your video recording. This is due to limitations in Windows that provide no capture methods for entire screen and multiple windows. So in case you want to go around the limitations and need to capture the whole screen and all windows, consider using AppGeeker Screen Recorder.
FAQ: How to screen record on HP laptop?
You can capture one application at a time on your HP laptop, not the whole screen. Once Xbox Game Bar is enabled through Settings > Gaming > Captures, It's a simple matter of using the Windows key + Alt + R on the keyboard to start and stop the screen recording on the HP laptop. Screen activities and audio should be recorded and saved as an MP4 file.
FAQ: How do I record the screen on laptop with sound?
To enable Windows pre-installed Xbox Game Bar screen recorder to capture a screen along with audio from a laptop (HP, Dell, Lenovo, Asus, Acer, etc.)
FAQ: How can you take a screen recording on a Mac laptop?
On newer MacBooks (MacBook Air, MacBook Pro), Screenshot Toolbar utility serves as a screen recording tool that helps capture entire screen or a customized area of the screen for any kind of app or game. To invoke Screenshot toolbar, you just need to press Shift + Command + 5.
For a MacBook running macOS Mojave or earlier, open QuickTime Player, choose File > New Screen Recording. If you want to screen record on Mac with audio, click the arrow next to the Record button and have the Internal Microphone checked. Then a press of the Record button initiates a video recording. That's done!