
How to backup contacts from iPhone to iCloud

Erasing your iPad wipes all of your content and settings permanently from your iPad, but you will get a fresh device to start. Here's how to erase an iPad to factory settings.

Erasing data and settings on iPad is relatively an easy process through Settings or use a Mac or Windows PC. However, if you're locked out and need to erase the iPad without passcode, try Appgeeker iPad Unlocker. It's capable of removing forgotten passcode quickly on iPad and iPhone.

Erase iPad will remove all data and settings, restore iPad to its factory settings, and install the latest iPadOS software.
If your iPad is freezing or starting to run slow, erasing the iPad to original factory settings and executing a clean install of iPadOS can be a good way to fix software-related issues with your iPad. This will let you set the device up like a new iPad.
Another reason why you might want to erase your iPad is to give it away, sell your iPad, trade it in, or just pass it to another person. Instead of simply deleting data that disappears in apps, erasing the iPad will permanently wipe all your data and settings from your iPad storage, and restore it to factory settings—also known as factory reset. This can be the only thing keeping your data safe.
Whatever the case, the process for erasing data and settings on iPad is easy thanks to an option in Settings. We'll run through the steps below on how to erase iPad completely. If you're unable to use Settings, there are another way to help you get iPad erased: use a computer and Finder or iTunes to restore the iPad. Before you do, it's important to back up the files on your iPad.
Table of Contents
Before moving onto the actual process of erasing your iPad data and settings, you'll need to do some basic preparations. Check below:
You would be wise to transfer any of your important information to your new device. Any action of deleting your personal data (contacts, messages, photos, reminders, photos, etc) that is synced with iCloud would delete your content from the iCloud servers and any of your other devices shared with the same Apple ID.
You will also want to disable Find My iPad feature, and remove your iPad from your list of trusted devices. In addition, remember to remove your credit or debit cards at iCloud.com, and cancel your AppleCare plan if you have.
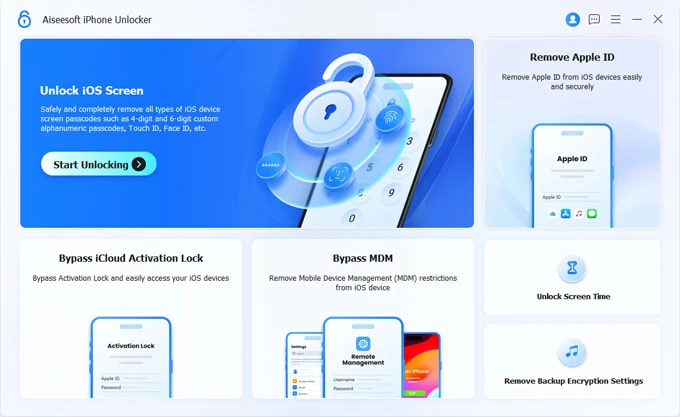
The lock screen passcode will be used for verifying your identity that you're the owner of the iPad before erasing. If you forgot the iPad passcode, you will need to reset it using something like Appgeeker iPad Unlocker mentioned in this article.
Before erasing the iPad, you will be asked to enter your Apple ID password used to set up your iPad before so that you can sign out of iCloud. This will also prevent the new owner from deleting your information from iCloud. Forgot your Apple ID or password? check the link to learn how to recover it.
If you get iPad from someone else and now need to erase the device to factory settings for a fresh start, ensure the iPad is logged out of iCloud. Or else, return it to the previous owner and ask to sign out of the Apple ID.
Before you perform an erase on iPad you should have a fresh iPad backup. This is because erasing an iPad to factory settings removes all the data stored on the device.
Apple includes a few tools and guides on how to back up data before erasing iPad. You can do this manually by using iTunes or Finder (Mac runs on Catalina or later) – as long as you have a Windows PC or Mac to use. The best thing about creating a backup of iPhone data locally on computer is it makes solid backup files, and you don't have to worry about running out of space. The modern hard drives usually carries get terabytes of storage
If you don't want to use iTunes, you can back up the iPad to iCloud. If you use iCloud, your photos, messages, contacts, reminders, safari history, documents, healthy data, and so on should be automatically backed up in Apple's cloud servers.
If you're backing up iPad with iTunes on your PC, ensure it has been upgraded to the latest version first. If you have macOS Catalina or later on a Mac, click the Finder icon in the Dock to open Finder instead.
1. Connect your iPad to your Mac or Windows PC.
2. Open Finder or iTunes as usual.
3. Trust your computer and enter the passcode to verify.
4. Locate your iPad in the window.
5. Under General tab in Finder window, click Back Up Now. If you're using iTunes, go to Summary, and then click the same button to begin backing up your iPad content and settings.
6. Optional. You can select Encrypt local backup —this can include your Health and Activity data in the backup, and as well avoid unauthorized access.

Also see: How to back up iPhone text messages.
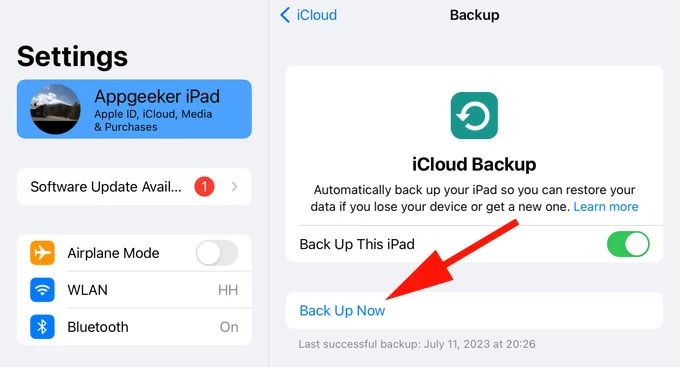
You may want to upgrade your iCloud to premium plan if the default 5GB of free storage isn't enough for you. Here's how to use iCloud to back up iPad. Make sure your iPad is connected to the Wi-Fi network.
1. Open Settings, and tap [Your Name] on the top of the page.
2. Select iCloud.
3. Turn on the switches next to apps you wish to back up.
4. Tap iCloud Backup.
5. Tap Back Up Now.
6. You may also toggle the Back Up This iPad switch to ON position to enable automatic iCloud backups.
Now that you've taken the backup of your iPad data, it's time to erase all of your content and settings from iPad and reset to its factory defaults. The Settings method is the easiest.
Here is how to use Settings app to erase the iPad.
1. Unlock your iPad, tap Settings app on the screen to open it.
2. Tap General > Transfer or Reset iPad.
![]()
3. If you don't back up your iPad before, you can tap Get Started to prepare your data and settings for new iPad. Apple lets you back up your iPad to iCloud first without limitations, even if you don't enough iCloud storage currently.
4. If you've backed up the iPad, directly tap Erase All Content and Settings.
5. Enter your passcode to restore iPad to factory settings.
6. Enter your Apple ID password to sign out of iCloud from your iPad.
7. Wait until your iPad is erased completely. All your data will be erased and the device will has the latest iPadOS installed later. The Settings app also includes options to erase iPhone.
You can also connect your iPad to a computer and use the Finder or iTunes to erase iPad to original factory settings—even if you aren't running the latest version of iPadOS.
To erase an iPad with Finder or iTunes:
1. Turn on the iPad if it shuts off.
2. Connect your iPad to your computer with a USB cable.
3. Open iTunes and locate your iPad in the upper left corner of the window. Or open Finder and select your device name in the left sidebar.
4. Click Summary, then click Restore iPad. If you're on a Mac, you should see the same button in General tab in Finder window.

5. Follow onscreen instructions to set up your iPad, after it's erased and restored to factory settings.
Again, if you use a Windows PC to erase all data and settings from iPad, make sure you have the latest version of iTunes.
What if you can't remember your passcode and unable to unlock the screen to erase your iPad in Settings or iTunes/Finder? Or you see iPad unavailable error? Or even the iPad says Security Lockout? You're not alone.
It's not the end of the world when you need to erase the iPad passcode that you forgot to. There're a lot of programs available to help you get rid of this problem, Appgeeker iPad Unlocker is our favorite. Not only does this tool effectively reset lock screen passcode you forgot on iPad or iPhone, it also removes Apple ID, Screen Time passcode, as well as Face ID/Touch ID that doesn't work, making it far easier to unlock your device without any hassle.
Note that unlocking an iPad without passcode using iPad Unlocker will erase your iPad data, restore iPad to factory settings, and install the latest iPadOS.
Below are the basic steps on how to erase everything on the iPad without passcode. Don't worry, the program also has onscreen prompts to walk you through the process.
Done!
If you don't mind experiencing with a complex process, you may also use Apple's Recovery mode to erase iPad without a passcode via iTunes. Here's how.
1. Turn the iPad off
The way of shutting off an iPad differs a bit, depending on whether your iPad has Home button or Face ID or not.
2. Enter recovery mode
iPad with Face ID: quickly press and release the Volume Up button, press and release the Volume Down button, and then hold the Top button until it appears Recovery Mode screen.
iPad with a Home button: press and hold both the Home and the Top buttons until you see Recovery Mode black screen.
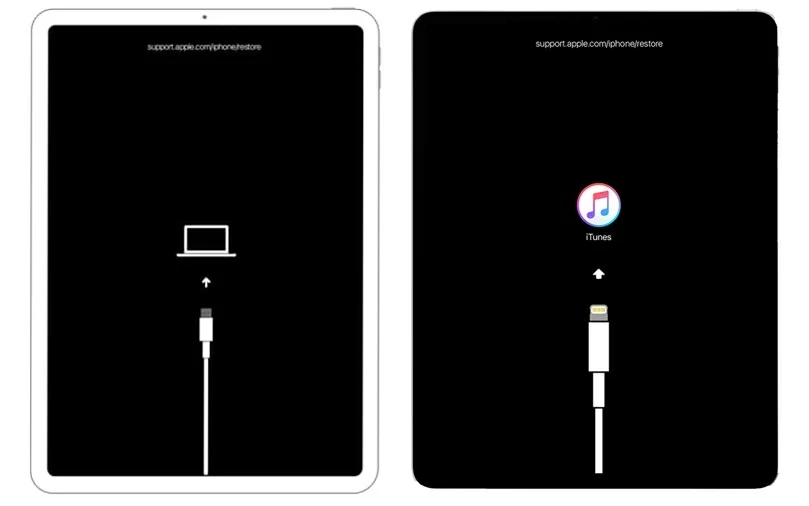
3. Open Finder or iTunes and locate your iPad
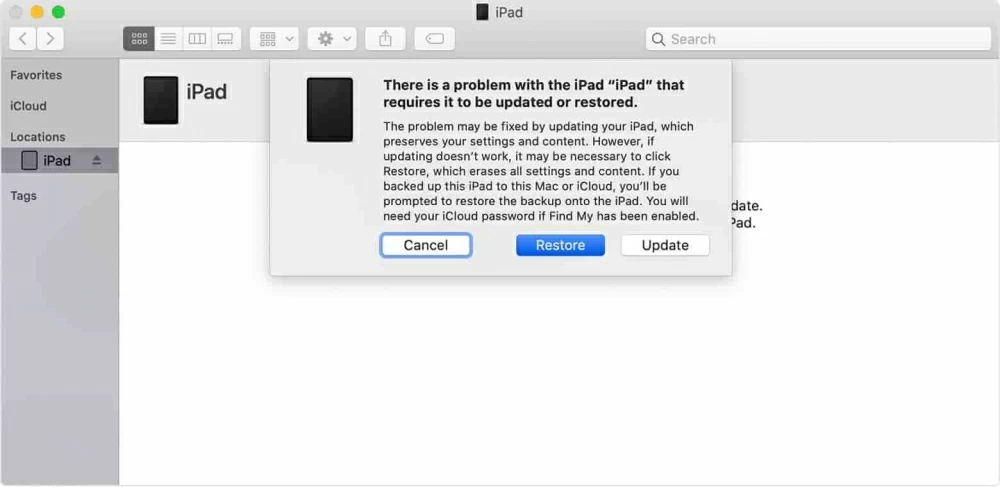
4. Select Restore option
When Finder or iTunes detects your iPad in Recovery mode, select Restore from the pop-up dialog. You have Update or Restore to choose from, but here we will need to select the Restore option to erase the locked iPad to remove the forgotten passcode.
5. Wait for the computer to reinstall the latest iPadOS software
6. Set up your iPad
Congratulation! You have successfully erased an iPad without passcodes. Set the iPad up and you're ready to use it. Want to get music you have on iPhone over to your iPad? Check out our dedicated guide on how to transfer music from iPhone to iPad.
You will learn more from frequently asked questions about how to wipe iPad.
How do I erase my iPad completely?
There are two ways to erase an iPad to reinstall the latest iPadOS firmware. One is use Settings app on your device, the other is use a computer and restore the iPad in iTunes or Finder. Both allows you to remove all of your content and settings from your iPad storage.
How do I erase the iPad before moving to a new owner?
To reset your iPad without any data leak, you will need to erase all the iPad data and restore it to its factory settings. You will also want to sign out of your Apple ID so there is no iCloud Activation Lock appear on the screen when new owner gets in hand. Here's how to do.
1.Go to Settings > General > Transfer or Reset iPad.
2. Back up your data.
3. Tap Erase All Content and Settings.
4. Enter your passcode to confirm
5. Enter your Apple ID password to begin erasing the iPad.
What's differences between soft reset, hard reset, and factory reset of iPad?
Soft reset. This always applies to cases when your iPad acts slower than usual, or the apps quit unexpectedly. A simple start usually fixes the issue.
Force restart. If your iPad becomes unresponsive, or frozen, or similar issues, you will need to force the device to start to reset the system to normal state.
Factory reset. Also known as hard reset or "formatting." It is a software restore which return your iPad to its original factory state, at the expensive of erasing all of the data and settings on the device. If your need a fresh start, or decide to sell it, trade it in, or give it away, it's wise to perform a factory restore on iPad.
Can I erase an iPad without a passcode?
If you forgot the passcode to iPad, you can't erase it using Settings or Restore iPad feature. Instead, you have to use a computer to erase iPad using Recovery mode, or use the third-party application like Appgeeker iPad Unlocker. The latter is a simple tool that can quickly remove lock screen passcode within minutes.


