
How Can I Get WMV Video Files to Play on iPad (Air, Pro, Mini)


WebM (VP8/VP9 video + Vorbis/Opus audio) is an open, royalty-free, container format designed for delivering videos on webpage using the HTML5 video tag. It is widely deployed by YouTube, Vimeo and other video hosting websites, and files end with .webm extension can play directly in most web browsers such as Firefox, Opera, Internet Explorer, Chrome.
WebM can be accessed in HTML5 environment without a problem, but the web-friendly format can run into trouble when it comes to offline. Desktop media players and applications on computer such as Apple QuickTime, Microsoft Windows Media Player, iTunes won't support a playback of WebM by default. Even popular devices like iPhone, iPad, Android phones, tablets, PS4, and HDTVs refuse to open the Web video files you throw at it.
Convert WebM to MP4, a more compliant format for multipurpose
Fortunately, there are many of ways you can take to get rid of WebM playback issue. Among them, converting the WebM to MP4, the most flexible and resilient file format on the planet, would be a nice option you can go after. In this article, we'll be using an application called Video Converter for Mac to help you convert the file from .webm to .mp4 format on Mac so you can use it on multiple platforms as well as the vast majority of multimedia devices & players.
It is a full-fledged tool with all of the added features one would expect in a file conversion tool, including preset choosing, parameters tweaking, video editing and the ability to create you own custom format profile for use next time. To convert a Web video in MP4 file on a Windows machine, please go and stick with its PC version—Video Converter for Windows, and the steps are akin to Mac's.
Step 1: Launch the Program and Add WebM Files
Start the program on your computer, you'll notice it's nothing more than an interface with main choices and clear-cut wizard built into the app, which are perhaps too sensitive and with the slightest click sending you off to the options you required.
To add one or more WebM files into the sequence on the program, you can either use the convenient drag-and-drop feature or import files with the touch of a "Add File" button at the toolbar.
Once a video is added to queue, you can preview it via a small preview window at the right pane.

Tip: there is a "Merge into one file" option located in the lower right corner available, allowing to merge two or more video files together.
Step 2: Select MP4 from "Profile" Drop-down Menu, and Adjust the Settings as Required
The critical part of performing conversion task is to choose an output format.
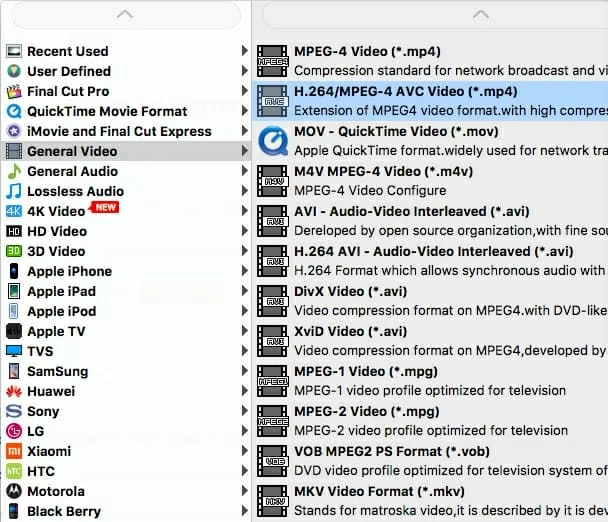
Head to the lower left hand corner of the screen, there should be a "Profile" pull-down box. Click it and you can take a pick from a choice popular video formats. In our case, select "MPEG-4 Video (*.mp4)" or "H.264/MPEG-4 AVC Video (*.mp4) under "General Video" category.
Once you have made your format selection, choose an output directory to save the results. You can stick to the default folder or pick a new one by clicking "Browse", beneath "Profile".
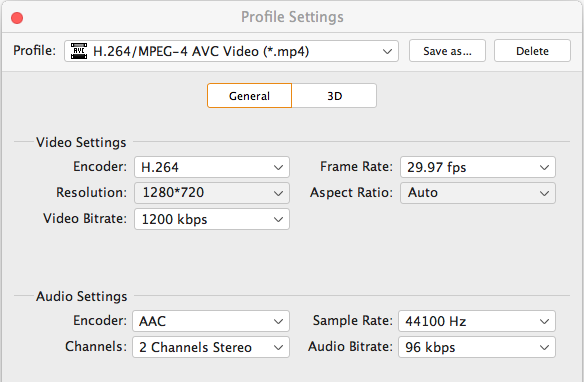
You also have the option of working with conversion elements that have impacts on video quality. Check the button that labels "Settings" to the right side of "Profile" drop-down menu.
Normally, we accept the default settings (codec, resolution, frame rate, bitrate, etc.) that have been optimized by this WebM to MP4 converter, but you can change them if you have trouble or want to get exact what you want for video.
If you don't want to take the trouble, just ignore this part and continue.
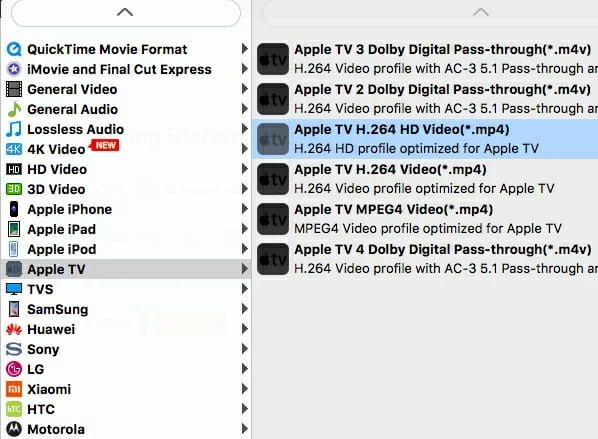
Don't want to fiddle with these annoy parameters when it comes to converting a video for portable playback? The good news is that the software offers flexibility through a set of optimized device/ player-oriented presets, with the purpose of making the output results full compatible with the device you are working on.
For instance, if you want to view a 1080p MKV movie through Apple TV, all you need to do is click "Apple TV" column on the left pane and then choose a model you hold in the right expanding pane. This way, you don't have to rack your brain to tackle the format and profile settings that your ATV requires. It's that simple.
This WebM converter also get your videos just the way you want it with some basic editing options. It's worth taking some time to explore them in depth if you want the files look better. You can preview the video clip in real-time to see if the edits you've made suit your needs.
Step 3: Specify an Output Path and Start Converting WebM to MP4 for Mac
When you've happy with the edits you've made, now you need to tell this program where to save the converted file. To do this, click the "Browse" button underneath "Settings". A window will appear allowing you choose the location and name of the file.
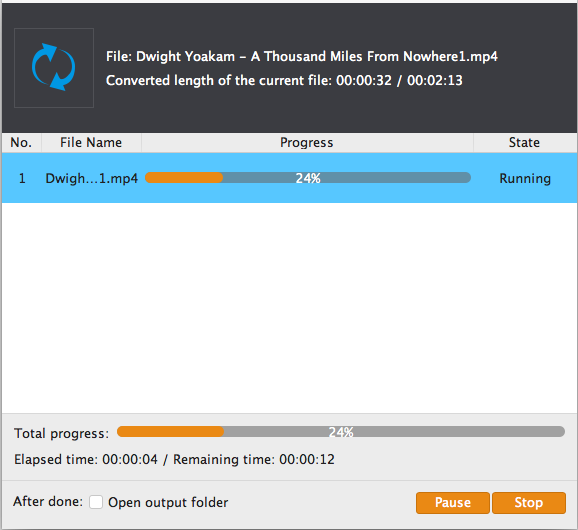
Press the orange button "Convert" and the program begins converting your imported WebM videos to MP4 in Mac and save them to your chosen location. Please be patient.
That's it! We suggest that it is better to play the new created MP4 files on your desktop media player to make sure that the conversion was successful and without errors.
Summary
This is all very basic, with only three relative steps, still, what you learn here works well. Apart from the controls and features mentioned above, it is also a exactly simple way to build and share short fun movies for social media like Facebook, YouTube, Instagram and more.