How to Get Photos from Locked iPhone

Does deleting photos from your iPhone also delete them from iCloud? This article will explain it and show you how to delete photos from an iPhone without affecting iCloud.

If you accidentally delete important photos from your iPhone, you can use Appgeeker iPhone Data Recovery to scan your device and recover deleted iPhone photos quickly.

There are multiple methods to delete your photos from an iPhone while keeping them stored in iCloud safely.
iCloud Photos is Apple's seamless solution for storing and syncing photos and videos across your devices, ensuring your memories are accessible anytime, anywhere. However, a common question among iPhone users is: If I delete photos from iPhone is it deleted from iCloud? This query often sparks confusion due to the intricate interplay between local device storage and Apple's cloud ecosystem.
Understanding the relationship is crucial not only for managing limited iPhone storage but also for safeguarding cherished photos in the iCloud. This article breaks down how iCloud Photos actually works, clearly answers whether deleting photos from iPhone also deletes from iCloud, and how to delete photos from iPhone without deleting them from the iCloud, allowing you to optimize iPhone space while keeping your iCloud photos intact.
Table of Contents
iCloud Photos is Apple's cloud-based solution designed to streamline photo management. When enabled, it automatically uploads and syncs all photos and videos from your iPhone's photo library to iCloud, allowing access across all devices linked to the same Apple account, such as iPads, Macs, and even through iCloud.com. Whether viewed on your iPhone or a web browser, this synchronization ensures your photo library remains consistent.
A key feature of iCloud Photos is its storage optimization options. Users can choose between "Optimize iPhone Storage", which stores lower-resolution versions of photos on the device to save space while keeping full-resolution originals in iCloud, and "Download and Keep Originals", which retains high-quality versions on both the iPhone and iCloud. This flexibility lets users balance device storage with full library access.
Additionally, iCloud Photos maintains a "Recently Deleted" album, a 30-day safety net where deleted photos and videos are temporarily stored, accessible on your iPhone as well as in iCloud, offering a recovery option prior to being permanently wiped.
The answer of "If I delete photos from iPhone is it deleted from iCloud" isn't always straightforward and depends heavily on your iCloud Photos settings.
iCloud Photos isn't a traditional backup system—it's a real-time synchronization service. With iCloud Photos turned on, your iPhone and iCloud are interconnected, meaning deleting a photo from the Photos app on your iPhone will also remove it from iCloud and all other synced devices. Once deleted, the photo moves to the "Recently Deleted" album, where it remains recoverable on both iPhone and iCloud for 30-40 days before permanent deletion.
However, there are exceptions. If iCloud Photos is disabled on your iPhone, photos stored locally on the device aren't synced with iCloud, so deleting them won't affect iCloud's content. Similarly, if you turn off iCloud Photos before deleting photos, those deletions will only impact the iPhone's local storage.
Read more: Transfer photos between iPhones without iCloud
If you're running out of storage on your iPhone but don't want to lose your photos saved in iCloud, you need to break the sync or store your photos somewhere else before deleting them from your iPhone. Below are several effective and safe methods to delete photos only from your iPhone while keeping them intact in iCloud.
If your goal is to separate your iPhone's local photo library from iCloud, disabling iCloud Photos is the most direct method. This stops the ongoing synchronization between your iPhone and the iCloud, giving you full control over what stays on your iPhone. Once the sync is off, deleting photos on your iPhone no longer affects iCloud's copy.
This approach is especially useful for those looking to remove clutter from their iPhone's storage without altering their main photo archive in the cloud. It's also an essential first step before making significant changes to your photo library, as it prevents deletions from affecting all synced devices.
1. Open the Settings app on your iPhone and tap your name at the top.
2. Navigate to iCloud > Photos.
3. Toggle off Sync this iPhone.
4. When prompted, you can choose Remove from iPhone to clear local copies but keep originals in iCloud. Or select Download Photos & Videos during this process, your iPhone will first try to download everything from iCloud before disabling sync, which can consume space.
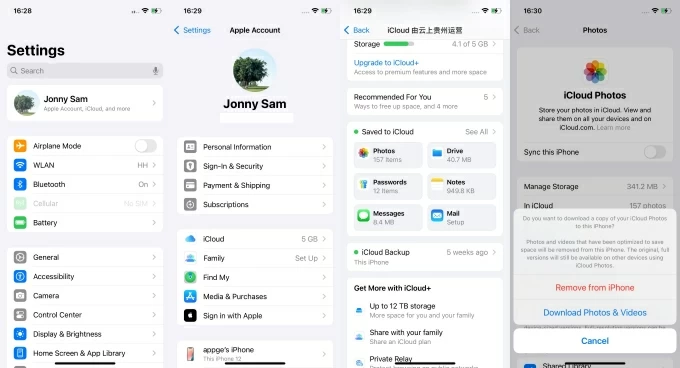
After stopping sync, you can go to the Photos app to manually delete pictures from your iPhone—they'll remain untouched in iCloud.
Note:
For users with multiple iCloud accounts, switching to a secondary iCloud account on iPhone allows you to delete photos locally without deleting them from your main iCloud account, offering a creative way to maintain a distinct iCloud photo library while clearing iPhone storage.
However, note that signing out of the original iCloud account will also impact other synced services on your iPhone, such as Contacts, iMessage, and iCloud Drive.
1. Verify that your photos are fully uploaded to your primary iCloud account by checking iCloud.com or another synced device.
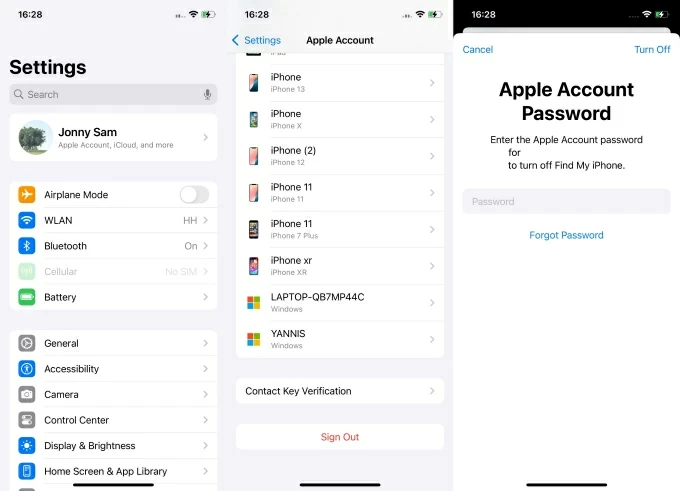
2. On your iPhone, go to Settings > [Your Name].
3. Scroll to the bottom of the screen and tap Sign Out.
Tip: If the Sign Out option is grayed out due to restrictions, return to the Settings menu, tap Screen Time > Change Screen Time Passcode, then select Turn Off Screen Time Passcode. After this, the Sign Out option should become available.
4. Verify your Apple account password to disable Find My iPhone.
5. Choose whether to keep certain data on your iPhone locally, if prompted.
6. Sign in to a secondary Apple ID by going to Settings > Sign In to Your iPhone and entering the credentials for the secondary account.
This way, you unlink your device from the synced iCloud Photos environment, allowing you to manage photos locally without syncing changes back to your original cloud account.
Instead of worrying about whether deleting photos from your iPhone will also remove them from iCloud, take proactive steps to manage your photos and prevent loss. Using Appgeeker iPhone Data Transfer is a smart choice to transfer your photos and videos from your iPhone to a computer for safekeeping, then delete them from your iPhone while ensuring the photos remain securely stored.
This professional software allows you to selectively export and back up photos to your computer without relying on iCloud sync. It can transfer large photo libraries in one go while preserving the original full-resolution images without compressing their quality. Plus, its built-in image converter makes it easy to ensure compatibility of HEIC images with Windows PCs.
1. Download and install Appgeeker iPhone Data Transfer on your PC or Mac. Launch the software and plug your iPhone into the computer using a compatible USB cable.
Once the software successfully recognizes your device, the main interface will display your iPhone's information.

2. Navigate to the Photos tab on the left side, where your device's photo library will be organized for preview. Select the photos you want to download to your computer. You can check them individually or select an entire photo library.

3. After making your selections, click the computer icon labeled [Export to PC/Mac] at the top, then choose a destination folder to save the photos.

Once you've created a photo backup on your computer independent of iCloud Photos, you can confidently delete unwanted photos from your iPhone without worrying about them being deleting from iCloud, as you have a backup option to retrieve your photos.
Related: How to transfer photos from iPhone to external hard drive
To delete photos from an iPhone but not iCloud, uploading them to third-party cloud storage services like Google Photos, Dropbox, or OneDrive offers greater flexibility, ensuring your photos remain accessible while freeing up device space.
These services act as independent backups, unaffected by Apple's ecosystem. Unlike iCloud's sync behavior, deleting photos from your iPhone after cloud upload won't remove them from third-party services. Here, we'll use Google Photos as an example.
1. Install the Google Photos app from the App Store and sign in or create an account.
2. Grant permission to Google Photos to access your photo gallery when asked.
3. Tap the profile picture in the top-right corner to enter the settings interface.
4. Tap Turn on backup.
5. Choose the upload quality based on your needs: Storage Saver or Original Quality.
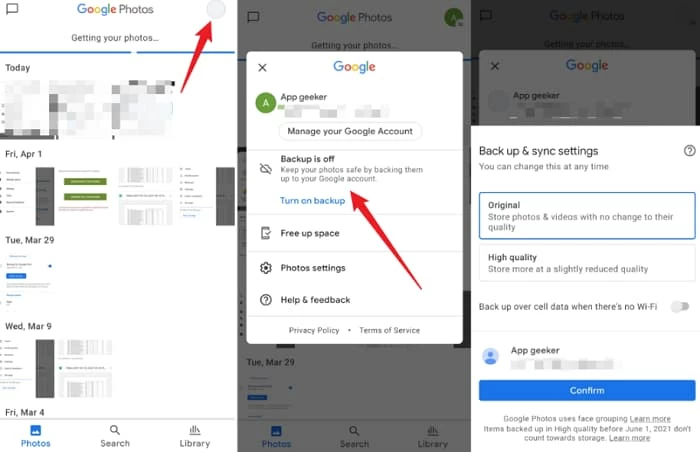
6. Tap Confirm to initiate the backup of your entire iPhone photo library to Google Photos. The time required depends on the number of photos and videos in your library.
Note:
Even with careful management, accidental photo deletion can still happen—especially with iCloud Photos. Fortunately, within 30 days of deletion, you can find deleted photos in the "Recently Deleted" album on your iPhone or iCloud.com.
However, if the photos are no longer there, a powerful Appgeeker iPhone Data Recovery tool offers a chance to recover deleted photos, even those permanently deleted from iPhone, whether they were lost from local storage, iCloud sync, or previous backups.
This software can deeply scan your iPhone's internal storage, detect traces of deleted photos that haven't been overwritten, letting you preview the results and recover the deleted photos. It also supports extracting photo items from iTunes backups for restoration without requiring a full iPhone reset.
Remember, the sooner you use Appgeeker iPhone Data Recovery after deletion, the higher the chances of full photo recovery, especially before deleted files are replaced by new data.
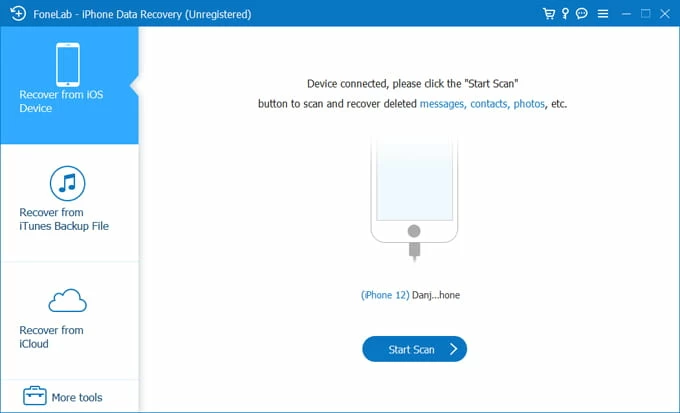
1. Run the software on your computer and use an adapted data cable to connect your iPhone to the computer.
2. Select the Recover from iOS Device option, then click Start Scan to begin a comprehensive analysis of your device's data.
3. After the scan completes, navigate to the Media section and browse thumbnails of recoverable photos in Camera Roll, Photo Stream, Photo Library, and App Photos.
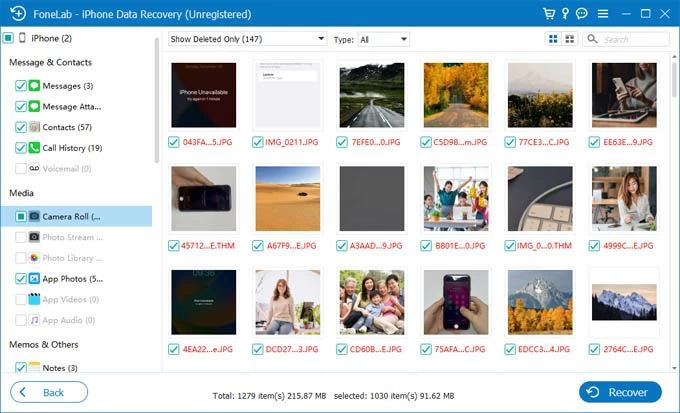
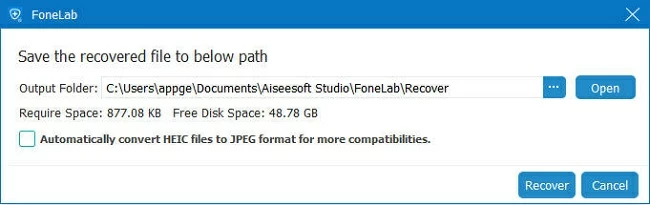
4. Select the photos you want to recover, hit the Recover button in the bottom-right corner, then choose a folder in the pop-up window to save the restored photos.
When your messages disappear on your iPhone, this software can also be a great help.
Having addressed the question "If I delete photos from my iPhone is it deleted from iCloud" and learned methods to delete photos from your iPhone but not from iCloud, the next step is to take smart strategies to ensure your photos stay available in iCloud while optimizing your iPhone's storage.
Use "Optimize iPhone Storage" instead of deleting
If you're running low on space, there's no need to delete your entire library. Instead, enable "Optimize iPhone Storage" under iCloud Photos settings. This keeps lightweight versions of your photos on your iPhone while the originals keep safely in iCloud—preserving quality without sacrificing space.
Also see: How to restore photos from iCloud
Regularly monitor iCloud storage
Staying ahead of storage limitations prevents disruptions in photo syncing. Head to Settings > [Your Name] > iCloud to view your unused storage. If you're nearing the 5GB free storage limit, consider upgrading to a paid iCloud plan.
Avoid unnecessary syncing across all devices
If you use multiple Apple devices, be selective about which devices have iCloud Photos enabled. For example, keeping it on for your main iPhone and iPad but off for your Mac can reduce the chance of accidental deletion or overuse of iCloud storage. Tailor syncing based on how each device is used.
Conclusion
If iCloud Photos is turned on, deleting a photo from your iPhone also deletes it from iCloud. To avoid this, you can disable sync, switch accounts, or use tools like Appgeeker iPhone Data Transfer to safely back up photos before deletion. And if important photos are lost, Appgeeker iPhone Data Recovery offers a reliable way to retrieve e them. Managing your sync settings wisely is the key to keeping your memories safe.