How to Recover Deleted iMessages from an iPhone

Lost your iPhone photos? Don't worry, follow these step-by-step instructions to view, extract and restore photos from iTunes backup without losing current data!

Overview: Whether you've lost or accidentally deleted your iPhone photos, a recent iTunes backup or Finder backup can help you get photos back by restoring everything from it. Alternatively, if you prefer to restore only photos from the iTunes backup without data loss, try using the backup extractor tool - Appgeeker iOS Data Recovery to view, extract and restore photos from iTunes selectively.

Extracting photos from iTunes or Finder backup can help you restore lost or deleted photos on your iPhone.
Apple either offers Finder or iTunes' Back Up Now option, or builds in an iCloud backup feature on iPhone to help users keep their valuable photos safe. If you just deleted camera roll photos on iPhone by mistake, you might only need Recently Deleted album to get back the photos, but for more serious problems, restoring photos from backup might be in order.
In this article, we will show you two ways to recover photos from iTunes backup or Finder backup. One is to use the Finder & iTunes backup to restore everything onto iPhone at the expense of wiping out all current data—the traditional approach by Apple, while the other is to selectively extract photos from a Finder & iTunes backup and restore them to your iPhone without losing data. Let's explore the detailed steps for restoring iPhone photos from an iTunes backup.
The first way to try is to get photos from iTunes Backup by restoring iPhone through "Restore backup" feature within iTunes, providing of course that you've made an iPhone backup containing the lost pictures before your photos were disappeared.
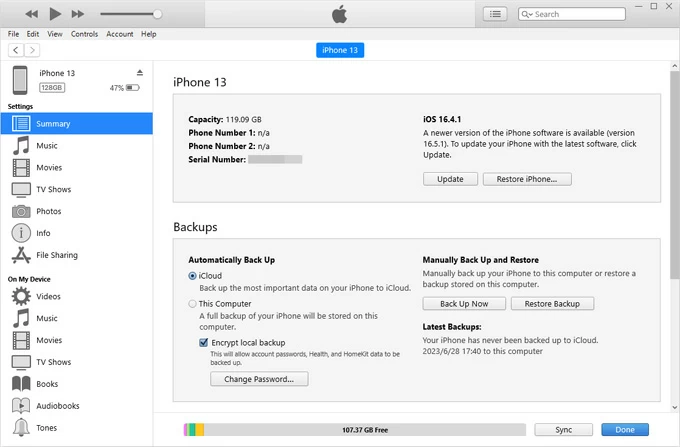
Restoring photos from iTunes backup is simple and reliable, however, be aware that the process will restore your entire device and overwrite all current data with the backup content. Here's how to retrieve photos from iTunes backup, for Windows PC or Mac with macOS 10.14 or earlier:
TIP: If the iTunes backup is encrypted on your computer, enter the passcode to unlock it and start the process of restoring photos from iPhone backup in iTunes.
How long the iTunes restore process will take depends on how big the backup is. When it is complete, your lost photos will be back on iPhone.
Note that the photos already stored in iCloud (Photo Stream and iCloud Photo Library) do not save in iTunes backup. You may restore photos from an iCloud backup alternatively.
If you have iPhone backed up in Mac with macOS Catalina 10.15 or above, you may use Finder to restore pictures from backup. Here's how to extract photos from iPhone backup in Finder:
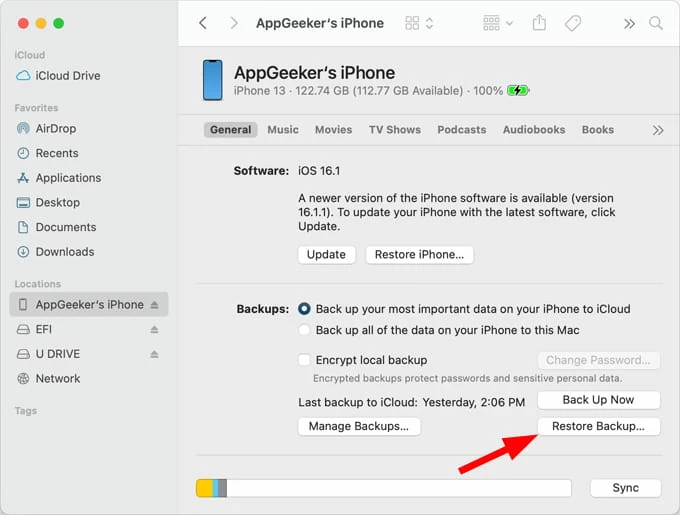
You are not able to view the recovered photos until the whole backup is restored to your iPhone. All your current content and settings will be erased and replaced with the old backup. If you don't like to erase your iPhone, try the next option to restore photos from iTunes with no data loss.
While you can get back photos to iPhone by restoring an entire iTunes or Finder backup, doing so makes your device reverted to its earlier state — which will replace all current data on your phone with the data in the backup. Is it possible to view backup photos and restore only photos from iTunes/ Finder backup without affecting current data on the device? The answer is absolutely YES! That is where Appgeeker iPhone Data Recovery come in.
The program is efficient and simple to use, letting you scan and preview photos included in iTunes/ Finder backup, and then decide to recover whatever you want. As a Finder & iTunes backup extractor, it can retrieve up to 19 types of data, including contacts, photos, messages, notes, reminders, calendars, call history, bookmarks, voice memos, WhatsApp chats and more.
Better still, it can even recover permanently deleted photos from iPhone & iPad internal memory, making it really convenient for those who don't have an earlier iTunes or iCloud backup.
If you're working on more than one computer, please ensure that you've installed the program on the computer that you normally sync iPhone with. It should contain the Finder & iTunes backup file. To recover photos from iTunes backup or Finder backup, follow step-by-step guide here:
Step 1: Choose iTunes recovery mode
Start the program and pick up Recover from iTunes Backup File mode on the main interface. This will search your computer for any available iTunes/ Finder backup files automatically and display them by date.
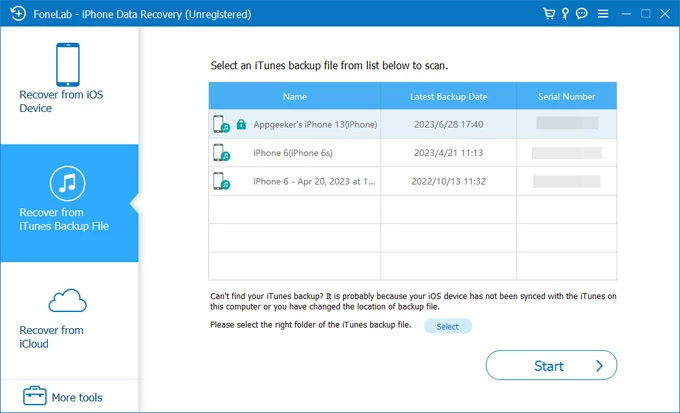
Step 2: Choose a backup to scan for photos
Select a backup containing the pictures you want to restore and click Start button. Wait for it to scan the whole iTunes backup and show all extracted contents, classified by different file types.
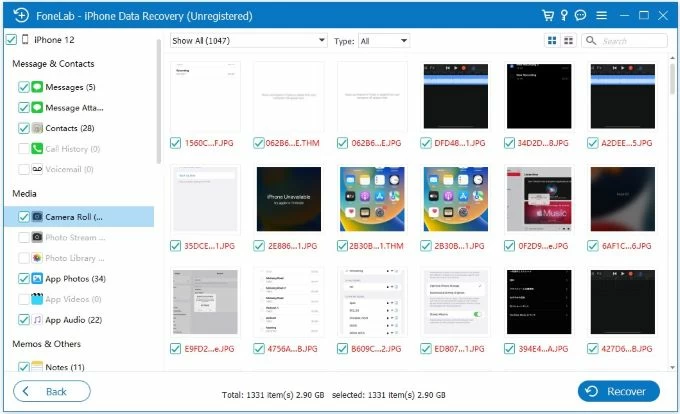
Step 3: View and extract photos from iTunes backup
Before the restoring process, preview the backup photos by selecting Camera Roll / Photos Library in the Media section on the left side; then tick the photos you wish to restore, and hit the Recover button at the bottom to get them back.
When a small dialog box pops up, specify a folder and click the Recover button again to save the retrieved photos onto a convenient location on your computer.

Once you have successfully restored pictures from iTunes backup (or Finder backup on Mac), you can open the folder on your computer to view, edit, or sync the photos back to your iPhone using a proficient two-way transfer tool such as iPhone Data Transfer.
Q1- How do I find my photos in iTunes backup?
If you've backed up your photos using iTunes, the backup is stored as a complete archive that can be located within iTunes. However, it doesn't allow you to view specific photos or restore only the photos separately. To restore individual photos from an iTunes backup, you may need a little help of the backup extractor tool - iPhone Data Recovery, which enables you to view and recover photos from iTunes backup or from iPhone/iPad internal storage with selectivity.
Q2 - How can I recover my iPhone photos from an iTunes backup?
If there's an iTunes backup that contains the iPhone photos you wish to recover, simply connect your iPhone to computer and run iTunes > click the device icon > select the Summary option from the left side > in the Backups section, choose Restore Backup.
Remember the restoring from iTunes backup / Finder backup will erase all existing data on your iPhone and replace it with everything in that backup.
Q3 - Can I retrieve permanently deleted photos from iTunes?
Yes, it is possible, but only if you had previously backed up your photos with iTunes before the permanent deletion. However, keep in mind that the recovery process will restore your iPhone to factory settings, and overwrite all your current data.