How to Transfer Videos from PC to iPhone

If you have a lot of songs in iTunes and you want to transfer them to USB drive for storage, here you can find the easiest way to transfer your music from iTunes to flash drive.


You can copy music from iTunes directly to your USB drive or flash drive with iTunes.
Developed by Apple, iTunes is a popular media player and library manager used by millions of users worldwide. Copying music from iTunes to your flash drive is a process that allows users to conveniently store, backup and share their music collection. For example, you may want to transfer music from iTunes library to flash drive for your car stereo, or transfer iTunes playlist to USB flash drive in MP3 format to ensure good compatibility with other devices.
This article will give you a comprehensive guide on how to transfer music from iTunes to flash drive. If you already have iTunes installed on your computer and your flash drive ready, then follow the instructions to copy your songs from iTunes to USB flash drive.
Tip: If efficient and fast music transfer is what you need, Appgeeker iPhone Data Transfer lets you transfer your iTunes music library to a USB flash drive or other portable storage drive with one click.
With Windows or Mac before Catalina version, you can transfer playlists to your flash drive through iTunes. But it should be noted that if you have music purchased from iTunes Store, only non-DRM songs can be transferred to flash drive and played on other devices.
If you want to transfer music to iPhone instead of USB flash drive, see How to transfer music from iTunes to iPhone.
Whether you are using Windows 11, Windows 10 or Windows 8, or a Mac computer, you can directly move songs to the flash drive from the music library in iTunes.
1. Run the iTunes app on your computer.
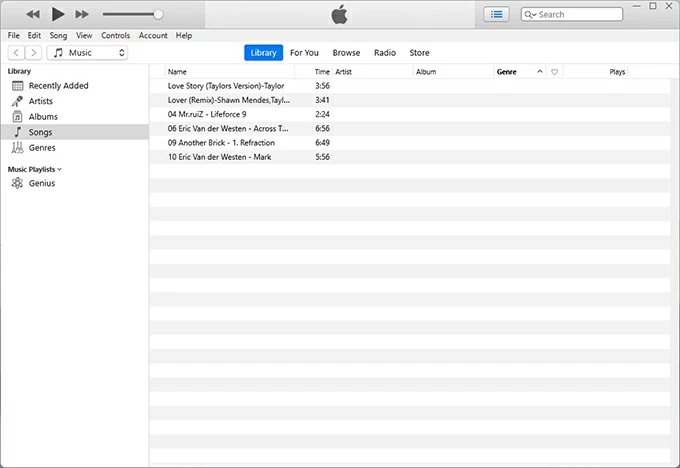
2. Navigate to your music library or playlist. On Windows computer, make sure the "Music" tab is selected in the upper left corner, then locate Library > Songs to better browse all tracks. In macOS, click on the "music icon" and locate the "Playlists" tab.
3. Insert the flash drive into your computer and open it. Connect your USB flash drive to your computer and access a certain folder, then display the iTunes window on the desktop along with the flash drive window.
4. Select the music in iTunes and drag them to the flash drive's folder. On Windows computer, you can press "Ctrl" or "Shift" to select multiple tracks, then drag and drop them to the USB device at once, while on mac you can do it with "Command" key.
Read next: How to fix if failed to transfer music to iPhone with iTunes
Besides putting iTunes music on your flash drive directly, you can also find the folder on your computer where iTunes songs are saved and copy them to your flash drive. Here's another way how to transfer your music from iTunes to a flash drive.
1. Plug the USB flash drive into the USB port of Windows or Mac.
2. Launch iTunes and click "Edit" in the top left corner, then Preferences > Advanced. Here you can see the location of the folder where your iTunes media files are saved.
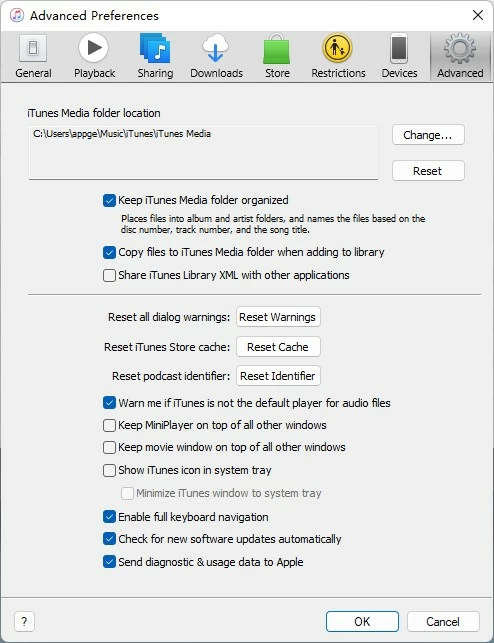
Tip: You can check the options "Keep iTunes Media folder organized" and "Copy files to iTunes Media folder when adding to library" to make it easier for you to neatly organize your music files into the appropriate folders and subfolders.
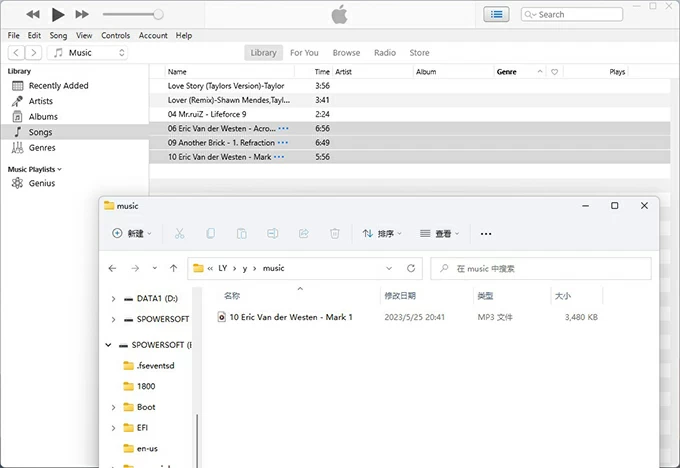
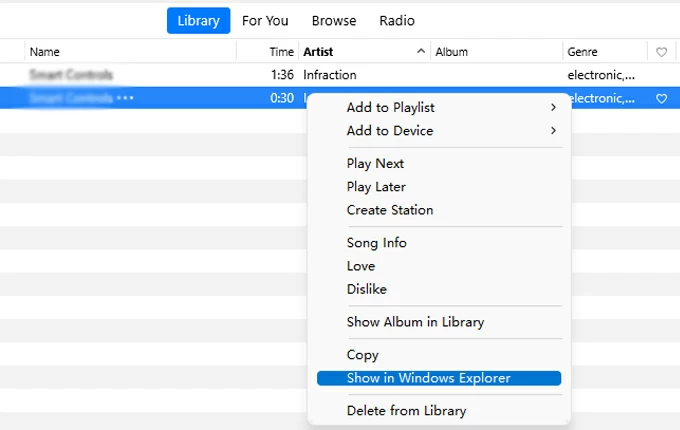
3. Navigate to the corresponding folder on computer according to the displayed location. iTunes songs are usually saved in a folder named iTunes Media. Alternatively, you can right-click any song in Library tab and select "Show in Windows Explorer" (Windows) / "Show in Finder" (Mac) to open the folder where downloaded iTunes music is stored.
4. Right-click on your music folder or music file and select "Copy."
5. Paste the selected iTunes music into your flash drive.
If you want to simplify the process of transferring music from iTunes to USB flash drive, then Appgeeker iPhone Data Transfer, with its intuitive user interface and simple operation process, is the right choice for you. Compared to iTunes, which requires manual song selection, iPhone Data Transfer allows you to transfer music library from iTunes to flash drive in bulk at once.
It is compatible with Windows and Mac and can read any connected USB drive. Not only can it export songs from iTunes to flash drive or USB drive, but also can sync music from iDevice to iTunes.
Key features:
Follow the steps to learn how to transfer music from iTunes to your USB flash drive:
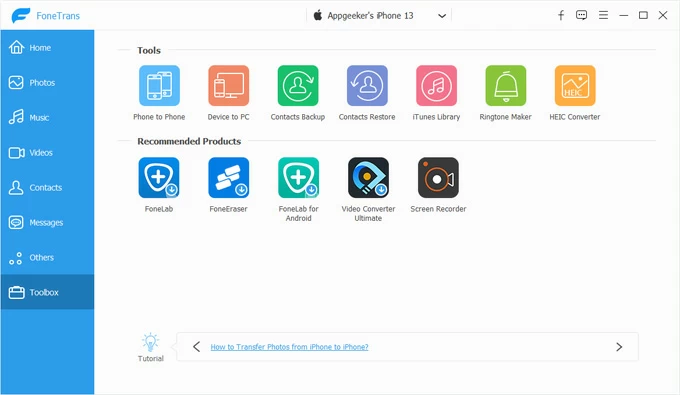
Step 1. Connect the flash drive to your computer and launch iPhone data transfer. Select "Toolbox" in the left sidebar and then choose "iTunes Library."
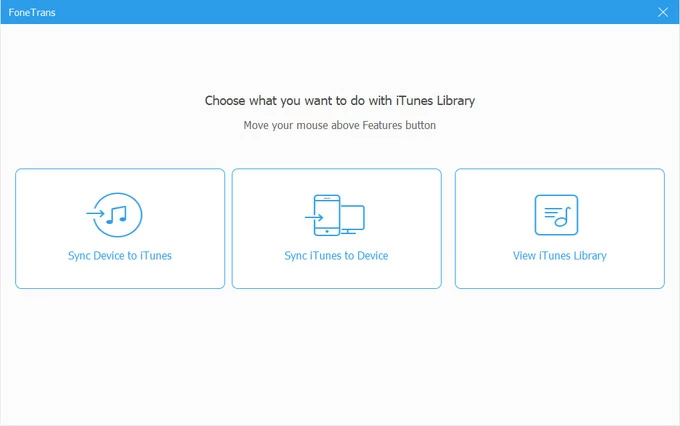
Step 2. Select "Sync iTunes to Device" to export iTunes music to the flash drive.
Check the "Music" option in the next window, and the number of songs in iTunes will be shown under the Music icon. If you have other items to transfer to the USB flash drive, such as Movies, TV Shows, Audiobooks, Playlist, Podcasts, you can check the corresponding options.

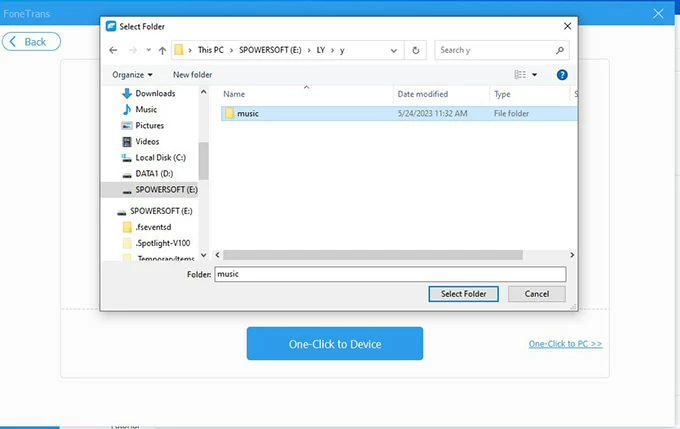
Step 3. Set flash drive as the destination for saving iTunes songs. Click "One-Click to PC" at the bottom right corner, change the storage destination to any folder in the flash drive, and then hit "Select Folder" to start moving music from iTunes to the flash drive.
You can see the progress of the transfer on the screen. Once the process is over, you can use the flash drive with your iTunes music library stored for your car and enjoy your music journey on the go. By the way, you can also use this software to transfer music from PC to iPhone without iTunes.
If you are not satisfied with the media files in your iTunes library and want to transfer YouTube video to an external storage device, such as an external hard drive or USB flash drive, you can record YouTube video on your Windows PC with the help of Screen Recorder and then import the videos to your other devices.
How to transfer music from computer to iTunes?
To add songs from your computer to iTunes, you can follow these steps:
After adding the songs to iTunes, you can use the above method to copy your playlists to USB flash drive via iTunes.
How to move music from iPhone to USB flash drive?
To import music from your iPhone to USB flash drive, you can use Appgeeker iPhone Date Transfer to do it.
Plug your iPhone and USB into your computer and run the software, select the "Music" tab in the sidebar, then pick the songs from the displayed list. Once selected, click the "computer icon" (Export to PC) above and find your USB flash drive as the save target in the pop-up window.
How to convert iTunes music to MP3 on Windows?
Most of the music you purchase from iTunes is in AAC format, so there are times when you want to convert songs to MP3 format for more media players. Here's how to convert purchased music to MP3 format in iTunes.
1. Run iTunes on your computer and then go to "Edit" in the top left corner.
2. Navigate to Preferences > General > Import Settings.
3. Select "MP3 Encoder" in the drop-down menu of Import Using.
4. Click "OK" in the bottom right and hit "OK" again to return to the library.
5. Select the song you want to convert to MP3 in the music library.
6. Click File > Convert > Create MP3 Version in the upper left corner.
The new MP3 format songs are saved in your music library next to the original format songs.