
How to Fix An iPad That Is Stuck on Black Screen

Need to back up videos on your iPhone? AppGeeker's latest guide allows you to export videos from iPhone to Windows 10.


To manage all the videos at one place, you can transfer them to your Windows PC.
The iPhone is one of the greatest inventions of modern times, allowing people to take a small machine out of their pockets to record their lives. But not everything can go the way we want. Sometimes you will find that for some reason, videos stored on the iPhone get lost. If you don't want to get into such a predicament, it is necessary to transfer videos to your Windows 10 computer make regular backups of them.
However, as an iPhone user who owns a Windows 10 computer, you may find it difficult to transfer videos between completely different systems. No worries, in this post we will introduce 4 easy ways to help you export videos from iPhone to Window 10.
Note:
Microsoft once offered a feature called AutoPlay, which allows users to transfer videos and pictures to Windows PC, but it has been retired in Windows 10. In its place, users can use Microsoft's Photos app to get the task done. Let's dive right into that.
For starters, you'll need a USB cord to connect your iPhone to your PC. The phrase "Trust This Computer?" will appear in a notification tab on your iPhone. Tap on the "Trust" button. Then you'll be prompted to enter the passcode to unlock your iPhone.
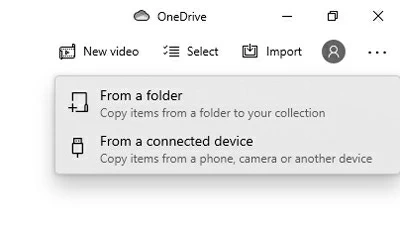
The Photos app should run automatically, if not, go to the start menu to open it. On the top right section, click on the "Import" section and then select "From a connected device" option.
Now, you'll be able to see all the videos and photos from your iPhone in the Photos app. Check the videos that you want to transfer from your iPhone. You can choose the import destination by clicking "Change destination." To begin transferring, click "Import X of X items."

After that, you can check the added items in the destination folder.
Appgeeker iPhone Data Transfer is widely considered to be one of the most convenient software options for transferring data between devices, which includes iPhone to Windows, iPhone to Mac, even iPhone to iPhone. Get it downloaded by clicking on the green button below. Afterwards you will face no compatibility concerns: iPhone Data Transfer automatically converts all videos to a format readable by your device during the transfer process. Besides that, you can transfer as many videos as you like.
You can follow these steps to transfer videos, photos, music and any other data from iPhone to Windows 10 computer.
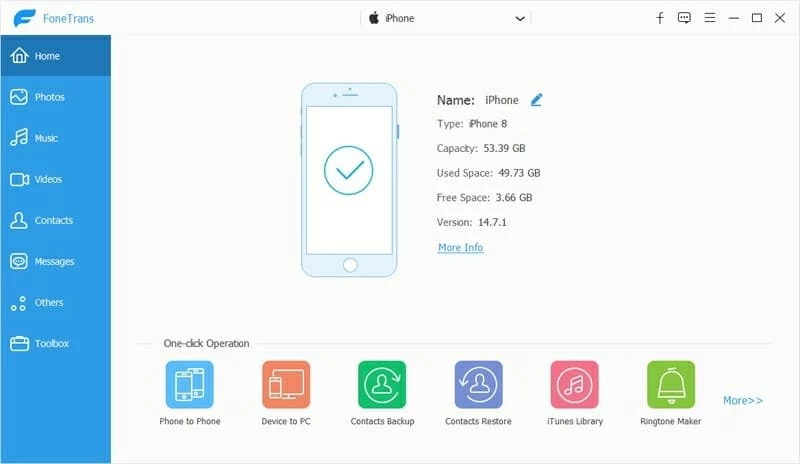
Step 1: Let iPhone Data Transfer run on the computer
Open iPhone Data transfer on your Windows PC. Use a USB cable to build a connection between your iPhone and PC. iPhone Data Transfer detects your device and show you the information about your iPhone.
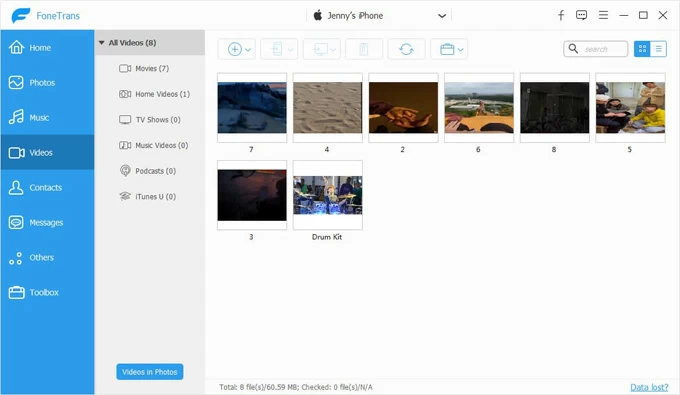
Step 2: Click "Videos" button
Choose "videos" from the "videos" tab on the left. All of your videos will appear in a new window when you do this.
Step 3: Export videos from iPhone to your computer
Tick the videos that you want to transfer. In the horizontal menu at the top of the software, hit on the button that looks like a computer. Then choose "Export to PC" button from the drop-down menu.

Relax a bit while iPhone Data Transfer does the rest. If you've accidentally deleted videos from your phone, read this post on how to recover videos.
iCloud allows you to sync photos from your iPhone to your Windows 10 computer wirelessly. With iCloud Photos being enabled, your videos can be automatically uploaded to the cloud. If you're using the free version of iCloud, you can transfer up to 5GB videos. For additional storage, you can upgrade to paid version.
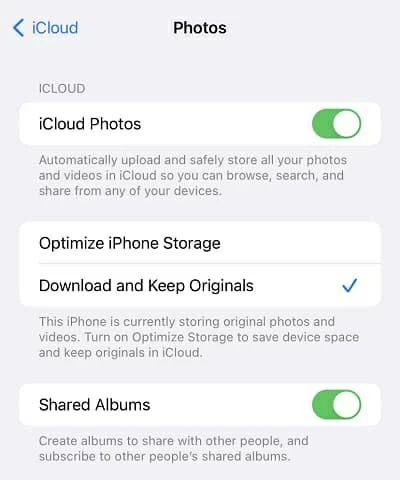
As a first step, make sure that iCloud Photo is turned on in your iPhone's settings. Activate the iCloud Photo by going to "Settings" > "Photos" > "iCloud Photos." All of your photographs and videos will be immediately uploaded to the cloud.
Move to your computer, visit the iCloud website in the web browser. Sign in with the same Apple ID as your iPhone. Tick the videos you're going to transfer to your computer. Finally, hit on the download button that looks like a cloud to save these videos from your iPhone to your Windows 10 computer.
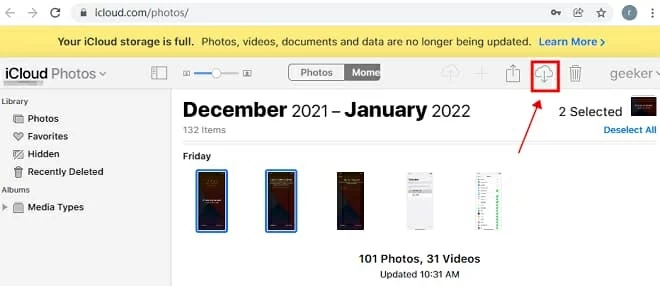
Wait for a while, you'll be able to access the videos on your computer from your iPhone.
If you have already downloaded iCloud Panel on your PC, you can stiil follow these steps:
Likewise, sign in with Apple ID. Go to "Options" button besides the "Photos." In the next window, tick "iCloud Photo Library" and "Download new photos and videos to my PC."
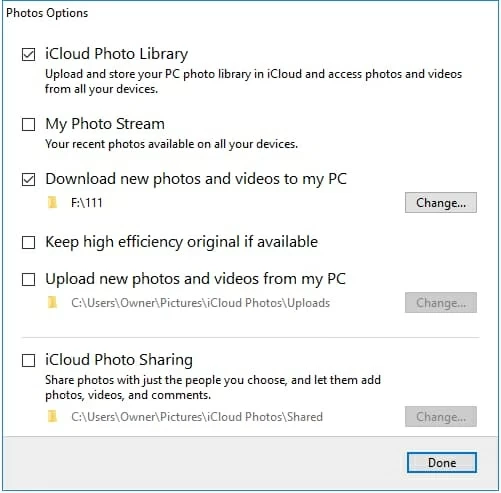
To sync videos from iPhone to your computer, click "Done" > "Apply."
Being a Windows computer user, you must have already been using File Explorer to manage and organize your files. Apart from that, transferring videos from iPhone to PC manually is also possible in File Explorer.
Once you have plugged iPhone into your computer, File Explorer treats it as a USB device and then read the data from iPhone. Let's see how it works:
1. Attach your iPhone to your PC with a USB cord.
2. Access This PC > Apple iPhone > Internal Storage > DICM.
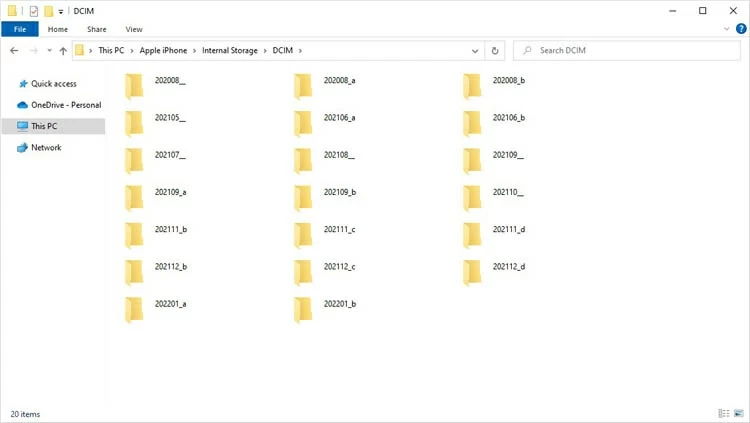
3. You can see all the videos from iPhone in the DICM folder.
4. Select all the videos that you want to transfer and right-click.
5. Choose the "Copy" option. Then paste all those videos into the folder you want.
We have come up with a few suggestions to make your life a little easier. You may import videos from iPhone to computer by using the approach that you believe is most appropriate for you. This way, you can make keep the precious videos backed up on your computer and watch your videos on a larger screen.