
How to recover deleted contacts iPhone

Whether your Mac supports iTunes or you want to transfer music from iPhone to Mac wirelessly, this post will give you the answer on transferring music from iPhone to Mac!


Knowing how to get music off an iPhone can be useful if you're creating a music library on a Mac.
To save your iPhone storage space, it is a good idea to transfer music from iPhone to Mac. Or you get a new macOS and want to sync music from iPhone to Mac or MacBook for enjoyment. But transferring music from iPhone to Mac is not as easy as transferring iPhone or video!
Don't worry, this guide will walk you through the various methods on how to transfer music from iPhone to Mac. And if you need to transfer bulk music files from iPhone to a Mac quickly or vice versa once and for all, Appgeeker iPhone Data Transfer is exactly what you need.
Table of Contents
If your Mac is running macOS Mojave 10.14 or older and you've purchased music from the iTunes Store, you can sync your purchased music from your iPhone to a Mac that has been authorized. But the Apple ID for signing into iTunes should be the same as the one you use to buy music from the iTunes Store.
Here's how to sync music from iPhone to your Mac using iTunes:
1. Connect your iPhone to Mac using a USB cable.
2. Run iTunes on Mac and make sure it is up to date.
3. Go to Account > Authorizations > Authorize This Computer > Authorize.
4. Sign in with the same Apple ID and password to give Mac access to your iPhone.
5. Navigate to File > Devices > Transfer Purchases from 'your iPhone' in the top-left of iTunes.
![]()
Wait for the music files to be transferred from iPhone to Mac, and then you can enjoy them in the music library.
If you're going the opposite way, from iTunes to iPhone, How to sync music from iTunes to iPhone is what you need.
Note:
If the songs you need to transfer are not purchased from iTunes Store or Apple Music, or if you want to add music downloaded from other sources from iPhone to Mac, Appgeeker iPhone Data Transfer will be your savior, which not only lets you transfer music from iPhone to Mac without iTunes, but also maintains the original sound quality in high-speed transfer.
As a full-featured multimedia transfer tool, it enables you to manage information such as songs, albums, artists, playlists and more. It can also transfer music, audiobooks, ringtones, photos, videos, etc. in bulk between iPhone and Mac, or between iPhone and iPhone.
Steps to move music from an iPhone to a Mac without iTunes:
1. Launch iPhone Data Transfer utility on your Mac.
2. Build the connection between iPhone and Mac. Plug your iPhone into your Mac using a lightening-to-USB cable. You will see the device information on the screen once the software detects your iPhone.
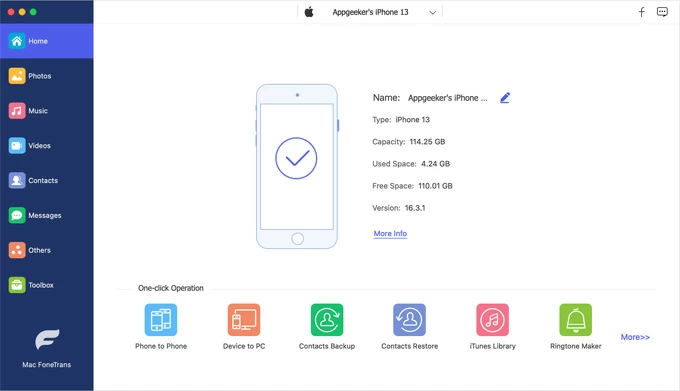
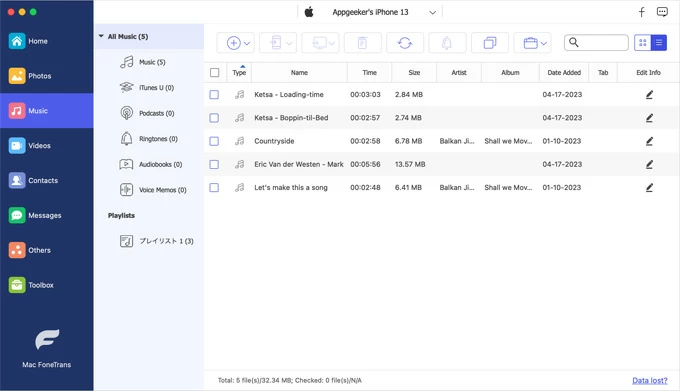
3. Select your desired music files. Click "Music" tab from the sidebar on the left. That will take you to access your music library and music that's on your iPhone. Now pick the songs individually ready for transfer.
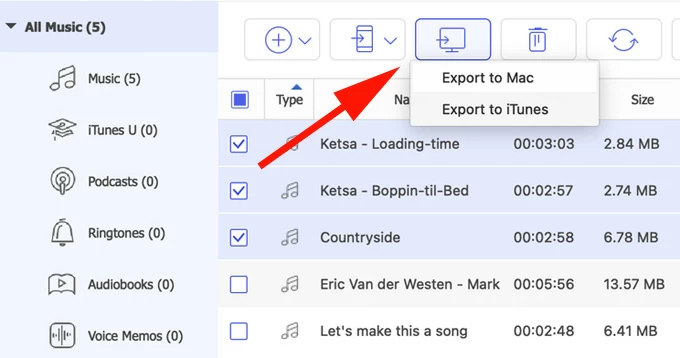
4. Export music from iPhone to Mac. After selection, locate the "computer" icon at the top toolbar and select "Export to Mac." Then select the appropriate destination and hit "Open" to save your music to your computer.
If the song you want to transfer is from a website and there is no way to download it, you can record audio from browser with the help of Appgeeker Screen Recorder and then transfer it from Mac to iPhone.
In fact, transferring music from iPhone to Mac can also be done without using data cable. Here are several methods available for you to move music to from iPhone to Mac wirelessly for free.
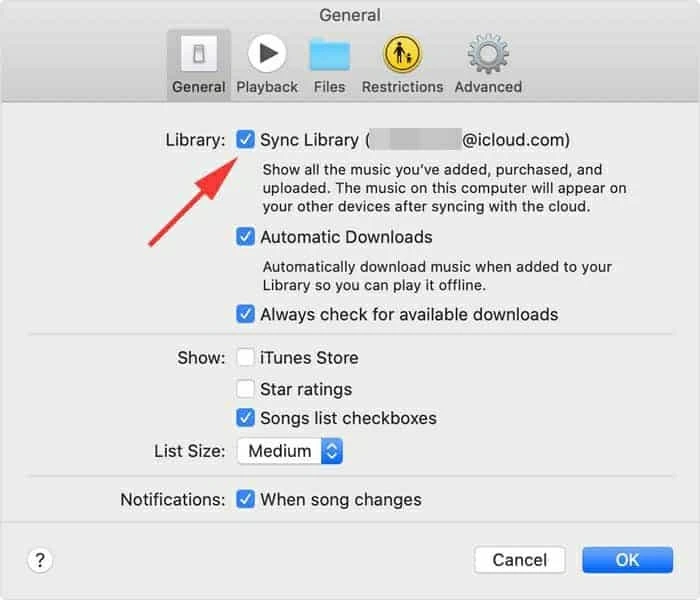
If you are using macOS Catalina and later computers and you have subscribed to the Apple Music service, then you can sync your music library from iPhone to Mac without downloading third-party software. As soon as you activate the Sync Library feature, Apple Music will automatically transfer your songs and playlists to devices with the same Apple ID.
Step 1. Make sure you have a paid subscription for Apple Music
Navigate to Settings > Music on your device, then tap "Join Apple Music." On the pop-up screen, choose a subscription plan and sign in your Apple ID to confirm.
Step 2. Enable Sync Library on your iPhone
On your iPhone, tap Settings > Music, then turn on the toggle for "Sync Library." If you're using an older iPhone, it should be "iCloud Music Library."
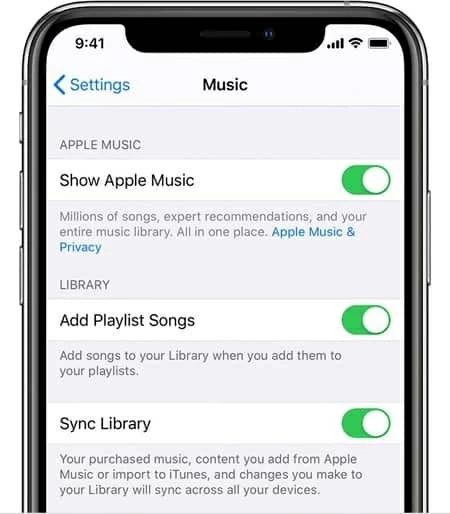
You'll see Sync Library if you joined Apple Music.
Step 3. Enable Sync Library on Mac
The last step is to switch on the feature on your Mac so the Apple Music on iPhone are able to being synced.
Any Apple music should automatically sync to your Mac machine.
Further reading: How to add MP3 to Apple Music on iPhone
Another way to transfer music from iPhone to Mac wirelessly is to use AirDrop. By enabling Bluetooth and Wi-Fi to establish a signal, you can quickly share downloaded music from your iPhone to a Mac.
If you already have Wi-Fi and Bluetooth already turned on on your iPhone and Mac, then follow these steps to move music from your iPhone to Mac. This process also applies to transferring photos from iPhone to MacBook Air.
1. Enable AirDrop on iPhone. Swipe the screen to access Control Center, tap the AirDrop icon and select "Everyone" to activate AirDrop feature.
2. Activate AirDrop on Mac. Open Finder and go to the AirDrop tab, select "Everyone" at the bottom to allow others to discover your Mac.
3. Choose music files on your iPhone and tap the "Share" icon, then select "AirDrop", and then choose your Mac as the target device.
4. Click "Accept" in the pop-up window on your Mac to download the transferred music to your desktop.
Tip: AirDrop's transfer speed depends on file size and Wi-Fi connection speed, so this method is better suited for transferring small amounts of music files.
Google Drive is a cloud service that can store photos, videos, music and other data files. You can upload your music to Google Drive on your iPhone, and then download them from Google Drive to your MacBook or Mac. But it should be noted that the free space provided by cloud service is always limited, so pay attention to the available space left on your Google Drive account to avoid transfer failure!
Follow the instructions on how to transfer music from iPhone to MacBook for free:
Conclusion
Whether you've downloaded music files from the website or purchased music from Apple Music or the iTunes Store, there's always a suitable way to transfer your music library from iPhone to Mac or MacBook.


