How to Add Music to iPhone without iTunes

It should be seamless to transfer iPhone photos to Mac. Learn the USB and wireless methods to ensure your photos move fast, stay safe, and retain the original quality.

For Apple fans, transferring photos from an iPhone to a Mac could be a common task. Whether you're looking to clear space on your phone, create backups of your memories, or organize your massive photo library on a larger screen, the good news is that Apple provides a few ways to import iPhone photos to Mac, both with a cable or wirelessly.
Which photo transfer solution is best for you? In this guide, we'll cover how to transfer photos from iPhone to Mac (iMac, MacBook) effortlessly, walking you through the fastest and most reliable cable-based transfer methods first, followed by wireless options for convenience, so that all camera roll photos (live photos, app photos, screenshots, etc.) are moved seamlessly over to your computer.
You can easily move your entire photo library, a single picture or some photos from an iOS device to the Mac computer.
Appgeeker iPhone Data Transfer allows for a smooth iPhone-to-Mac photo transfer via a direct cable connection, letting you access your photo collection and transfer the pictures in bulk or individually at their original resolution. Drag-n-drop is also supported.
Apple has made it easy to transfer iPhone photos to the Mac's drive without losing quality or vice versa, and the options include wired transfer and wireless cloud syncing or sharing. The best one for you depends on how large your library is (the number of photos you want to move), whether you prefer automation or manual control, and how often you transfer the photos.
Cable-based iPhone photo transfer to Mac
Wireless photo transfer from iPhone to Mac without USB
Importing photos through a wired connection between iPhone and Mac is best for bulk transfers, maximum stability, when you don't have a reliable internet connection, and when you've got over 5GB of photos to copy over without upgrading your iCloud storage plan.
The native Photos app on macOS is the most common free way to import the photos (HEIC, JEPG, ProRAW, PNG) that are in the iPhone Camera Roll to your computer, preserving all metadata.
When your iPhone is connected to your Mac using a USB data cable, the Photos app can automatically detect your device and allow you to import selected images or entire camera roll directly into your photo library. To get your photos from your iPhone to Mac's Photos, here's how.
1. Plug your iPhone into your Mac via a lightning-to-USB cable or USB-C cable. Make sure to unlock the device's screen and trust the computer to allow full access.
2. Open the Photos app on your Mac machine.
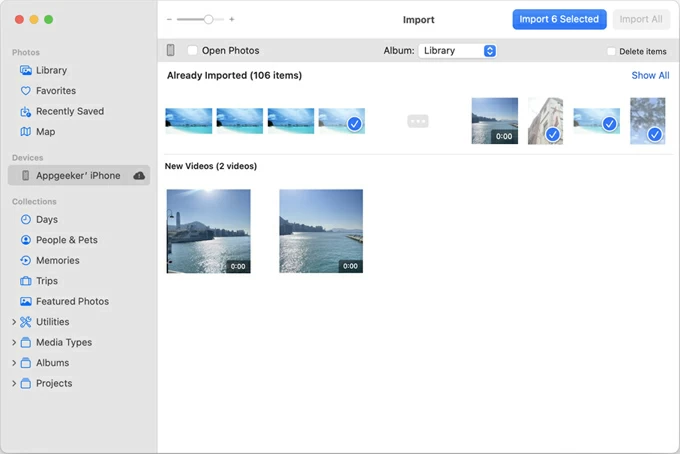
3. The Photos app displays an Import screen with all photos and videos that are available for import from your connected iPhone. If you don't see this, click [your iPhone] under Devices on the left sidebar.
4. If needed, change where you'd like to import your pictures into your Mac Photos Library through the Album dropdown selector - an existing album or a new album.
5. Select the photos you want to transfer.
6. Click Import Selected to complete manual photo import. A click on the Import All New Photos button will send all photos and videos from the iPhone that have not yet been saved to your Mac Photos.
Done! Your favorite photos are imported into the Photos app on your Mac from your iPhone.
While official Photos is a simple built-in solution to import large numbers of pictures across from iPhone to the Mac ecosystem, it can be slow to load with giant libraries. The imported media files are trapped in the Photos library rather than a standard folder, making it less control over the folder output.
If you want maximum flexibility and full control over your photos, third-party software like Appgeeker iPhone Data Transfer provides more advanced transfer options. It is a versatile tool that supports two-way transfers, granting you to transfer photos from iOS devices to Mac or vice versa in a one stop.
The utility works to help you access your iPhone photos on Mac using a wired USB connection, so you can preview, select and export photos to any computer folder or even external hard drive without quality loss or limitations. The manual drag-n-drop is also a stunning feature to make the transfer of photos relatively quick compared to Apple's native routes.
In additional to transferring photos between iPhone and Mac or PC, you can also make the move for your videos, music, playlists, messages, contacts and many more files.
iPhones take incredible photos, and Macs offer a powerful, organized environment for storing, editing, and backing them up. Whether you're a photographer, a content creator, or someone who simply wants to free up iPhone storage, here's how to move photos from iPhone to Mac seamlessly using Appgeeker iPhone Data Transfer tool, regardless of the device models or software versions.
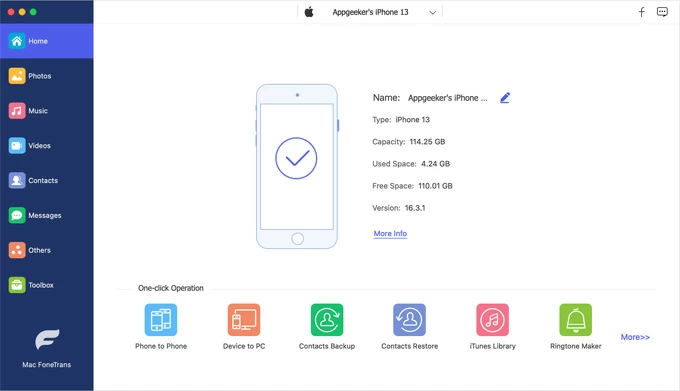
Step 1: Open iPhone Data Transfer for macOS
Download the software and install it on your Mac computer. Then, launch it.
Step 2: Connect iPhone to Mac via a data cable
Grab a lightning cable and attach your iPhone with your computer.
When the software recognizes your device, the details of your iPhone will appear on the interface.
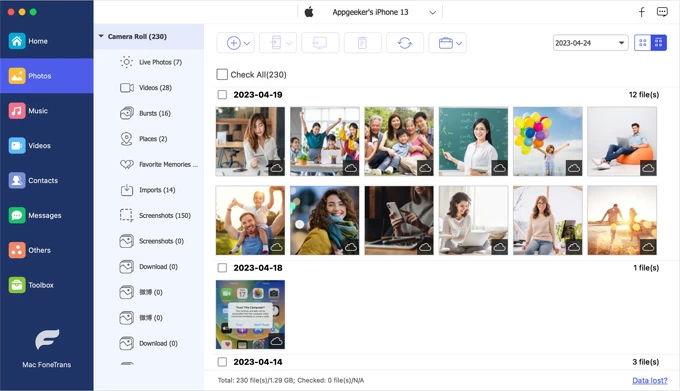
Step 3: Preview and select pictures you want to transfer
To copy iPhone photos onto Mac storage, click Photos tab on the left column. You can now access your iPhone's photo library, which is sorted by type (Live Photos, Screenshots, Favorites, Places, Downloads, etc.)
Scan through the thumbnails and choose the images you wish to transfer from your iDevice to your Mac.
Tip: If you need to transfer your entire photo library in one click, you can tick the box next to "Check All" for batch transfer.
Step 4: Begin moving photos from iPhone to Mac
After selections, it's time to click the Export to Computer icon at the toolbar.
When a dialog box pops up, you can choose a folder as you like to decide where your photos will be saved onto your Mac, and hit Open button.
The process for photo import from iOS to macOS should kick off. Depending on how many photos to be transferred over, this could take a few seconds and up to minutes to finish. You can monitor the procedure on the software interface.
After transferring, it would be no challenge to access your iPhone photos on your Mac.

Struggling with the HEIC photos? Don't worry. There's a converter built into the software that helps with HEIC to JEPG conversion during copying pictures from iPhone to PC or Mac.
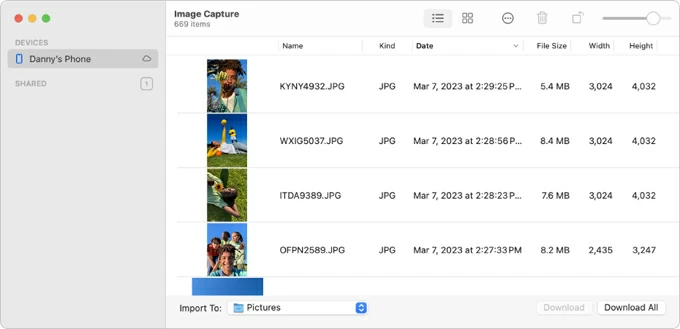
Mac users can also use the pre-installed Image Capture for importing photos from an iPhone. Similar to Appgeeker iPhone Data Transfer program, Image Capture is a wired option to let you view and select pictures on iPhone Photos Library to transfer over to the Mac without an internet connection.
You can export the photos to any folder in macOS system—which is what the Photos app won't allow, making it more flexible for users who want to move the iPhone photos to an external hard drive. Follow these steps on how to download photos from iPhone to Mac via Image Capture.
This moves photos directly to a specific folder on your Mac without adding them to your Photos library. After importing, you can choose to deleted the items if your iPhone storage is full.
Cable transfers are usually faster and more stable, especially for large photo libraries and bulk exports. However, wireless methods are more convenient when transferring a small number of photos to Mac over from iPhone.
The best wireless options for quick shares, automatic syncing, and on-the-go convenience are iCloud Photos and AirDrop.
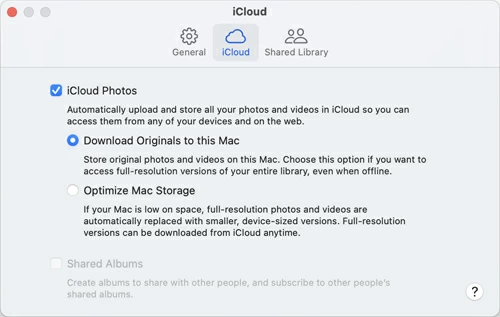
iCloud Photos syncs your entire photo library across all Apple devices automatically. Once enabled, every photo taken on your iPhone will automatically appear on your Mac if both devices are signed into the same Apple Account—no manual transfer needed.
To perform an automatic import of pictures from iPhone to Mac's photo library, first sign into your Apple Account on both your iOS and Mac devices, then set up iCloud Photos.
On iPhone
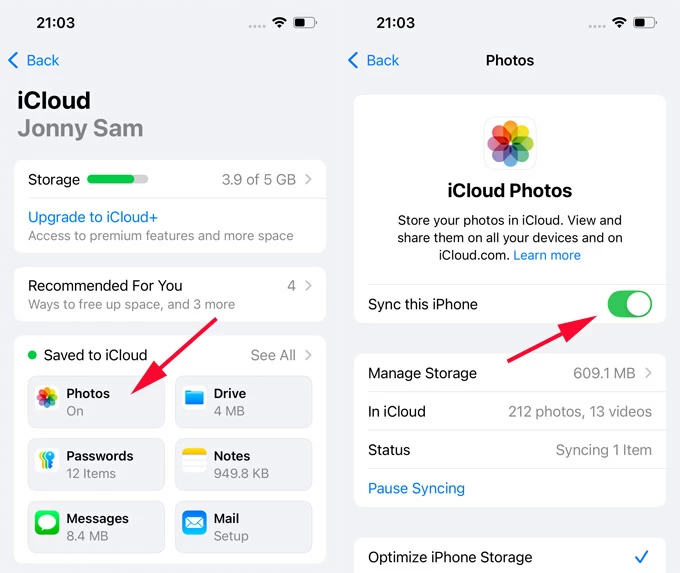
On Mac
The speed for uploading photos from an iPhone to Mac without a USB cable depends on your Wi-Fi network signal; it may take for hours or days if you're transferring the whole photo library with photos and videos.
The drawback is that iCloud Photos can only sync 5GB of photos until you upgrade the plan in case you have a large collection to move between devices.
Warning: While iCloud Photos is activated, any changes you make to one device will automatically mirror to another device. So if you need to delete a photo on your iPhone but keep it on another Apple device, turn off the photos sync after transferring. Alternatively, you can download your iPhone photos to a specific Mac folder via icloud.com for local saving and offline access without syncing restrictions.
Likewise, you can also utilize Google Drive, Dropbox, OneDrive, etc. for cloud-based photos transfers. However, each service has limited free storage and requires additional subscription to upload your iPhone photos.
AirDrop is perfect for quickly sending a single photo or small batches of photos without cables or cloud storage. It adopts Apple's direct device-to-device sharing technology to copy raw pictures from iPhone to a Mac through Wi-Fi and Bluetooth when two devices are close each other.
Transferring a photo between your iPhone and Mac is super easy, and there's no quality loss.
1. Go to Photos app on your iPhone.
2. Tap to open a photo you're going to send to your Mac machine.
3. Tap Share icon at the bottom, followed by AirDrop.
4. On the "Send Copy with AirDrop" screen, tap on your [Mac's name].
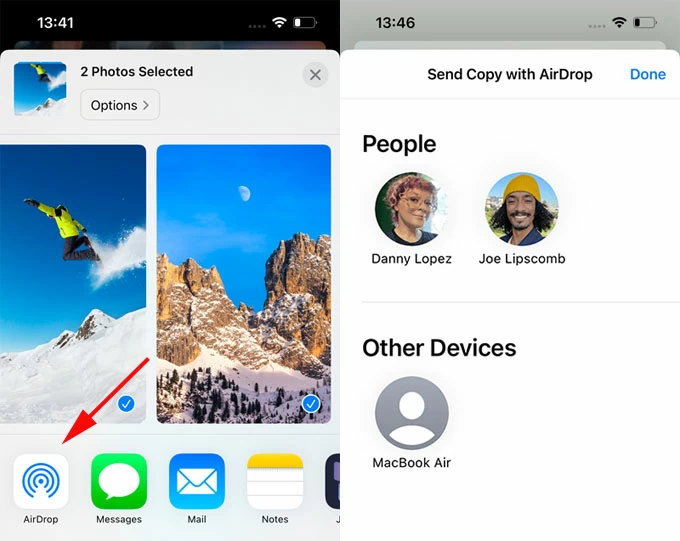
5. On your Mac, a pop-up window appears asking you to decline or accept the photos from your iPhone. Click Accept to finalize the AirDrop transfer process.
Airdrop will send your photo to the Downloads folder on your Mac by default, but you can put it onto any folder of your choice.
Tip: In the event that you're sharing hundreds of photos at a time using AirDrop, you may encounter low speed and occasional connection issues.
By following the wired or wireless methods above, you should know how simple the iPhone to Mac photo transfer is — if everything goes well. However, if you fail to transfer your images, it's usually down to issues with connection or settings.
Here is a troubleshooting checklist to get your photos moving again, starting with the most common culprits.
"Optimize iPhone Storage" trap in iCloud Photos
When you have Optimize iPhone Storage turned on from iCloud Photos, your iPhone may only store optimized versions of photos. The full-resolution originals live in iCloud, so macOS Photos app may import fewer photos or none at all.
On iPhone, go to Settings > [your name] > iCloud > Photos, then change it to Download and Keep Originals (if you have enough space), or simply download the full-resolutions photos directly from icloud.com on your Mac
Mac doesn't recognize iPhone
If your device doesn't appear in Photos, Image Capture or Appgeeker iPhone Data Transfer tool, the connection may not be recognized.
To fix the physical connection while using the cable-based import options, try to restart both devices and keep the source iPhone unlocked, update iOS and macOS to the latest version, and use another cable that's in good condition.
HEIC image format issues
Some older Macs struggle with HEIC photos. Try to update the macOS to the most recent software version.
If this won't help for you, consider using Appgeeker iPhone Data Transfer software, which includes an inbuilt converter and works to convert the HEIC image to the JEPG format automatically without compressing the resolution.
Photos app freezes or fails to import
The Photos app may become unresponsive when loading large libraries or get stuck in the middle of the import process. You need to quit and reopen Photos, and most importantly, import only a few pictures simultaneously from your iPhone to a Mac.
Check the "Wired Accessories" security in iOS 26
In the latest updates, Apple added stricter security for cable connections to prevent you from accessing and transferring photos and videos. If your iPhone running iOS 26 is connected to Mac with macOS 26 Tahoe, but still doesn't appear, you need to change the wired accessories security settings to get your device communicating.
In iOS 16 Settings app, head to Privacy & Security > Wired Accessories, and set to Always Ask or Automatically when Unlocked.
The "Trust This Computer" permission gets corrupted
If you can't complete the "Trust" process especially for the first time when you connect an iOS device to a Mac, try resetting iOS privacy settings.
Open Settings app on iPhone, tap General > Transfer or Reset iPhone > Reset > Reset Location & Privacy. After that, re-connect the device to the computer and you'll get the "Trust This Computer" option to allow the connection and trust it.
Getting photos from an iPhone to a Mac has never been easier, and you now have multiple options depending on your priorities.
Speed, stability, fastest for bulk transfers: The fastest way to transfer, say 3000 photos, from your iPhone to your Mac, stick with the cable-based methods like the native Photos, Image Capture or Appgeeker iPhone Data Transfer tool—a 3rd-party tool designed to one-click export to folder.
Convenience, fastest for single photo or small imports: The wireless sharing methods like iCloud and AirDrop are excellent choices for transfering a few photos.