How to transfer photos from iPhone to iPhone without iCloud or backup
Looking for a simple and quick way to transfer all your pictures from old iPhone to the new one without full backup or iCloud? Here's how to transfer photos between iPhones.

Alex Griffith Updated on Mar 18, 2026 6:05 PM
Transferring photos from an iPhone to an iPhone can be very easy and quick with the right tools below.
Let's say you get a new iPhone, and now you want to transfer photos from the old iPhone to it. You know you can create a backup on your computer and then restore it on the new iPhone, but you just want to transfer the photos, and nothing else. So, how do you move the entire photo library from one iPhone to another quickly, without losing quality, and without full backup?
The good news is that the answer isn't a single button, but rather choosing the right tool for your photos transfer. Below is the definitive guide to the 6 primary methods of transferring photos from iPhone to iPhone.
For those who have the new iPhone set up under a different Apple ID, and only have the free iCloud plan (5GB) that's not enough to transfer all photos and videos in the old iPhone, you may go with a reputable tool named Appgeeker iPhone Data Transfer to transfer pictures between iPhones directly. It doesn't require you to reset the iPhone or take a backup first, the process is simply a select-n-move.
Table of Contents
Transfer photos using iCloud Photos
Feature: Automatic sync all photos
If the two iPhones are using the same Apple account, it can't be easier to transfer photos from iPhone to iPhone automatically
via iCloud as long as you already pay for an iCloud+ subscription. Regardless of how large your photo library, your pictures aren't actually moved—they are simply synced. This way, You can start using your new iPhone immediately while the high-resolution images download in the background.
Every iPhone device holds 5 GB of free iCloud storage by default. You can upgrade to 'iCloud +' plan for more cloud space anytime.
Requirement:
- Ensure iCloud Photos option is toggled ON in Settings on both iPhones.
- You sign into the new iPhone with the same Apple ID used on the old device
- Both devices are connecting to power and Wi-Fi
Here're detailed steps to sync photos from iPhone to iPhone through iCloud.
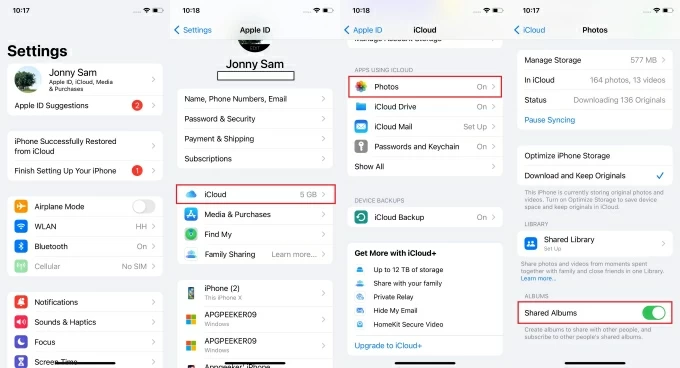
1. On both iPhones, access Settings and tap the name at the top.
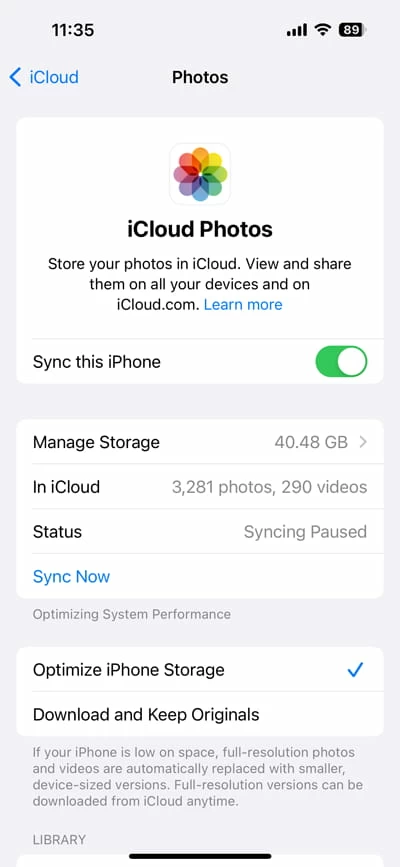
2. On the Apple ID page, tap "iCloud" and choose "Photos."
3. Toggle on "Sync this iPhone." In older iOS, the option may say "iCloud Photos" instead.
4. Tap "Sync Now" to begin syncing photos across all Apple devices sharing the same Apple ID.
The photos on the source iPhone will be automatically uploaded and safely stored in your iCloud. You can open the Photos app, go to the "Library" tab, and scroll to the bottom. There you will see a status bar. Keep the phone plugged into power until it says "Synced with iCloud."
5. On your target iPhone, after turning on "Sync This iPhone," you will want to choose storage strategy (see above):
- Optimize iPhone Storage: Best if the new iPhone has less storage than the old one. It keeps smaller versions on the phone and the full-resolution versions in iCloud.
- Download and Keep Originals: Pick it if you have plenty of space and want full-quality photos available on the new phone.
See also: iPhone photos disappeared
Troubleshooting Common Issues
Sync is Paused?
In the Photos app, if you see "Syncing Paused," tap "Resume." This often happens if the battery is low (below 20%) or Low Power Mode is on.
Storage Full?
If you see an iCloud Storage Full alert while syncing pictures from one iPhone to another, you will need to Settings > [Your Name] > iCloud > Manage Account Storage to check your usage.
Missing Photos?
Sometimes it can take several hours (or overnight) for a massive library to populate on a new device.
Feature: Direct, fast transfer of media files
If you don't want to use iCloud Photos at all, or your new iPhone has already been set up, you will want to use a way that can get photos from old iPhone to new iPhone quickly without extra configurations. That's where Appgeeker iPhone Data Transfer comes in.
The software is a reputable media file manager that gives you granular control that Apple's routes usually block. You can browse your photo library and selectively choose specific photos, moments, or custom albums from one iPhone to another that is already in use without erasing the existing data on that device. It simply merges the new photos into the current library.
Appgeeker iPhone Data Transfer allows two-way transfer, meaning that it can move photos from iPhone to iPhone, iPhone to computer and vice versa, and even handle the music and videos transfer the same way. It also features a set of useful tools to manage your phone library, including the ability to export messages and contacts, create custom ringtones, manage iCloud drive, convert the incompatible files into iOS friendly format automatically during transfer, etc.
Install the software on your computer and road on to see how to transfer photos from iPhone to iPhone without affecting the rest of the library.
Step 1: Connect two iPhones
Let the software run on your computer, and connect both of the iPhones.
Once connected, you can see the brief information about the first connected device. You can switch the source and target iPhone from the top drop-down menu.
You can switch to another iPhone by clicking the user's name at the top of the interface.
Step 2: Click Photos tab from the sidebar
Click "Photos" from the left sidebar. Then you can see all the source iPhone's photos sorted in chronological order.
The phone button will light up automatically after you choose a picture or more.
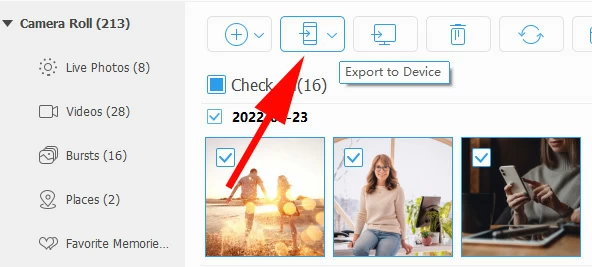
Step 3: Transfer photos to another iPhone
Select the pictures that you'd like to transfer. And hit the "Export to Device" (phone icon) at the top of the window. Then click the target iPhone. The process of moving pictures from old iPhone to new iPhone will start immediately.
Once done, you can check those pictures in Photo Library on the new device.
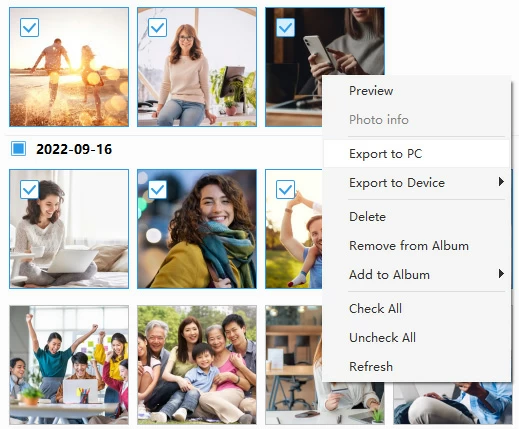
Tip: You can make use of the software's right-click context menu to perform your actions, no matter you want to transfer to an iPhone/ computer, add to another album, or delete the images.
See also: How to transfer music from laptop to iPhone
Additionally, for those who would like to complete the process in one step, Appgeeker iPhone Data Transfer offers a shortcut that lets you move all pictures between iPhones with two clicks:
Click "Phone to Phone" at the main page and tick 'Photos'
A shortcut of abundant options at the bottom of the home page.
When both of the iPhones get connected, click "Phone to Phone" from One-click Operation at the bottom of the main page. And tick "Photos" box from the options. Then all the photos on your device will be synced to the other one in a few seconds.
You can also sync your music, videos, contacts and other files from one iPhone to another.
Don't unplug the two iPhones before the process is fully accomplished. When it's finished, you can back to the home page and switch to the target iPhone to check whether the photos are moved successfully.
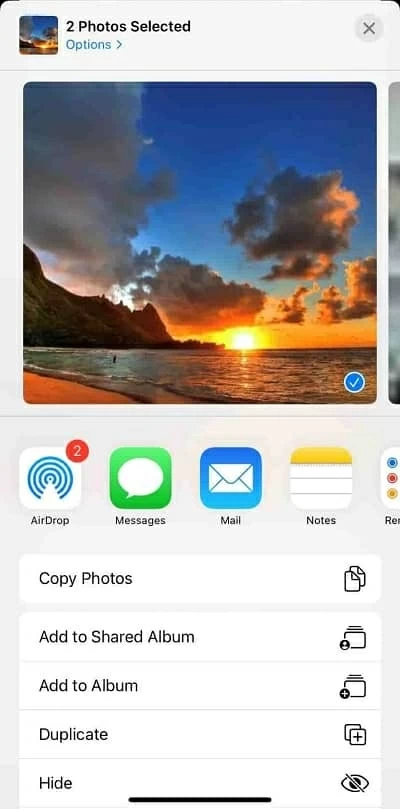
AirDrop photos between iPhones
Feature: Wireless, quick for transferring a few hundred photos
If there're only a few hundred photos that you want to transfer to another iPhone nearby, consider AirDrop built in the iPhone. Using AirDrop to send your pictures between two Apple iPhones requires slight preparation on both devices, but once configured, it is the fastest way to share specific media.
Requirement:
- Ensure that both Wi-Fi and Bluetooth are turned on
- On the destination iPhone, open Settings > General > AirDrop, choose "Everyone for 10 Minutes"
Steps to airdrop pictures from iPhone to iPhone (or iPad)
1. Open Photos app on your iPhone. Browse your library and select the photos you wish to share.
2. Tap the Share icon (the square icon with an upward-pointing arrow) in the bottom-left corner.
3. Then you will see the AirDrop button from the share sheet.
You can swipe left and right to choose what you want.
4. Tap "AirDrop" button. A list of all nearby AirDrop-capable devices will appear.
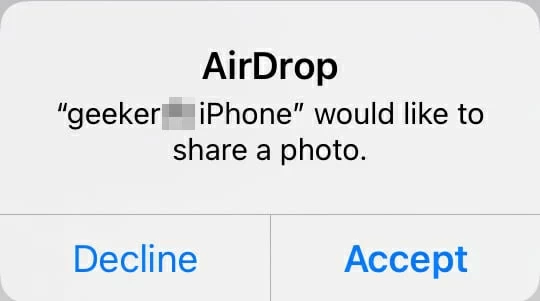
5. Choose the target iPhone from "Other People." If you can't see another iPhone user, check whether AirDrop is enabled on the target device.
6. On the iPhone that you send files to, tap "Accept" option when the AirDrop box pops up on the screen reminding you that someone nearby has shared a photo with you.
AirDrop box on the target iPhone asks whether to accept the files that others share with you.
7. When the transfer finishes, the Photos app will automatically open to display the newly received images on your new iPhone. They are now safely integrated into your local library.
See also: How to transfer WhatsApp from iPhone to iPhone
Transfer pictures via Quick Start
Feature: Suitable for photos transfer on a new iPhone during a full setup
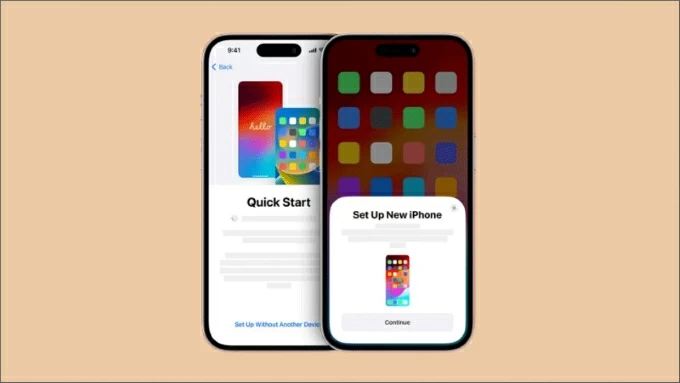
If the second iPhone is brand new and hasn't been set up yet, you can skip the manual iCloud, third-party file transfer, or AirDrop steps. Apple allows you to automatically set up a new iPhone using your current iOS device, including importing photos and videos. This is the simplest way to do it
Just place the two phones next to each other during the initial setup, and follow the steps on the screen to migrate everything automatically.
If you have 200GB of photos to transfer, expect to stay off the grid for about 60–90 minutes.
Ready to go? Do the following:
1. Turn on the new (or factory reset) iPhone and place it physically next to your old iPhone.
2. Proceed with the Hello screen, and select your language and region.
3. Tap "Continue" when a "Set Up New iPhone" screen slides up from the bottom on your old device.
4. An animation (a blue swirling nebula) will appear on the new iPhone.
5. Pick up your old iPhone and hold it over the new one, centering the animation in the camera viewfinder.
6. A message will say "Finish on New iPhone."
7. Enter your old iPhone's passcode on the new iPhone when prompted.
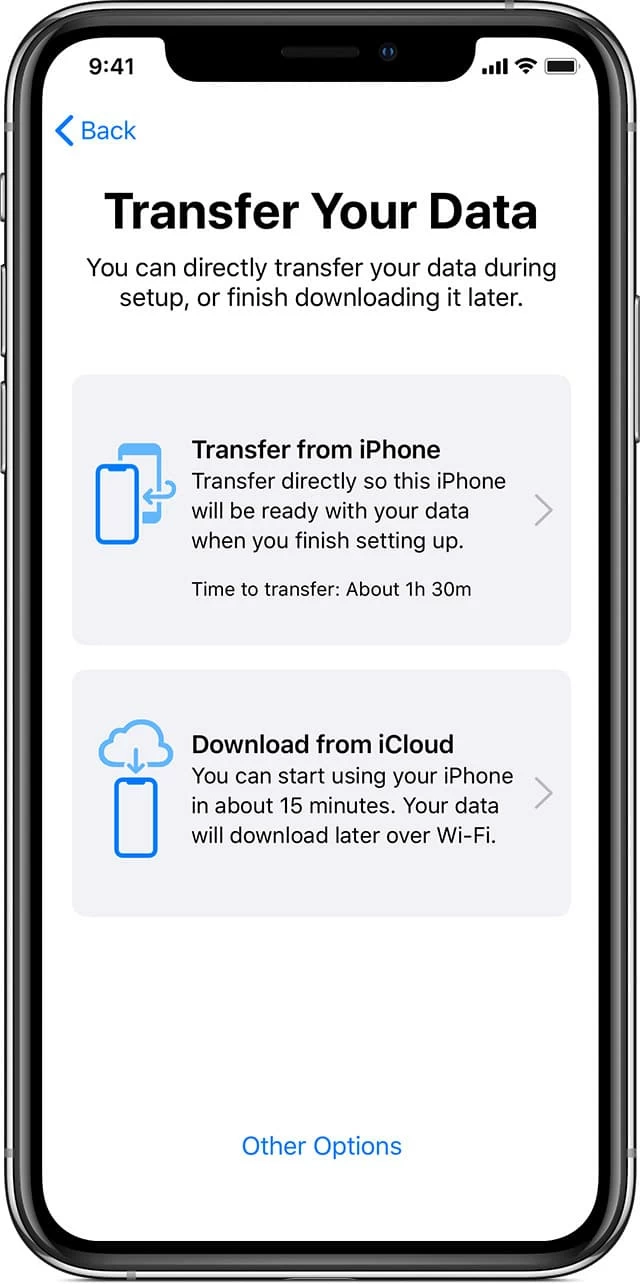
8. When you reach the "Transfer Your Data" screen, select "Transfer from iPhone." It migrates your photos directly from one iPhone to the other.
9. The screen will show "Transferring Data from [Name]'s iPhone." Keep the devices near each other and connected to power until the progress bar completes.
Once the transfer is complete, all albums, hidden media, and Recently Deleted images will appear on your new iPhone exactly as they did on the old one.
FAQs
Why isn't the Quick Start screen appearing on my new iPhone?
The "Set Up New iPhone" prompt only appears if the new device is on the Hello (factory reset) screen. If you've already gone past that, you must go to Settings > General > Transfer or Reset iPhone > Erase All Content and Settings to start over.
Does Quick Start transfer everything (Apps, Photos, passwords)?
Most data is transferred, including photos, messages, contacts, and settings. However, Apps are not physically moved; Some secure data, like Apple Pay cards and Touch ID/Face ID, must be set up again for security.
Why it says "Transfer Failed" on the screen?
If the transfer cancels, it is usually due to a Wi-Fi interference or a version mismatch. Ensure both phones are on the same Wi-Fi network and that the new iPhone is not significantly behind on iOS updates.
See also: How to delete Apple ID without password
Transfer photos via Shared Albums
Feature: Best for sharing selected albums
To transfer photos from one iPhone to another iPhone using Shared Albums feature, you are essentially creating a private folder that both devices can access. Unlike the "iCloud Shared Photo Library," Shared Album lets you hand-pick exactly which images to send. making it a great way to move specific photos between iPhones, especially if the two phones use different Apple IDs.
Here are the detailed steps to set this up and transfer your photos.
1. Open Settings on both iPhones, tap [Your name] > iCloud > Photos. Scroll down and ensure the toggle for "Shared Albums" is ON.
2. Open the Photos app on the iPhone that currently has the photos.
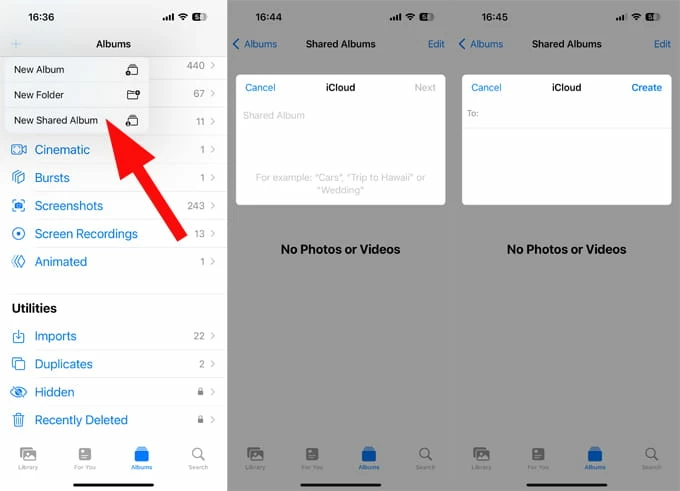
3. Go to the "Albums tab" at the bottom, then tap the plus (+) icon in the top-left corner.
5. Select "New Shared Album." Give the album a name and tap Next.
6. Type in the Email address or Phone number associated with the Apple ID of the new iPhone. Tap "Create."
7. Open the new Shared Album you just created.
8. Tap the plus (+) button (or "Add") inside the album.
9. Select the photos and videos you want to transfer from old device.
10. Tap "Add" in the top-right corner.
11. Tap "Post" to share it.
12. On the receiving iPhone, open the Photos app.
13. Tap the For You tab at the bottom. You should see an invitation for the Shared Album. Tap "Accept" to join the Shared Album.
15. Go to the "Albums" tab and scroll down to the Shared Albums section to open it.
16. To save photos onto your new iPhone, select all the photos you want, tap the "Share" icon, scroll down and tap "Save Image."
The photos are now permanently saved to the Recents folder of the new iPhone.
See also: How to reset iPad without buttons and computer
Transfer photos via iTunes
Feature: Allow for making backup first and then full restore
If you're old-school and want to use iTunes to transfer photos from one iPhone to another, this section will help you out. You can plug your old iPhone into computer, back up photos locally with iTunes and then restore that backup to the new iPhone. But you would still be required to reset your new phone.
To transfer pictures from iPhone to iPhone:
Backup the old iPhone
1. Connect your old iPhone to your computer, and open iTunes.
2. click the small iPhone icon near the top-left of the iTunes window.
3. Under the Backups section, select "This Computer."
4. Click "Back Up Now." Wait for the progress bar at the top to finish.
Prepare the new iPhone
1. Turn on your new iPhone. You should see the Hello screen.
2. Follow the on-screen instructions to set it up (Language, Region, Wi-Fi).
3. When you reach the Transfer Apps & Data screen, select "From Mac or PC."
Note, if you have already set up your new phone, you must go to Settings > General > Transfer or Reset iPhone > Erase All Content and Settings to return to this screen, use other methods outlined in this article, like Appgeeker iPhone Data Transfer.
Restore to the new iPhone
1. Connect the new iPhone to the same computer you used for the backup.
2. Click "Restore Backup."
3. Pick the backup you just created from the list.
4. Your iPhone will say "Restore in Progress." Keep the cable plugged in until the iPhone restarts and appears in the iTunes window again.
After the phone restarts, your photos will begin re-indexing. If you see blank thumbnails, just give it time—it's rebuilding the library.