How to Restore Data from iPhone After Reset

Sometimes iTunes doesn't work at all when it comes to transferring pictures from Mac to iPhone. If that is the case; you've landed at the right place.

Nowadays, most of us all capture our memories in the form of photos by camera and often we sit back to enjoy by looking at our memories. We usually choose to transfer photos from camera to Macs for storing because it is safe for the future – you can view the images even after 10 years on your Mac.
Compared with iPhone, for making backups of precious photos, Mac is a good choice. However, for editing photos, iPhone is slightly better: iPhone is small and also has powerful photo editing apps, which makes it more convenient to edit your photos anytime and anywhere. To edit the photos on your iPhone, you may need to copy them from your Mac to your iPhone.
![]()
It is possible to get photos from Mac to iPhone without using iTunes.
Apple's iTunes offers the possibility to organize your iPhone media library, which means that you can rely on iTunes to transfer photos across devices. This is good news if you want to sync photos between your Mac and iPhone. However, iTunes is not perfect: sometimes it doesn't work at all. Luckily, a third-party software named Appgeeker iPhone Data Transfer can help you out.
Without iTunes, transferring photos from Mac to iPhone can be done using software called iPhone data transfer.
Appgeeker iPhone Data Transfer provides many helpful features to manage photos on your devices. It helps you to establish a bridge between your Mac and iPhone so that you can transfer photos between the two devices without worrying about whether data will be lost during iTunes synchronization.
Not Just that, iPhone Data Transfer also works well for the management of content such as contacts, photos, music, playlists, videos, texts. iPhone Data Transfer could be your one destination solution that brings together data transfer and management in one place. Apart from being able to handle all the basic things that iTunes can do, it offers even more: you can transfer your data from Mac to iPhone, PC to iPhone, and even phone to phone.
Step 1: Download the software
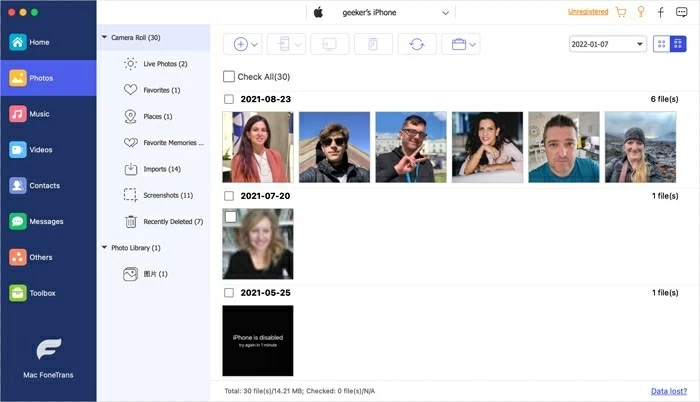
To transfer photos from Mac to iPhone without iTunes, click on the button above to download iPhone Data Transfer. Once the Setup is downloaded successfully, you can run it in your Mac. Connect your phone to your Mac by a USB cable. You may need to enter your screen passcode to let your iPhone trust your Mac. Then you'll be landed at an interface like the following screenshot, which means that iPhone Data Transfer has detected your device and shows the detailed information.
![]()
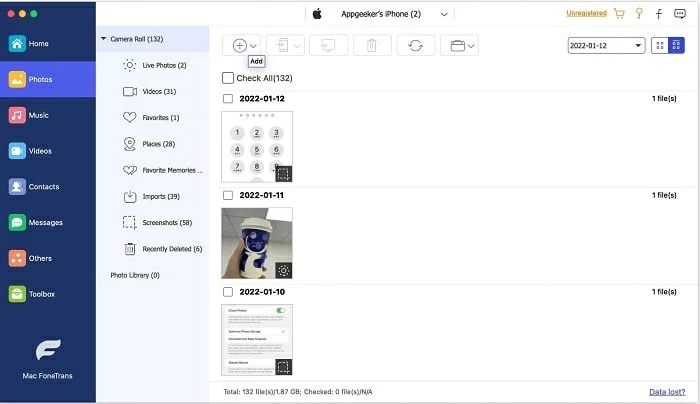
Step 2: From the left sidebar, click on the Photos button
The photos on your phone will be displayed on the software in front of you.
Step 3: Add pictures from Mac to iPhone
Click on the "+" button at the top of iPhone Data Transfer. Then select the photos to be transferred from a picture folder on your Mac.
After selecting, the syncing process begins immediately. It won't take you a long time to copy the pictures from you Mac to your iPhone without iTunes. Once synced, you can edit the newly added photos on your device.
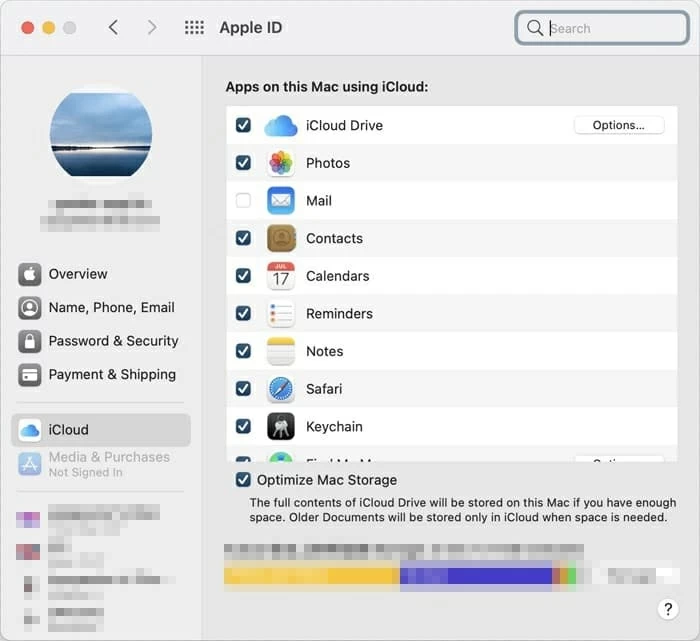
Alright, the methods aren't limited to iPhone data transfer software but there are some cloud-based methods which you can also use to import photos to Mac to iPhone without iTunes. Among them, iCloud is a good option which is built into every Apple device.
Before we move to the detailed steps, there is one thing you need to know: with an Apple account, everyone gets 5 GB of free iCloud storage to start. If you want powerful new features and more storage, you can upgrade to iCloud+ with apaid subscription.
When done, synchronization will take place. once the Synchronization is completed, you can go to Photos on your device and the cherish the memories you just transferred.
Cloud-based shared services aren't just limited to iCloud. Google photos is another option to import photos from Mac to iPhone without iTunes. Most iPhone users probably aren't aware of Google Photos. Compared with Apple's cloud service——iCloud Photos, Google Photos provide each user 15 GB free cloud storage. If you are looking for ways to transfer a transfer a bulk of images from Mac to iPhone, Google Photos is a great service to rely on.
Note:
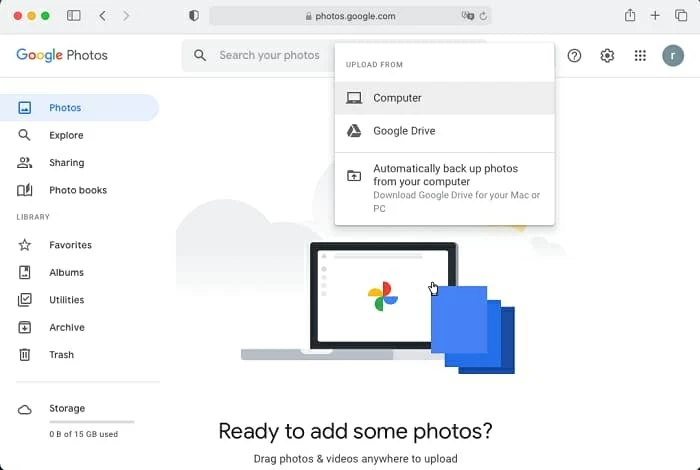
Open Google Photos on your Mac or you can also visit Google Photos website. Follow these simple steps to download photos from Mac to iPhone using Google Photos.
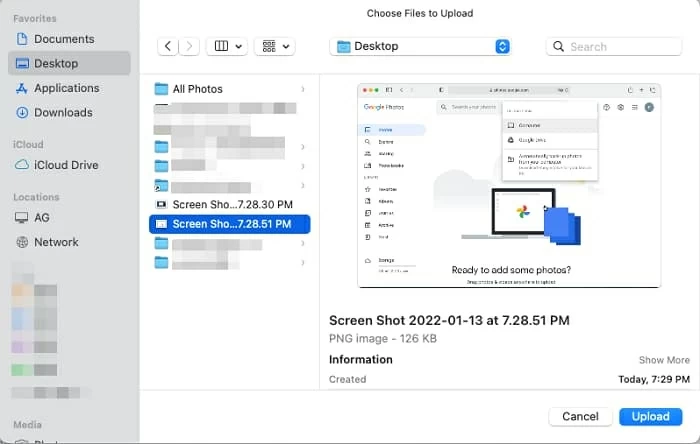
Step 1: Upload Photos from Mac to Google Photos. This can be done by clicking "Upload" > "Computer" in the upper right corner.
Step 2: Select the images that you want to share to your iPhone, followed by clicking on the Upload button.
Step 3: Move to your iPhone, open Google Photos. Sign in to the Google Photos using the same account on which you uploaded the pictures from your Mac
Step 4: All the images will be displayed in the Google Photos, select the ones you want and tap "Share". Then choose "Save Image" to add the images to the Photos Library on your iPhone.
As a cell phone user, you must be no stranger to Bluetooth, which is a technology that uses radio frequency to share data over short distances without wires. With this technology, Apple has developed a Nearby Sharing service——Airdrop. Airdrop allows you to transfer photos from Mac to iPhone without iTunes. Don't forget to enable Bluetooth in the quick setting drop-down.
Note: when you have a large number of photos to transfer, Airdrop may not be your first choice.
Here's how:
1. Enable Airdrop on your Mac and iPhone. Also set to receive from "everyone".
2. On your Mac, select the photos that you want to send to your phone. Once the images are selected, tap on the share button on your Mac, a menu will pop up when you choose the option of share. Choose Airdrop in the menu.
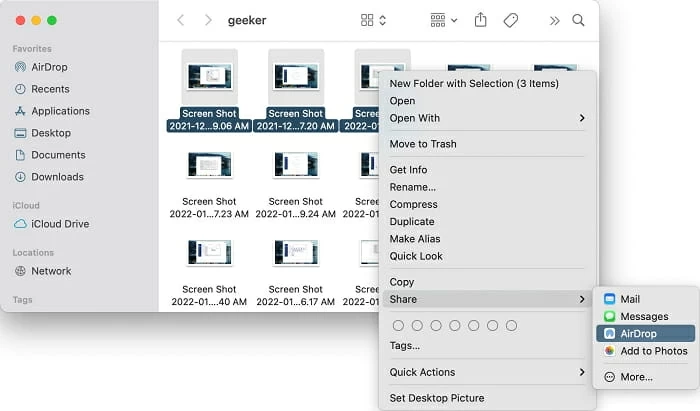
3. When the Airdrop window appears, choose your iPhone's name.
4. A notice asking whether to accept the pictures that someone shares with you pops up on your iPhone. As soon as you tap "Accept", all the photos from your Mac show up on your device.
Hope the methods in this post will help you transfer photos from Mac to iPhone without iTunes at ease. Regardless of the number of photos you want to transfer and whether you have a USB cable or not, you can choose any of the above methods and get the same results. Again, iPhone data transfer software allows you to go beyond images and explore more options for importing contacts and other useful items.