How to Screen Record Gameplay on Mac

Dig deeper into the easy techniques on recording Mac's screen plus its audio at the same time to create a video. You can get video and original audio and/ or microphone to record.

If you're someone who likes to watch and save videos on your Mac for video creation, you might be curious about how to record screen and audio on your Mac at the same time. In fact, you can record your Mac screen while using apps or watching videos, capturing both visuals and sound.
Depending on what audio source you want during a Mac screen recording, you may record your voice through the microphone or capture audio from your Mac, websites, or apps. There are various methods to record Mac screen with your voice and internal sound all together. For a comprehensive solution covering screen and audio recording during media playback, as well as microphone audio, consider the all-in-one macOS Screen Recorder.
There're a few ways to record both screen and audio on Mac at the same time - internal & external sound.
THE SHORT ANSWER
To record audio and screen on Mac simultaneously, open QuickTime Player and go to File > New Screen Recording. In the New Screen Recording window, click the arrow icon next to the red Record button, and choose [your microphone] or [an actual audio driver] to record your voice and other audio for a screen recording. Hit the Record button to start recording your Mac screen and sound at the same time.
Choose an app to record screen and audio on Mac below:
1. Record screen and audio on Mac with QuickTime Player
2. Screen and audio recorder for Mac - screen, Mac's sound, your voice together
macOS has a built-in screen recorder bundled with QuickTime Player that you can take to record video and audio at the same time on Mac, in one file.
Basically, you know how to record your Mac screen via QuickTime and manage to capture your own voice through a microphone. While QuickTime offers a direct path to record voiceover from the screen, you may find it challenging to screen record your Mac with internal audio like music, movies, YouTube videos, notifications, game audio and more along with the screen recording.
But don't worry. This part covers both parts: use QuickTime on Mac to screen record with microphone audio, or actual audio from macOS internally via New Screen Recording, getting both video and audio in the same playback.
Using the screen and audio recorder in QuickTime, you're able to take a Mac screen recording with the audio narrating at the same time - as long as your Mac or MacBook have an internal mic in place, or you've had headphones with a microphone or a USB mic connected to your computer.
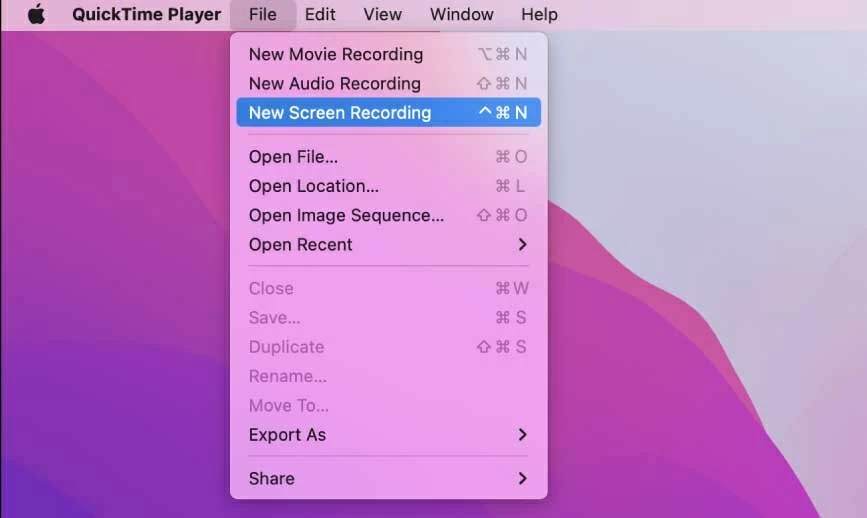
1. Open QuickTime, and click File > New Screen Recording to invoke Screen Recording window.
2. To record audio while capturing screen, click the arrow next to the red button, and then have Internal Microphone or any connected microphone selected.
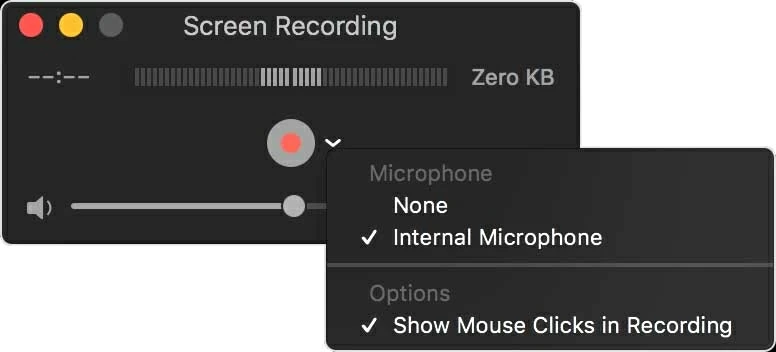
If you choose None under Microphone settings, then no audio will be record in the Mac screen recording.
3. Click the Record button. Before the recording actually begins, do the following:
4. Hit Stop button from the menu bar to stop recording. The audio and screen recording should automatically open and play into QuickTime Player.
This way, QuickTime can simultaneously record your Mac screen and the audio coming from your microphone. Watch the video to check the recording result. If your audio isn't captured, you may need to re-record everything once again.
No need to be surprised when screen recording on your Mac with QuickTime. Imagine you're recording an educational video or an online meeting, but the sound isn't captured while the video records fine. In that case, you might wonder if QuickTime can record screen video and audio simultaneously while picking up background sound from your Mac.
Fortunately, by setting up the BlackHole plugin for both audio input and output, QuickTime flawlessly records both screen and audio on Mac, whether you're screen capturing or playing media on your Mac. Here's how it works.
Tip: The process is mostly the same if you're on a newer macOS (macOS Mojave or higher) to record video and audio at the same time on Mac screen.
Step 1: Install BlackHole free extension and set it as sound output
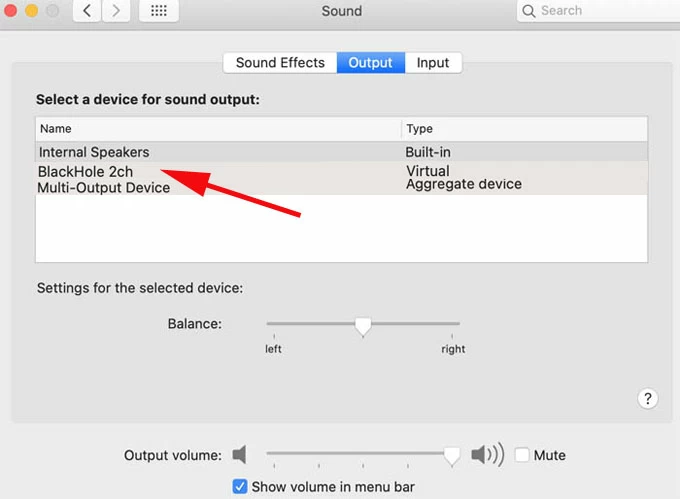
Configure audio source to BlackHole to get system sound captured in the same screen video recording.
Note: Remember to reset the setting back to the way they were after you finishing your Mac sound and screen recording adventure.
Step 2: Open the media with both video and audio you want tot record on Mac screen
Head to browser, application or any media platform you want to audio and screen capture. Don't start to play it.
Step 3: Run QuickTime Player and click File > New Screen Recording
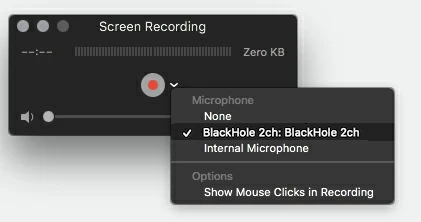
Step 4: Choose audio source in Microphone settings and adjust volume to record
In Screen Recording window, click the arrow symbol and choose BlackHole 2ch in Microphone settings to record Mac screen with internal sound.
Choose actual audio source to record Mac screen with internal sound.
Step 4: Hit Record button to start recording and play the media to be recorded on Mac
Click the Record button, and then click anywhere of the screen to record entire Mac's screen with both video and audio; or drag to select a only a portion and hit Start Recording button. Then play the video you want to capture.
Step 5: Click Stop button to end the recording
To end QuickTime recording, hit the Stop button from the menu bar.
Play the recorded video file and check the footage as well as test out the sound. Done! You've got a simultaneous screen and audio recording on Mac without any external noise or voiceover.
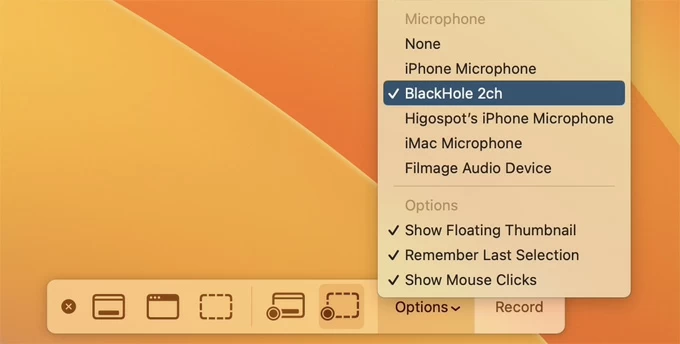
To record screen and audio on Mac at the same time on a macOS version higher than Mojave, simply press Shift-Command-5 shortcut to open Screenshot Toolbar, then click Options to choose a sound source to record computer audio from Mac screen. Finally, hit Record button to begin a Mac screen and audio recording, followed by playing the media video you like to record and save.
When you click File > New Screen Recording in QuickTime Player, macOS Screenshot toolbar should be invoked as well by which you could comfortably record your screen and audio from Mac at the same time.
"Is there any other software that allows screen, internal sound, and microphone audio to record at the same time?"
The answer is YES. Screen Recorder should be your best bet, making it possible to capture your voice and screen record on Mac with sound at the same time — QuickTime's built-in audio and screen recorder only enables you to record screen and external sound from mic or just the screen and screen audio, but not all three sources.
The software is an incredibly powerful Mac screen and audio recorder and gives users ability to create a screen video recording that includes the computer audio from Mac. The microphone option lets you decide whether your screen recording has your own voice or not, so you can narrate instructions if need be. There's also noise reduction function comes included in an attempt to mute any surrounding sounds in the audio recording.
Here's how to screen record with audio on Mac using Screen Recorder:
1. Fire up the software and choose Video Recorder tab.

Select Video Recorder to take a video from Mac screen plus its audio.
2. On the next screen, take these actions:
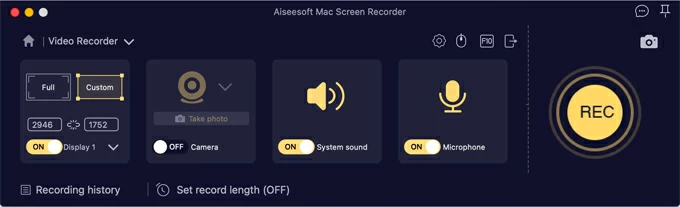
Enable "System sound" as internal audio recorder, and "Microphone" for voice recorder.
3. Hit REC button to begin. While it's recording, play your video and use your microphone to add narration or commentary to the screen capture.
4. Once done, click the red Stop square icon on the float bar.
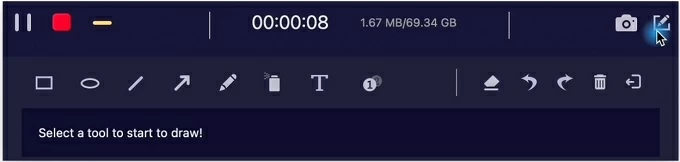
Click the pen icon in the upper-right of the float bar to display editing tools to add on-screen annotations in real time.
After recording, you will get a preview window to play back the recorded video with the screen audio or/ and your voiceover. You can trim the Mac screen recording with its own video editor, and press the Save button to keep it on your desired Mac folder locally.
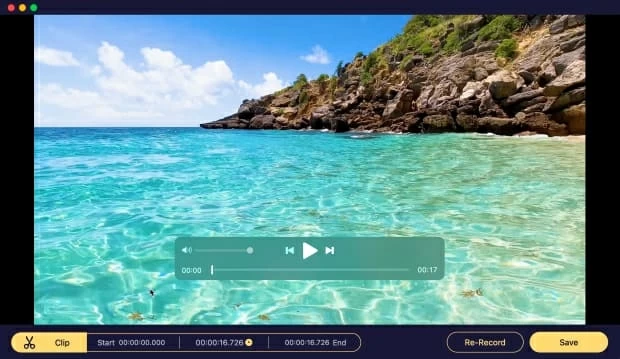
Preview the video and audio recorded from Mac screen and save the file to a local folder.
That's it. This Mac Screen Recorder software might be your wise option that allows to record screen and sound at the same time on macOS computer. Depending on your recording needs, the utility records your Mac screen and activities while capturing the sound from your macOS or microphone, or both in a single file.
Video guide on how to record screen and audio on Mac at the same time: