Best FRP Unlocker All-In-One Tool

iPhone is accumulating many photos? Just explore the best methods to import photos from the iPhone to MacBook quickly, ensuring all precious memories are moved over.

Thanks to Apple's Continuity features, the process of transferring photos from iPhone to MacBook, or vice versa, should be simple and smooth.
Whether you'd like to back up memories, free up device storage, or you'd like to save you the hassle of managing vast photo library on a small screen, it's essential to move iPhone pictures onto a MacBook Air or MacBook Pro - by means of macOS Photos app, iCloud Photos, AirDrop, Image Capture, or third-party apps.
Here's a guide on how to transfer photos from an iPhone over to a MacBook, with or without using a cable to connect two devices. All models of MacBook Air, MacBook Pro are supported.

This article offers detailed steps for both wired and wireless iPhone photo transfer methods to get images onto MacBook.
For a more stable and streamlined option, AppgeekeriPhone Data Transfer facilitates seamless transfer of entire photo album or individual photos from iPhone to MacBook in original resolution.
Table of Contents
Tip: To ensure a successful migration, make sure to clean up your MacBook's storage to make space for transferring over your iPhone photos at original quality, including live photos, app photos, screenshot, and more.
Whether you're looking to copy entire photo library or just some pictures onto MacBook from an iPhone, macOS Photos app could help with a USB cable attached. Simply connecting your iPhone to MacBook (Pro, Air) will get all of photos transferred effortlessly. Here's how to import pictures directly from the iPhone onto Photos on the MacBook Pro & Air (M4, M3, M2, M1.)
1- Use a cable to connect your iPhone to your computer.
2- When you're prompted to allow your accessory to connect to your computer, tap Allow.
3- Unlock your iPhone, and if asked, tap Trust so you're able to make the connection.
4- On your MacBook, open Photos app.
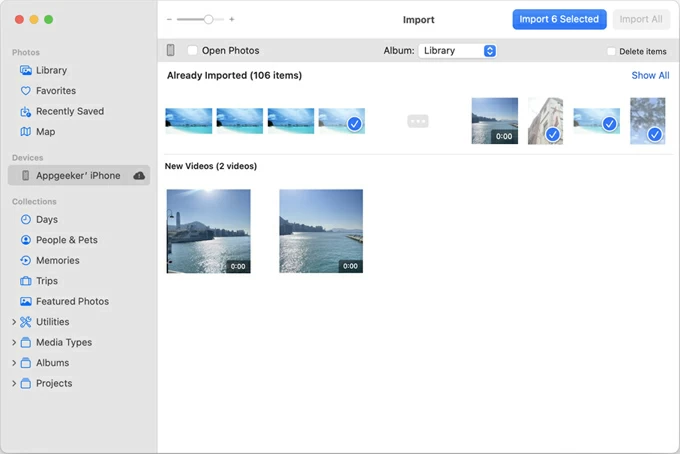
5- An Import screen opens, showing all of your photos and videos that are inside your iPhone Photos app and available for import. If you can't see the Import screen, tap [your iPhone] under Devices on the left sidebar.
6- From the toolbar at the top, choose an album where you want your photos are copied to.
7- Click to select the photos you wish to move. For a bulk transfer, hold down the Command key while clicking on each image.
8- Click Imported Selected to add multiple pictures, or click Import All New Photos to put the whole photo album from iPhone onto MacBook Photos Library.
9- Once the transfer is done, navigate to Library or any other collection of your choice on the left column of MacBook Photos app and view your iPhone photos there. Tip: A Live photo is imported as two separate files - a still-image file and a video file.
Can you move pictures from an iPhone to a MacBook without removing the pictures from the iPhone?
Plugging in your iPhone every time that you want to transfer all photos from iPhone's photo library to a MacBook can be exhausting. That's why Apple has added a method to switch to an automatic iCloud syncing between iOS and macOS through the same Apple ID, allowing you to access photos on one device from the other.
With iCloud Photos enabled on both devices, you don't have to manually export your photos - every original, full-resolution photo you take on your iPhone is synced with MacBook almost instantly.
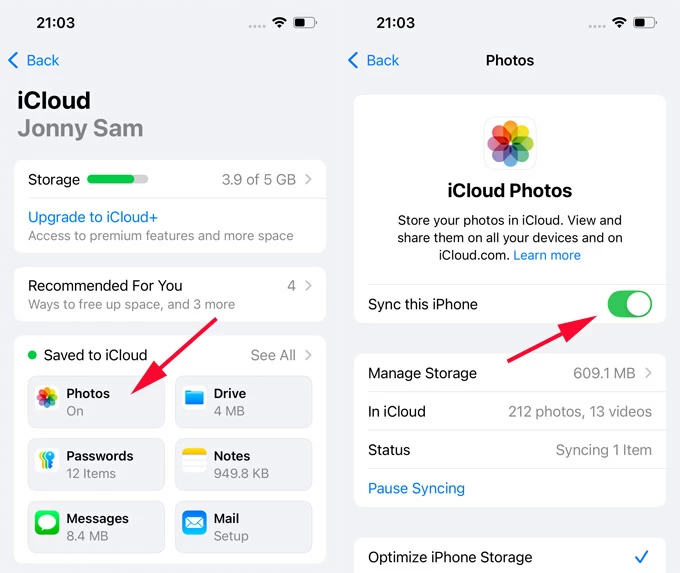
Step 1. Activiate iCloud Photos in iPhone.
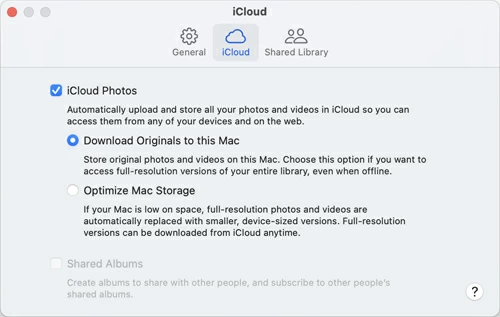
Step 2. Activate iCloud Photos on MacBook Pro and MacBook Air.
Now, you've got photos to automatically go from iPhone to MacBook.
Step 3. Download iPhone Photos to MacBook from iCloud and save them locally.
Apple routes is usually easy to use and helps transferring photos between iPhone and MacBook with high success rate. But occasionally, there can be an add hiccup. Perhaps neither Photos app nor Image Capture on MacBook show any of the photos in the iPhone. Or maybe iCloud and AirDrop do not function well because you have large gigabytes of photos to export.
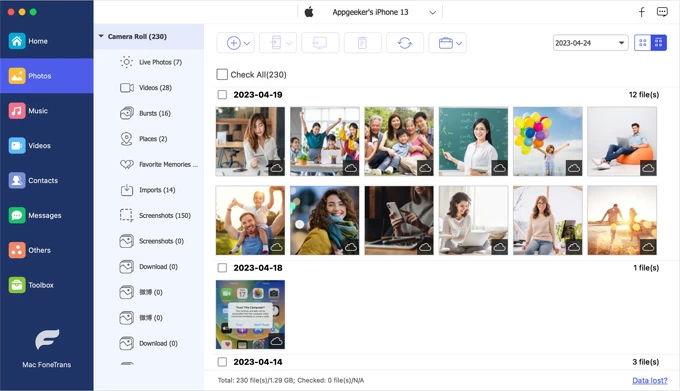
In such case, users that really want to copy pictures to MacBook's storage from iPhone seamlessly may want to check out a third-party app like Appgeeker iPhone Data Transfer. The software provides a simple and clear way to see entire picture album on an iPhone once it's connected with a USB cable, including camera roll, Live photos, app images, screenshots, videos and more. All you need is to make your selection to transfer what pictures you want.
With a few simple clicks, you're able to move a large number of photos from your iPhone to your MacBook without quality loss. There's also an option that you can use to convert HEIC image to JPG. Here's how to execute iPhone photo transfer to MacBook in minutes.
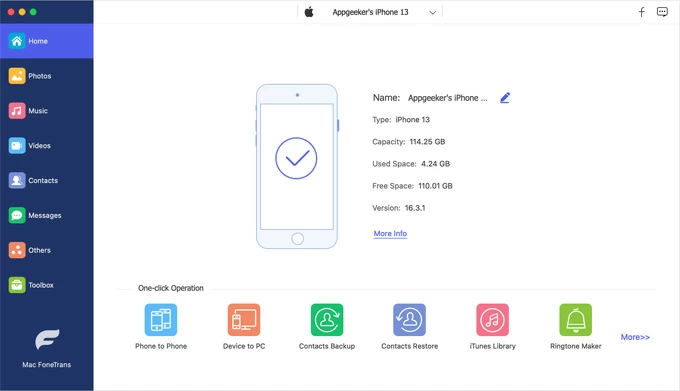
Step 1. Run iPhone Data Transfer and connect your iPhone to MacBook
Download iPhone Data Transfer for Mac on your MacBook and install it properly.
Launch the tool, then attach your iPhone to the computer via a USB cable. Make sure to unlock your device and allow it to trust the machine.
Step 2. Access iPhone photo library and select the pictures you want to export
On the sidebar, click Photos to view your albums and photos.
Locate and select the photos or an album for transfer.
Step 3. Start copying photos from iPhone directly to MacBook local drive
When everything looks fine, click Computer icon at the toolbar. In the pop-up window, specify a folder to add all iPhone pictures to the MacBook at once.
When done, disconnect your iPhone from MacBook and unplug the cable.

If you want to export some photos from your Mac to your iPhone, iPhone Data Transfer program could help as well. Click on the link and check the guide.
You can also take advantage of AirDrop and Image Capture to send or export photos from an iPhone to a MacBook for free.
If there are not too many photos, you can use AirDrop, Apple's in-built file transfer utility, given that same Wi-Fi network and Bluetooth are enabled on both devices. For those who tend to transfer a great number of photos, or an entire photo collection over from iPhone to your MacBook, this method could be time consuming as a wireless connection might be not working consistently during the import process.
Use these steps to copy a few photos onto MacBook nearby using AirDrop without a USB cable.
1. Enable AirDrop on iPhone. Open Control Panel, tap and hold the network settings card, then tap AirDrop button and choose Everyone for 10 minutes.
2. Turn on AirDrop in MacBook. In macOS Control Center, click the AirDrop icon to turn on the feature, and select Everyone.
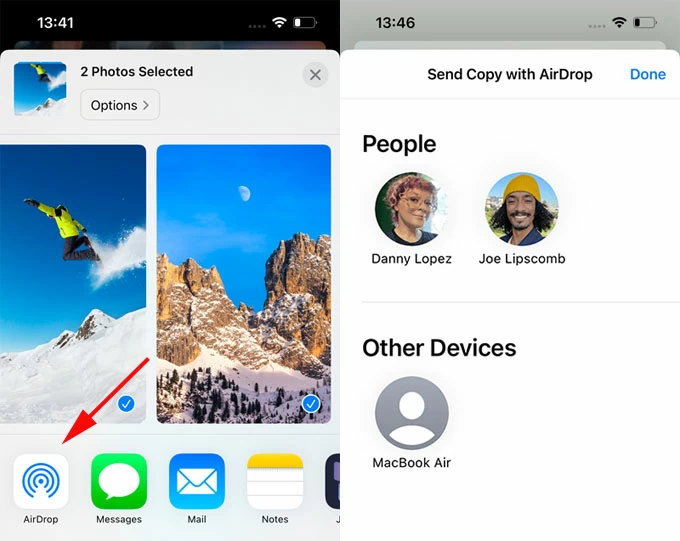
3. Go to Photos app on iPhone, and tap to select the images for transferring.
4. Tap Share icon at the lower left of the Library, and choose AirDrop.
5. Tap their profile picture of MacBook you want to share photos with when it appears.
6. When an AirDrop request shows up on MacBook screen if it's nearby, tap Accept to let your iPhone transfer photos to your computer. If two devices are using the same Apple ID, you won't get a preview and images will be accepted automatically and saved into Photos app on MacBook.
Don't Miss: How to View iPhone Text Messages on a PC or Mac
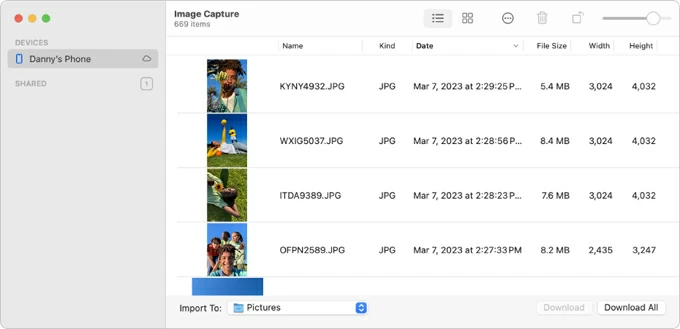
If you fond of Image Capture app for importing photos on iPhone to MacBook Air & MacBook Pro without using iCloud or Photos app, here's how. Note that Image Capture sometimes doesn't work and stuck on random fraction of photo files.
Q1- How to transfer photos from iPhone to MacBook directly?
The most straightforward way of transferring iPhone photos to a MacBook is to use Photos app and USB connection. To get photos off iPhone and onto MacBook, do this:
If Photos app on MacBook doesn't work as expected when exporting your photos, consider trying AppGeeker iPhone Data Transfer for macOS.
Q2- How do I transfer photos from iPhone to MacBook without cord?
iCloud Photos and AirDrop are both great tools for importing your iPhone photos directly into the macOS Photos app library without using a USB cable. To make a wireless photo transfer, make sure the following are in place:
Q3- What is the best way to export photos from iPhone to MacBook?
There are a few practical ways to transferring photos over from iPhone onto MacBook with or without USB connected.
Q4- How can I upload photos from iPhone to MacBook using iCloud Photos? Will it delete the photos after transferring?
iCloud Photos works to upload photos to iCloud as you take them on your iPhone, and sync them to MacBook if it's signed into the same Apple ID. Once you turn on iCloud Photos feature in both your iPhone and MacBook, your photos should be transferred between the devices.
Note that, Any changes you made on one device will also sync to the other. If you delete a photo on your iPhone, it will be also deleted from your MacBook. To avoid this, turn off sync after you're done with transferring.