How to Record a YouTube Video with Efficient Steps

Learn how to record videos on a Windows 10 laptop using the inbuilt Xbox Game Bar, and other software such as Appgeeker Screen Recorder, Microsoft PowerPoint, and OBS.


There're a couple of excellent ways for you to record videos on your Windows 10 laptop screen.
When you're looking through YouTube videos with your Windows 10 laptop, you may find some interesting or helpful ones, which you feel like saving to local storage for watching afterward. However, there is no download option available on YouTube. In this case, you'll need a useful tool to record a video on the Windows 10 laptop.
In this article, we will walk you through how to record a video on Windows 10 laptops such as HP, Lenovo, Asus, Dell, etc., using the built-in software called Xbox Game Bar and other video recording applications such as the AppGeeker Screen Recorder, Microsoft PowerPoint and Open Broadcaster Software (OBS). Let's get right to it!
Related: How to record videos from YouTube on a Windows PC
Table of Contents
Available on Win10 and Win11, Xbox Game Bar is an inbuilt video recording tool especially designed for users to record gameplay. Furthermore, it can be used to capture videos from a browser, or any other software on your laptop.
Let's figure out how to record a video on Windows 10 laptop via Game Bar.
Step 1. Enable Xbox Game Bar
Before recording video with this tool, you should first go to Start menu > Settings > Gaming > Xbox Game Bar to activate it by toggling the switch on. If your laptop is connecting to an Xbox 360 or Xbox One Controller, also tick the checkbox for Open Xbox Game Bar using this button as a controller.
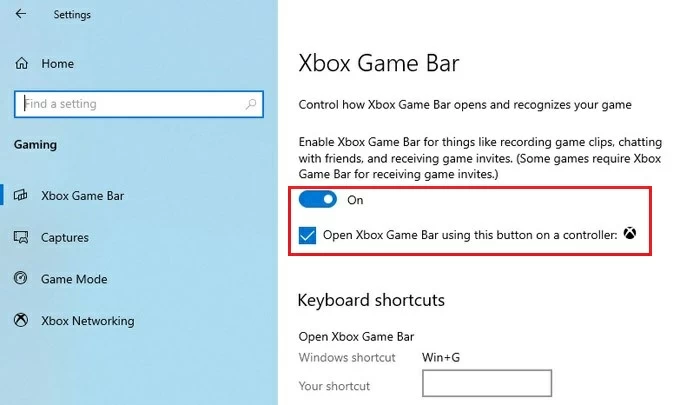
Tip: Turn on Game Mode in Gaming. The video recording performance can be improved with this feature enabled.
Step 2. Launch the video recorder
Open the video that needs recording. Then press Windows Key + G to run Xbox Game Bar on your Windows 10 laptop desktop. Selectively, you can search it in the lower-left search box.
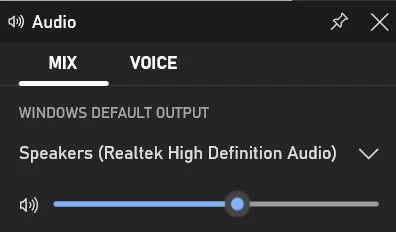
Step 3. Check the audio settings
In order to capture the video with proper volume of audio on your Win10 laptop, you may need to adjust the audio settings before recording.
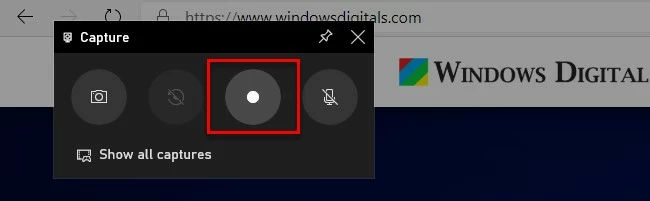
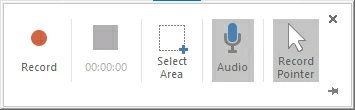
Step 4. Start the video recording
Hit the Record button if you got everything ready. You may also start recording by use of the shortcuts Windows key + Alt + R.
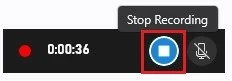
Step 5. Complete recording the video
Hit the Stop button to finish the video recording, or use the same shortcuts (Windows key + Alt + R) again to put it to an end.
You will then get a notification "Game clip recorded" that pops up from the right on the screen. Click it and the Game Bar Gallery will show up, where you can preview your recorded video.
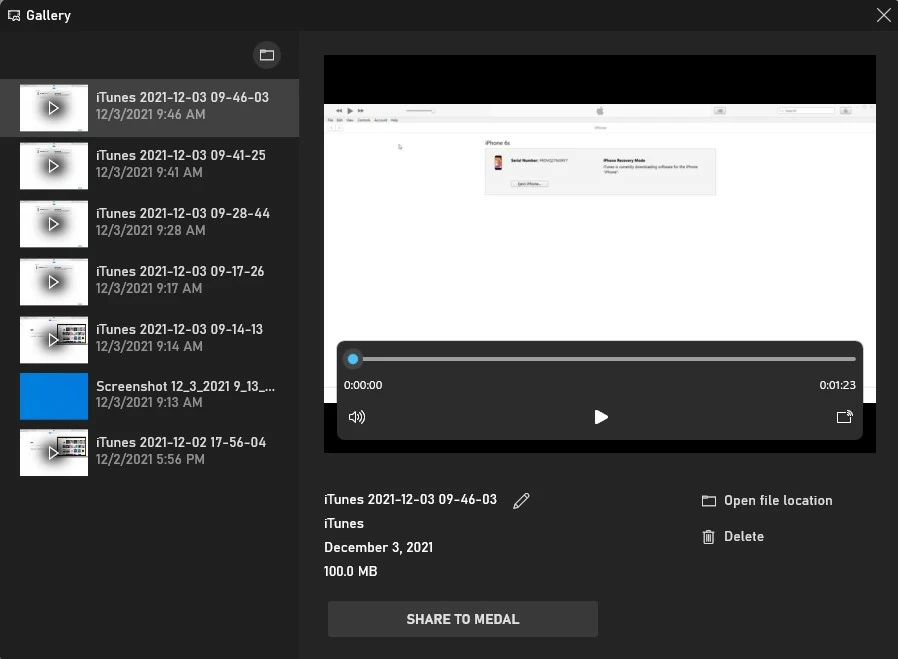
It's optional to rename, share, or delete the video file, too.
There're a few of drawbacks using Xbox Game Bar to record video:
Given the shortcomings above, it's no match for other dedicated apps like AppGeeker Screen Recorder, whose purpose is to help record anything on Windows 10 laptop screen and edit directly in the tool. Keep on reading if you need a more advanced video recorder.
One of the most reliable video recording software, AppGeeker Screen Recorder, makes it possible to capture and edit videos easily without the trouble of downloading another tool. Different from Xbox Game Bar, this video recorder allows you to record various windows simultaneously, which can be of great help when you need to record a video on YouTube as well as other applications at the same time.
Moreover, audio from your Win10 laptop and your microphone can be captured while recording the video. You can even record webcam as well in the recording process. Also, the intuitive interface will be a plus for this software.
Here's how to record a video using Screen Recorder:
1. Download and install the video recorder on your Windows 10 laptop. Fire it up, and click Video Recorder on the left of the menu.

2. Enable System Sound before recording video. You can also adjust the settings according to your needs, like customizing recording area, turning on Webcam recording or microphone audio. Clicking the gear icon will navigate you to specific output settings.

3. Hit REC to begin recording a video on your Windows 10 laptop. You can pause it in the recording process.
4. Once you're done recording, click the Stop button. You can then polish the video using various video editing feature in the software, including trimming, merging, adding effect, converting, etc.
It might be unexpected that Microsoft PowerPoint can also help capture a video on Win10 laptops besides making presentations. In addition to video recording, you can even make simple clipping in the software. Using it to record videos is just a piece of cake. Let's see the steps now.

Read more: How to record sound on Windows 10
OBS, short for Open Broadcaster Software, is a well-known program intended for video recording and live streaming. It's so professional that it enables you to set up various scenes and sources while recording a video on Windows 10 laptop.
However, unlike AppGeeker Screen Recorder, OBS may confuse beginners because of its complex interface. Don't worry, you can have a try by following the steps below to record videos using OBS on your Win10 laptop.
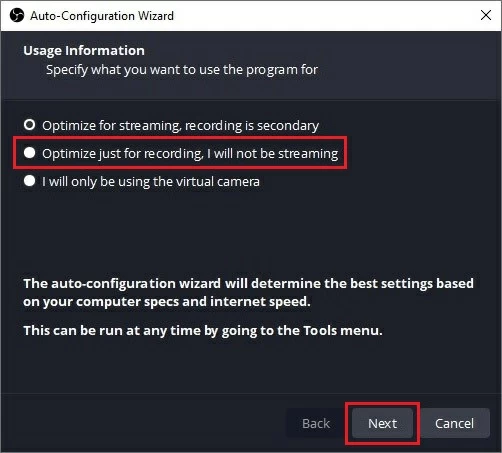
Step 1. Download and install OBS at first. Launch it, and click on "Optimize just for recording, I will not be streaming" and then "Next" in the pop-up box called "Auto-Configuration Wizard." Selecting the option enables the software to optimize the video recording settings in relation to your Windows 10 laptop condition.
Tip: If you want a change afterward, you can navigate to Tools > Auto-Configuration Wizard to alter it.
Step 2. Click on the + icon in the Scenes box at the bottom-left corner to create a scene for recording a video on your Win10 laptop.
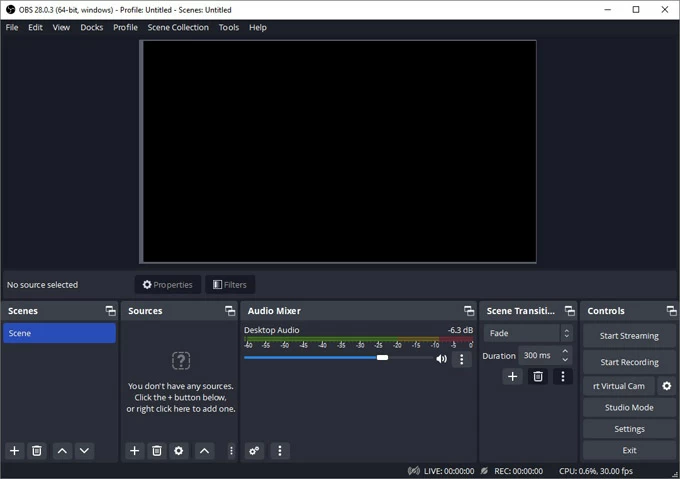
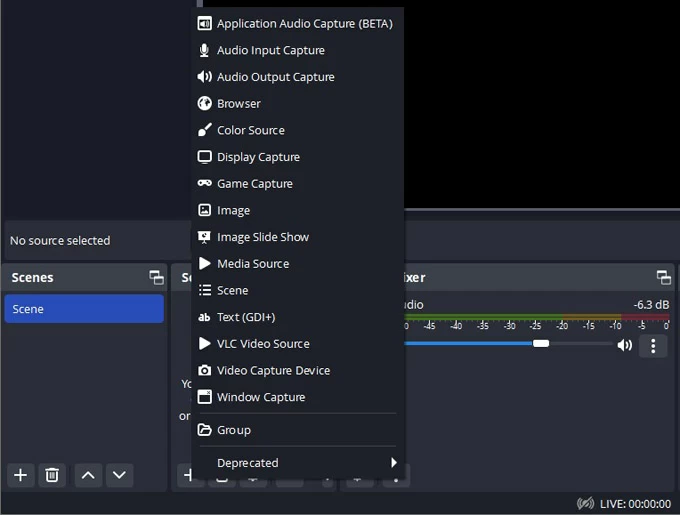
Step 3. In the Sources section, hit the + icon and select Display Capture from the list. Later you can see the real-time activity of your screen in the preview window.
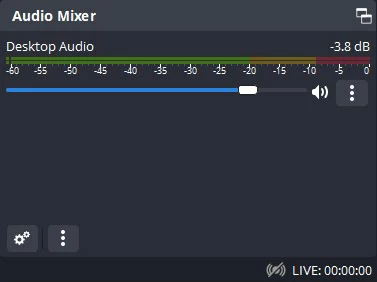
Step 4. Adjust the audio volume by dragging the slider in Audio Mixer. You might click on the speaker icon if you want to mute the sound.
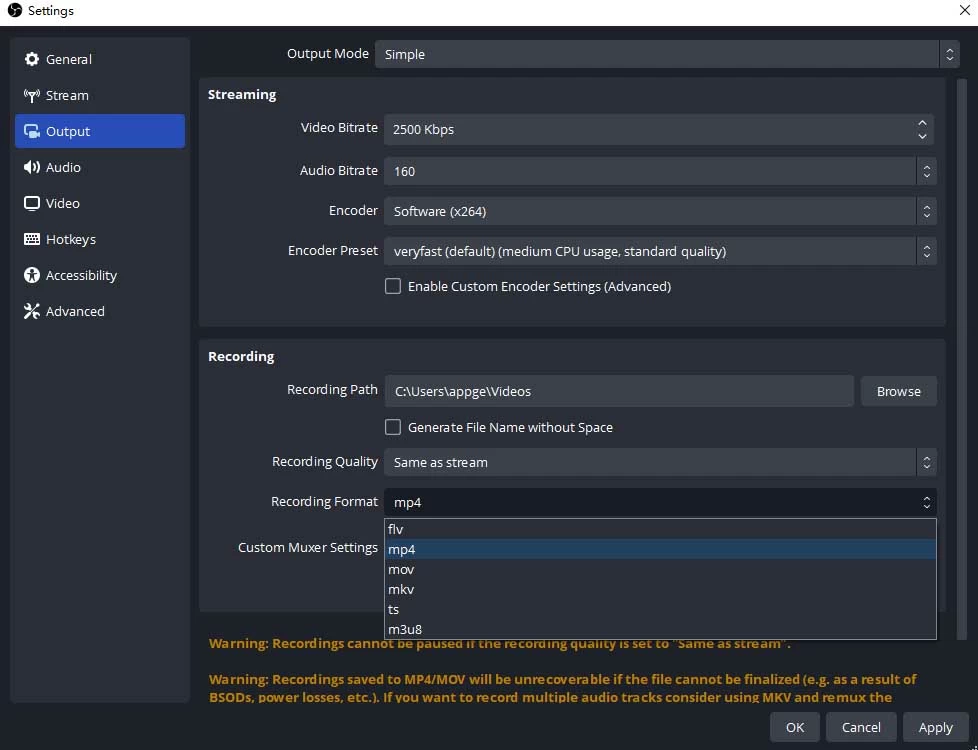
You are also able to adjust the output settings from File > Settings.
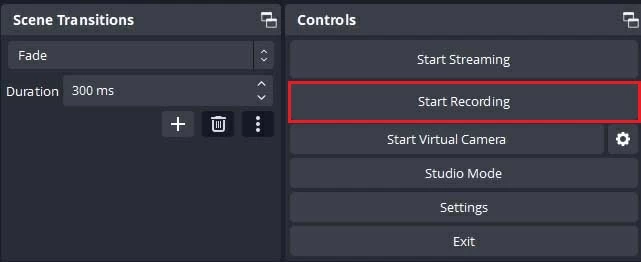
Step 5. Hit Start Recording in the Controls section. Then play the video to get it record.
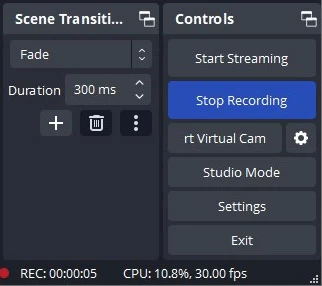
Step 6. Hit Stop Recording when you finish recording the video. Go to File > Show Recording, you will then be guided to a file where your recorded videos are saved.
Tip: If you need to convert the recorded video into a different format, you could do that in File > Remux Recordings.